n8n is an open‑source workflow automation platform that lets you integrate APIs, databases, and services without writing code. While n8n Cloud is available, many teams prefer to self‑host to retain full control of their data. In previous posts, we have shown how to deploy n8n on Google Cloud with Compute Engine and Kubernetes. This tutorial shows how to run n8n on an Amazon EC2 instance using Docker and Caddy, a reverse proxy that automatically issues and renews TLS certificates via Let’s Encrypt. You will spin up a free‑tier Ubuntu server, configure Docker, prepare environment variable,s and secure your instance behind HTTPS. By the end you will have an always‑on automation server accessible via your own domain.
Prerequisites
- AWS account – you must be able to create EC2 instances.
- A domain name – you need the ability to create an A‑record for a subdomain (e.g.
automate.example.com). - SSH key – AWS will create a key pair when launching your instance; download it and keep it safe because you cannot download it again after creation.
- Basic Linux knowledge – familiarity with the command line, file editing and remote connections.
Throughout this tutorial, we assume you are using the Asia/Kolkata timezone (UTC+5:30) and Ubuntu 22.04 LTS on a t2.micro instance. Replace values such as example.com, YOUR_EMAIL and passwords with your own.
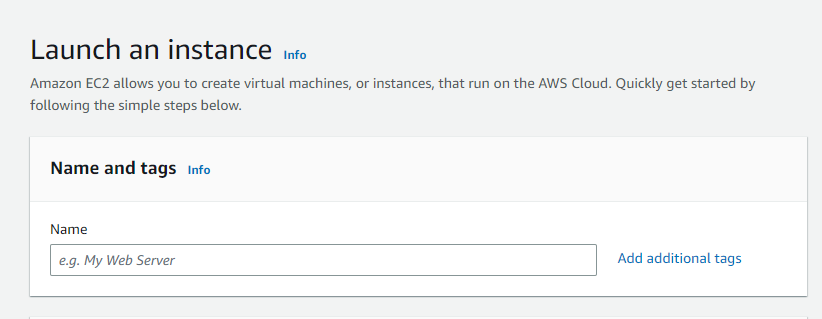
Step 1: Launch an EC2 instance
Log in to the AWS Console and navigate to EC2 → Instances → Launch instance. Follow these guidelines:
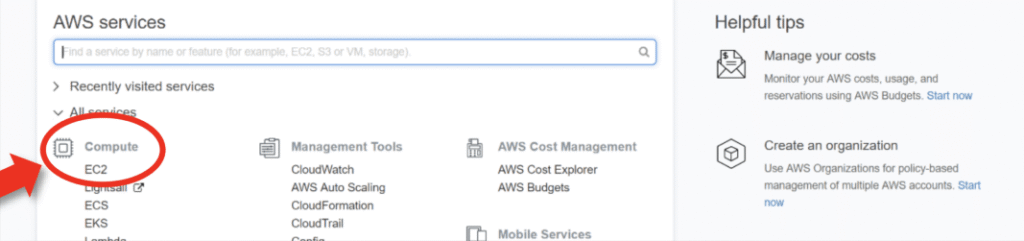
- Choose AMI and instance type – select the latest Ubuntu Server LTS image. For small workloads and the free tier select t2.micro, which provides 1 vCPU and 1 GB RAM
- Key pair – create a new key pair in PEM or PPK format and download it. AWS warns that the private key can be downloaded only once. Save it in a secure folder on your machine.
- Network and security – in the firewall section create a new security group that allows inbound traffic on ports 22 (SSH) for remote access, 80 (HTTP) and 443 (HTTPS) for web traffic. Restrict SSH to your IP for better security. AWS will automatically open port 22 if you keep the default rules.
- Elastic IP (optional but recommended) – allocate an Elastic IP and associate it with your instance. An Elastic IP ensures the server’s public address does not change when you stop or start the instance which simplifies DNS configuration.
- Launch – review the settings and click Launch instance. After the instance is running, note the public IP or Elastic IP.
Step 2: Connect to the instance via SSH
On your local machine, ensure the downloaded private key is not world‑readable by running:
chmod 400 ~/Downloads/ec2‑n8n.pemConnect to the server using the command AWS provides in the console (substitute your Elastic IP and key file):
ssh -i ~/Downloads/ec2-n8n.pem ubuntu@YOUR_ELASTIC_IPIf the connection succeeds, you will land in a shell on your Ubuntu server.
Step 3: Update the server and install Docker
Update packages and install Docker Engine and Docker Compose (compose v2 is included in the Docker CLI):
sudo apt update && sudo apt upgrade -y
sudo apt install -y docker.io docker-compose-plugin
Verify that Docker and Compose are installed correctly. The n8n documentation recommends checking the versions using docker --version and docker compose version. For example:
docker --version      # should print Docker Engine version
docker compose version  # should print the compose plugin version
Docker commands require root privileges. To avoid using sudo for every command, add your user to the docker group and log out and back in:
sudo usermod -aG docker ${USER}After re‑logging, verify that docker run hello-world works without sudo (docs.n8n.io).
Step 4: Prepare the n8n workspace
Create a directory to store n8n data and configuration. Using your home directory keeps things easy to back up:
mkdir -p ~/n8n && cd ~/n8nCreate an .env file to hold environment variables. These variables configure the n8n container and the reverse proxy. Below is an example; adjust values as needed:
cat > .env <<'EOF'
N8N_PORT=5678
# Activate basic authentication on the n8n UI
N8N_BASIC_AUTH_ACTIVE=true
N8N_BASIC_AUTH_USER=admin
N8N_BASIC_AUTH_PASSWORD=a-strong-password
# Set timezone matching your region
GENERIC_TIMEZONE=Asia/Kolkata
# Domain and subdomain used for HTTPS
DOMAIN_NAME=example.com
SUBDOMAIN=automate
# Email used by Caddy/Let's Encrypt for certificate issuance
[email protected]

# Optional: encryption key for credentials inside n8n
N8N_ENCRYPTION_KEY=$(openssl rand -hex 16)
EOFThe variables GENERIC_TIMEZONE, DOMAIN_NAME, SUBDOMAIN and SSL_EMAIL correspond to options described in the official n8n Docker Compose guide. Setting N8N_ENCRYPTION_KEY provides an extra layer of security by encrypting credentials saved within the tool.
You can also set variables like N8N_HOST, N8N_PROTOCOL, N8N_SSL_KEY or N8N_SSL_CERT if you prefer to manage TLS yourself instead of using Caddy. In this tutorial Caddy will manage certificates for you.
Step 5: Write the Docker Compose configuration
Create a docker-compose.yml in the same directory. This file defines two services: n8n (the automation server) and caddy (reverse proxy). Caddy automatically obtains and renews TLS certificates from Let’s Encrypt and forwards traffic from your domain to the n8n service – an approach recommended by community tutorials. The caddy service mounts a Caddyfile that defines the routing rules.
version: '3.8'

services:
  n8n:
    image: n8nio/n8n:latest
    restart: always
    env_file:
      - .env
    ports:
      - "127.0.0.1:5678:5678"  # listen only on localhost; Caddy will proxy
    volumes:
      - ./data:/home/node/.n8n

  caddy:
    image: caddy:2-alpine
    restart: always
    ports:
      - "80:80"
      - "443:443"
    environment:
      - ACME_AGREE=true
      - DOMAIN_NAME=${SUBDOMAIN}.${DOMAIN_NAME}
      - EMAIL=${SSL_EMAIL}
    volumes:
      - ./caddy_data:/data
      - ./caddy_config:/config
      - ./Caddyfile:/etc/caddy/Caddyfile

networks:
  default:
    name: n8n-net
Next create the Caddyfile referenced above. It instructs Caddy to obtain a certificate for automate.example.com and proxy traffic to the n8n service. Caddy automatically provisions and renews certificates via Let’s Encrypt and hides the internal port (5678) from the public:
cat > Caddyfile <<'EOF'
${SUBDOMAIN}.${DOMAIN_NAME} {
    reverse_proxy n8n:5678
    encode gzip
    # optional: enforce security headers
    header {
        Strict-Transport-Security "max-age=31536000; includeSubDomains; preload"
        X-Frame-Options DENY
        X-Content-Type-Options nosniff
        Referrer-Policy no-referrer
    }
}
EOF
The ${SUBDOMAIN}.${DOMAIN_NAME} placeholder will be replaced at run time by Caddy using the environment variables we defined. Caddy listens on ports 80 and 443 and forwards all requests to the n8n container on port 5678.
Step 6: Start n8n and Caddy
With both configuration files in place, you can start the stack:
sudo docker compose up -dDocker will download the images, create a shared network and start the services. Use docker compose ps to verify both containers are Up. Wait a couple of minutes for Caddy to negotiate an SSL certificate. You can follow the logs to see the process:
docker compose logs -f caddyWhen you see a message about a successful certificate issuance, open your browser and visit https://automate.example.com (replace with your domain). You should see the n8n login screen protected by HTTP Basic Authentication. Log in with the credentials defined in your .env file. Remember to update your domain’s DNS: create an A record for your subdomain pointing to the Elastic IP of the instance. DNS changes might take a few minutes to propagate.
Step 7: Secure and maintain your installation
- Encryption key – always define
N8N_ENCRYPTION_KEYto protect credentials stored in n8n. Without an encryption key, credentials may be stored unencrypted. - Updates – regularly update Ubuntu (
sudo apt update && sudo apt upgrade) and the n8n image (docker pull n8nio/n8n:latest). After updating the image, restart the stack withdocker compose down && docker compose up -dto apply updates. - Backups – your workflows and credentials are stored in the
datavolume (~/n8n/data). Backup this folder regularly. - Elastic IP retention – remember that AWS charges a nominal fee if an Elastic IP is allocated but not attached to a running instance. Release unused Elastic IPs when cleaning up resources.
- Server hardening – restrict SSH access to your IP and regularly rotate keys. Consider using AWS Security Groups and IAM to enforce least privilege.
Troubleshooting Common Issues
Here are some things I observed (or the community reported) which can trip up first-timers. I also include steps to debug & fix them.
| Issue | Cause | Fix / How to Diagnose |
|---|---|---|
Cannot reach UI via public IP + port (e.g. http://<IP>:5678) | Security group doesn’t allow inbound on that port; Docker container not binding properly; EC2 network ACL or firewall blocking. | Check EC2’s Security Group in AWS console: ensure inbound rules for port 5678 (or whatever port you used). Run docker ps to see container port mapping (0.0.0.0:5678). Use curl from another machine to test. If still not visible, try opening ports 80/443 and use reverse proxy. |
| Let’s Encrypt certificate creation fails | Could be DNS not pointing correctly; domain not resolvable; ports 80 or 443 blocked; using HTTP but proxy misconfigured; wrong domain name. | Check DNS: does your.domain.com resolve to EC2’s public IP? Use dig or nslookup. Confirm SG allows 80/443. Make sure reverse proxy has access and permission. Check logs for errors from Caddy/Nginx/Traefik. Sometimes firewall (on the EC2 OS) also blocks ports. |
| “Invalid PEM format” or SSL key errors | Key file created on Windows breaks due to line endings; permissions wrong; wrong path in volume; missing file mount. | Generate key/cert on Linux/Mac or convert using dos2unix. Ensure Docker volume mount makes the certificate/key files available inside container or proxy. Check file ownership/permissions (readable by container). Use absolute paths. |
| Secure cookie / cookie warnings persist after setup | Env vars not set properly or overridden; browser caching; protocol mismatch (HTTP vs HTTPS); cookie domain mismatch. | Clear browser cache or open in incognito. Verify .env or compose file: N8N_PROTOCOL=https, N8N_HOST=your.domain.com. Ensure you are accessing via domain + HTTPS, not IP. Check domain in cookie settings. If you’ve set N8N_COOKIE_SECURE=true, confirm HTTPS works first. |
| Workflows/data lost after instance reboot or container restart | Using SQLite default DB without persistent volume; never backing up / saving .n8n directory; environment variable misconfiguration. | Mount a Docker volume for the data directory (often /home/node/.n8n or other) so data persists. Alternatively, use PostgreSQL or another database. Backup your .env and workflows. Test by restarting container or EC2 to ensure persistence. |
| SSH connection fails / permission denied | Wrong key-pair; using wrong username (Ubuntu vs Amazon Linux vs other distro); incorrect chmod on key file; key not associated with instance. | Ensure you used the same key pair when launching EC2. Match distro to username (ubuntu@, ec2-user@, etc.). On local machine, chmod 600 key.pem. Confirm public key is shown in EC2 console. |
The two big hurdles first-timers face on AWS EC2 are SSL setup and security group rules. Once those are sorted, n8n runs smoothly.
Conclusion
You have successfully deployed n8n on a small EC2 instance with Docker and Caddy. This setup is cost‑effective (free tier qualifies for a t2.micro) yet powerful enough for personal automation or small teams. The combination of Docker and Caddy provides an easy way to manage the service and keep your connection secure via Let’s Encrypt certificates. With a few configuration files you can reproduce this setup in any region. Enjoy building workflows, integrate your favourite services and remember to keep your instance up to date!
Frequently Asked Questions
Why does my browser show a “not secure” or “dangerous” warning when I open n8n?
Because by default, your site is only served over HTTP (no SSL). Browsers warn you when there’s no TLS certificate, which is expected. To remove the warning, you need:
1. a valid domain or subdomain pointing to your EC2 instance,
2. open ports 80 & 443,
3. configure a reverse proxy (e.g., Nginx, Caddy, or Traefik) to serve HTTPS using Let’s Encrypt or another CA.
Also, set environment variables like N8N_PROTOCOL=https, N8N_HOST=your.domain.com, WEBHOOK_URL=https://your.domain.com/… so n8n knows it’s behind HTTPS.
What is the “secure cookie” warning I see after setting up under HTTP, even though I disabled secure cookie?
You may see:
“Your n8n server is configured to use a secure cookie; however, you are either visiting this via an insecure URL…”
This happens if N8N_COOKIE_SECURE=true (default for many setups) but you access via HTTP. Even if you set N8N_COOKIE_SECURE=false, other envs or headers sometimes override it. Best fix: use HTTPS + correct N8N_PROTOCOL & domain. Some community users had this (Ubuntu on EC2 + Docker) and only solved it by enabling HTTPS fully
Can I use an IP address instead of a domain for n8n?
You can, but with limitations:
1. SSL certificates via Let’s Encrypt require a domain (not just IP).
2. Some webhooks / integrations expect valid domain names (especially OAuth providers).
3. Using HTTPS with IP is harder, and browser warnings will persist.
So, for production or even stable usage, get a domain/subdomain and map it.
How do I handle webhooks & external services pointing to my self-hosted n8n?
Make sure that:
1. WEBHOOK_URL environment variable is set to your public HTTPS URL (domain + protocol).
2. Ports 80/443 are open in security group so external services can reach you.
3. Reverse proxy forwards to correct internal port (often 5678).
4. If you use .env, don’t forget to restart Docker Compose / container after changes.
Do I need to configure authentication for self-hosted n8n?
Yes. By default, n8n may allow anyone to access the editor UI. Set environment variables like N8N_SECURE_COOKIE=true, N8N_ENCRYPTION_KEY, and configure user management. This prevents unauthorized access.