Setting up process automation doesn’t have to cost money. n8n, an open-source tool, can run entirely on Google Cloud’s Always Free tier, giving you a production-ready automation platform without monthly hosting fees.
While n8n provides excellent official documentation for self-hosting, this guide documents the specific production-grade approach I used when deploying n8n for my website. Rather than covering general installation steps, this focuses on Google Cloud’s free tier constraints, comprehensive security from day one, and enterprise-level monitoring and backup systems integrated into a complete workflow.
You’ll deploy n8n on the Google Cloud as a subdomain of your existing website or as a new website. The result is a fully configured automation server with SSL encryption, Nginx reverse proxy, systemd service management, automated backups, health monitoring, and security hardening – all within free tier limits.
The process takes 30-45 minutes and requires a Google Cloud account with billing enabled, domain DNS access, and basic command line knowledge. Unlike basic tutorials, this prioritises production readiness from installation through ongoing maintenance.
By the end, you’ll have a robust n8n instance capable of handling complex workflows with the foundation to scale beyond free tier limitations when needed.
Deployment Architecture
You’ll use a Docker-based architecture deployed on Google Compute Engine with integrated SSL termination and reverse proxy capabilities. This approach provides simplicity and reliability while remaining within the Always Free tier. You can also deploy using managed services like Cloud Run for serverless scaling or Google Kubernetes Engine for container orchestration, but the VM-based Docker deployment offers the most cost-effective solution.
These instructions have been tested to work with Debian 12 on e2-micro instances. The architecture leverages Docker Compose for container orchestration, Nginx for SSL termination and reverse proxy functionality, and Let’s Encrypt for automated certificate management. You can enhance this setup further by migrating the SQLite database to managed Cloud SQL PostgreSQL, implementing Cloud Load Balancing for high availability, or using Secret Manager for credential storage.
After deployment is complete, your fully configured n8n instance will look like this:
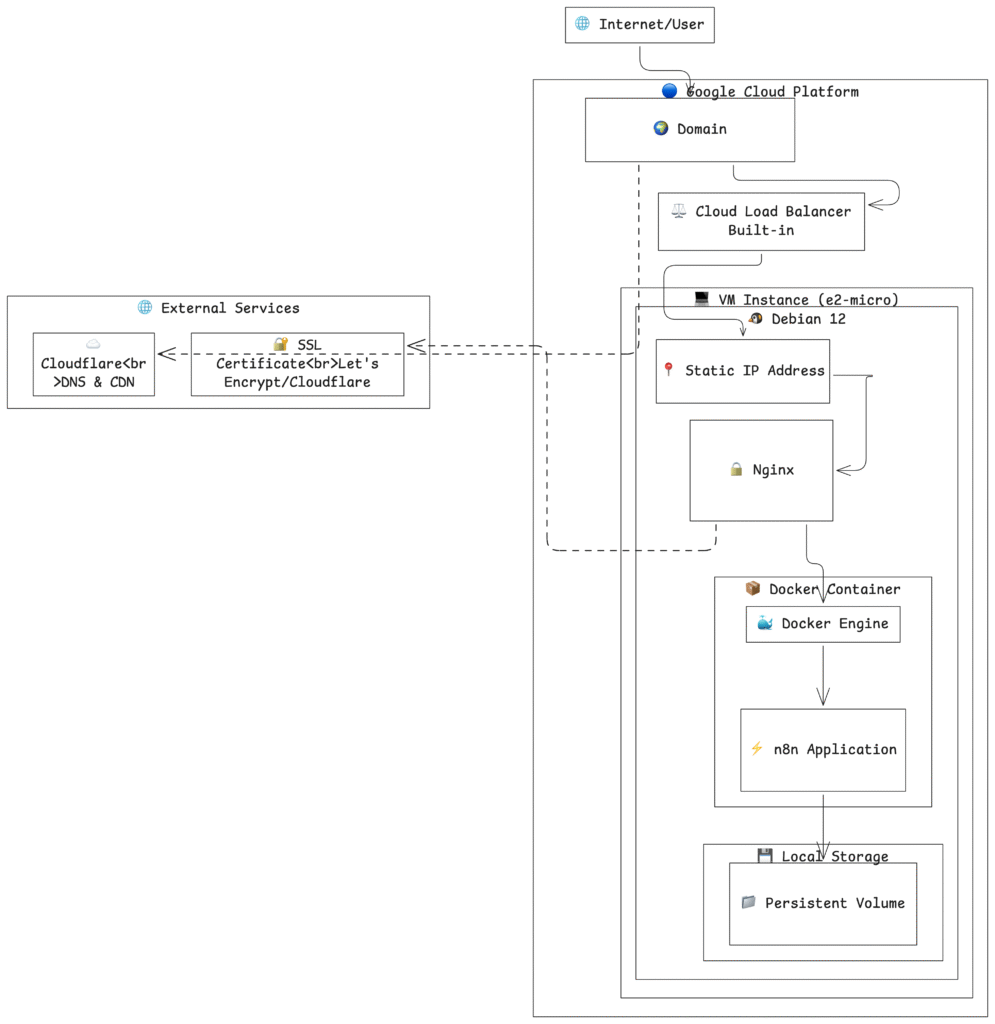
Key Components:
- Compute Engine VM: e2-micro instance running Debian 12
- Docker Container: Official n8nio/n8n image with automatic restarts
- Nginx: Handles SSL termination, security headers, and request proxying
- Let’s Encrypt: Automated SSL certificate management with auto-renewal
- SQLite: Built-in database requiring no additional setup or maintenance
- Local Storage: Persistent data storage using Docker volumes
This architecture balances simplicity with production readiness, providing a robust foundation that can handle moderate automation workloads while remaining cost-effective and easy to maintain.
Deployment Options on Google Cloud
Choose the deployment method that best fits your needs and technical requirements:
- Compute Engine (VM)
- Google Kubernetes Engine (GKE)
- Cloud Run
- App Engine
Best for: Traditional deployments, full control, predictable workloads
Deploy n8n on virtual machines with complete OS control. Ideal for organizations wanting traditional server management or specific security requirements. Offers predictable pricing and resource allocation.
- Full control over the operating system and environment
- Easy integration with existing VM-based infrastructure
- Straightforward backup and disaster recovery
- Compatible with all n8n features and configurations
Best for: Scalable deployments, microservices architecture, DevOps teams
Container orchestration for high-availability n8n deployments. Perfect for organizations already using Kubernetes or needing automatic scaling and self-healing capabilities.
- Automatic scaling based on demand
- Built-in load balancing and health checks
- Seamless integration with Google Cloud services
- Production-grade security and networking
Best for: Serverless deployments, variable workloads, cost optimization
Fully managed serverless platform that automatically scales n8n containers. Excellent for sporadic automation workloads where you only pay for actual usage.
- Pay-per-request pricing model
- Automatic scaling to zero when idle
- No infrastructure management required
- Quick deployment from container images
Best for: Simple web applications, minimal configuration
Platform-as-a-service option requiring minimal setup. Less suitable for n8n due to limitations with persistent storage and background processes, but viable for basic automation needs.
- Minimal configuration required
- Automatic scaling and load balancing
- Limited customization options
- May not support all n8n features
Deploying n8n on Google Cloud using Docker
This deployment creates a secure, web-accessible n8n instance using four integrated components. Docker Compose orchestrates the n8n container with proper networking and volume management, Nginx acts as a reverse proxy handling web traffic and SSL termination, Certbot manages free SSL certificates from Let’s Encrypt, and your custom domain provides professional access to the automation platform.
The beauty of using Docker Compose here is that it treats your entire n8n setup as a single application stack, making it much easier to start, stop, update, and troubleshoot compared to managing individual Docker containers.
Prerequisites
Before starting this deployment, ensure you have:
- Google Cloud account with billing enabled (required for free tier access)
- Domain name with DNS management capabilities
- Basic terminal command familiarity
- Approximately 30 minutes for complete setup
Step 1: Google Cloud Infrastructure Setup
1.1 Create Google Cloud Project
Think of a Google Cloud project as a container that holds all your resources for this specific deployment. This organizational structure helps with billing, permissions, and resource management. Navigate to Google Cloud Console and create your deployment container:
1. Click the project dropdown in the top navigation
2. Select “New Project”
3. Project name: n8n-automation (or your preference)
4. Organization: Use default unless specific requirements exist
5. Click “Create” and wait for initialization
The project acts as a billing boundary, meaning all costs for this n8n deployment will be tracked separately from your other Google Cloud activities.
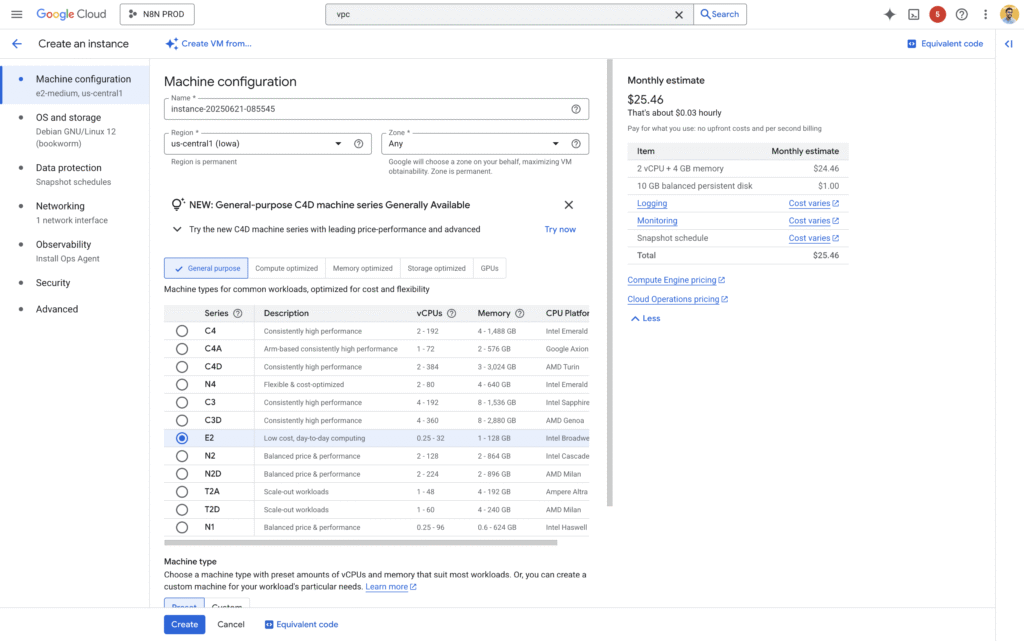
1.2 Configure Virtual Machine
The e2-micro instance provides the perfect balance of performance and cost for n8n workloads. It offers 1 vCPU and 1GB of memory, which is sufficient for most automation workflows while staying within Google Cloud’s generous free tier limits. Go to Compute Engine > VM instances and create your server:
Name: n8n-server
Region: us-central1, us-west1, or us-east1 (free tier eligible)
Zone: Any zone within selected region
Machine Configuration:
  - Series: E2
  - Machine type: e2-medium (2 vCPU + 4 GB memory)
Boot disk:
  - Operating System: Ubuntu or Debian
  - Version: Ubuntu 22.04 LTS or Debian 12
  - Boot disk type: Standard persistent disk
  - Size: 30 GB (maximum for free tier)
Firewall:
  - Allow HTTP traffic: ✓
  - Allow HTTPS traffic: ✓
The firewall settings are crucial because they create the network openings that allow web browsers to reach your n8n instance. Without these, your server would be completely isolated from the internet.
1.3 Reserve Static IP Address
Static IP addresses solve a critical problem: virtual machines can get different IP addresses when they restart, which would break your domain configuration and make your n8n instance unreachable. A static IP ensures your domain always points to the same location. In VPC network > IP addresses:
1. Click “Reserve External Static Address”
2. Name: n8n-static-ip
3. Type: Regional
4. Region: Match your VM region
5. Attach to: n8n-server
6. Click “Reserve”
Document this IP address immediately as you’ll need it for DNS configuration in the next step.
Step 2: Domain DNS Configuration
DNS (Domain Name System) is like the phone book of the internet, translating human-readable domain names into IP addresses that computers can understand. We configure this early because DNS changes can take time to propagate across the global internet.
2.1 Add DNS Record
In your domain provider’s DNS management interface, create an A record that points your chosen subdomain to your Google Cloud server:
Record Type: A
Name/Host: n8n (for subdomain) or @ (for root domain)
Value: [Your Static IP from Step 1.3]
TTL: 300 (or provider default)
For a subdomain like n8n.example.com, use n8n as the name. The TTL (Time To Live) value determines how long other servers cache this DNS information before checking for updates.
2.2 Verify DNS Propagation
DNS changes don’t happen instantly. They propagate through a network of DNS servers worldwide, which can take anywhere from 5 minutes to 48 hours. You can check propagation status using online tools or command line utilities to ensure your domain correctly points to your server before proceeding.
Step 3: Server Preparation
3.1 Connect to Server
Google Cloud provides browser-based SSH access, eliminating the need for additional software or key management. This secure terminal connection allows you to execute commands directly on your server. In the Compute Engine console, find your n8n-server and click the “SSH” button to open a secure terminal session.
3.2 Update System Packages
Before installing any new software, we need to ensure your server has the latest security patches and package versions. This foundational step prevents compatibility issues and security vulnerabilities:
# Update package lists to get information about newer versions
sudo apt update

# Upgrade all installed packages to their latest versions
sudo apt upgrade -yThink of this as getting your server up to current standards before we start building our n8n environment on top of it.
Step 4: Docker and Docker Compose Installation
4.1 Install Docker
Docker containerization simplifies n8n deployment by packaging the application with all its dependencies into a portable container. This approach ensures consistency across different environments and simplifies updates:
# Install Docker from Ubuntu/Debian repositories
sudo apt install docker.io -yUsing the distribution-provided Docker package ensures good integration with your system’s service management and automatic security updates through the standard package manager.
4.2 Install Docker Compose
Docker Compose extends Docker’s capabilities by allowing you to define and manage multi-container applications using a simple YAML file. This makes complex deployments much more manageable:
# Install Docker Compose
sudo apt install docker-compose -yDocker Compose will let us define our entire n8n setup in a single configuration file, making it much easier to understand, maintain, and reproduce the deployment.
4.3 Configure Docker Service
Docker needs to run continuously and start automatically when the server boots to ensure your n8n instance remains available:
# Start Docker service immediately
sudo systemctl start docker

# Enable Docker to start automatically at boot
sudo systemctl enable docker

# Verify Docker is running correctly
sudo systemctl status dockerThe service configuration ensures high availability – your n8n instance will automatically restart even after server maintenance or unexpected restarts.
Step 5: Create Docker Compose Configuration(optional)
This step is completely optional if you prefer to stick with individual Docker commands. You can continue using the single docker run command from your original approach
5.1 Create Project Directory
Organization is key to maintaining your deployment. Create a dedicated directory for your n8n project files:
# Create and navigate to n8n project directory
mkdir ~/n8n-docker && cd ~/n8n-dockerThis directory will contain your Docker Compose configuration and any other related files, keeping everything organized and version-controllable.
5.2 Create Docker Compose File
Docker Compose uses YAML files to define application stacks. Create the main configuration file that describes your n8n deployment:
# Create the Docker Compose configuration file
nano docker-compose.ymlAdd this configuration, replacing n8n.example.com with your actual domain:
services:
  n8n:
    image: n8nio/n8n:latest
    container_name: n8n
    restart: unless-stopped
    ports:
      - "5678:5678"
    environment:
      - N8N_HOST=n8n.example.com
      - WEBHOOK_TUNNEL_URL=https://n8n.example.com/
      - WEBHOOK_URL=https://n8n.example.com/
      - GENERIC_TIMEZONE=UTC
    volumes:
      - n8n_data:/home/node/.n8n
    networks:
      - n8n_network

volumes:
  n8n_data:
    driver: local

networks:
  n8n_network:
driver: bridgeLet me explain each section of this configuration:
- Services: Defines the containers that make up your application. Here we have one service called ‘n8n’.
- Image: Specifies which Docker image to use. We’re using the official n8n image with the ‘latest’ tag to always get current versions.
- Container Name: Gives our container a predictable name for easier management and log viewing.
- Restart Policy: ‘unless-stopped’ means the container will automatically restart if it crashes, but won’t restart if you manually stop it.
- Ports: Maps port 5678 from the container to port 5678 on the host, allowing Nginx to communicate with n8n.
- Environment Variables: Configure how n8n behaves. The HOST and WEBHOOK settings ensure n8n generates correct URLs for webhooks and external integrations.
- Volumes: Creates persistent storage for n8n data. Without this, all your workflows and settings would disappear when the container restarts.
- Networks: Creates an isolated network for your containers, improving security and organization.
5.3 Deploy n8n with Docker Compose
Now launch your n8n instance using Docker Compose:
# Deploy the n8n stack
sudo docker-compose up -dThe ‘-d’ flag runs the containers in detached mode (in the background), allowing you to continue using your terminal while n8n runs.
5.4 Verify n8n Deployment
Check that your deployment is running correctly:
# View running containers
sudo docker-compose ps

# Check n8n logs for any startup issues
sudo docker-compose logs n8n

# Test local connectivity
curl -I http://localhost:5678You should see the n8n container listed as “Up” and responsive to local requests. The logs will show any configuration issues or successful startup messages.
Step 6: Nginx Installation and Configuration
6.1 Install Nginx
Nginx serves as a reverse proxy, creating a secure front door for your n8n instance. This architecture provides several benefits: SSL termination, better security than exposing n8n directly, improved performance through caching, and the ability to serve multiple applications from the same server:
# Install Nginx web server
sudo apt install nginx -yNginx will handle all incoming web traffic and route it securely to your n8n Docker container running on port 5678.
6.2 Create Nginx Configuration
Configure Nginx to properly proxy requests to your containerized n8n instance:
# Create n8n-specific Nginx configuration
sudo nano /etc/nginx/sites-available/n8n.confAdd this configuration, replacing n8n.example.com with your domain:
server {
    listen 80;
    server_name n8n.example.com;

    # Redirect all HTTP traffic to HTTPS (will be added by Certbot)
    location / {
        proxy_pass http://localhost:5678;
        proxy_http_version 1.1;

        # Disable buffering for real-time functionality
        chunked_transfer_encoding off;
        proxy_buffering off;
        proxy_cache off;

        # WebSocket support for n8n's real-time features
        proxy_set_header Upgrade $http_upgrade;
        proxy_set_header Connection "upgrade";

        # Essential proxy headers for proper functionality
        proxy_set_header Host $host;
        proxy_set_header X-Real-IP $remote_addr;
        proxy_set_header X-Forwarded-For $proxy_add_x_forwarded_for;
        proxy_set_header X-Forwarded-Proto $scheme;

        # Extended timeout for long-running workflows
        proxy_read_timeout 86400;
        proxy_connect_timeout 60;
        proxy_send_timeout 60;
    }
}This configuration includes several important elements:
- WebSocket Support: n8n uses WebSockets for real-time updates in the interface. The Upgrade and Connection headers enable this functionality.
- Proxy Headers: These headers ensure n8n receives correct information about the original request, including the real client IP and the fact that the connection should be treated as HTTPS.
- Buffering Disabled: For real-time applications like n8n, we disable proxy buffering to ensure immediate response transmission.
- Extended Timeouts: Long-running workflows might take time to complete, so we set generous timeout values.
6.3 Enable Nginx Configuration
# Enable the n8n site configuration
sudo ln -s /etc/nginx/sites-available/n8n.conf /etc/nginx/sites-enabled/

# Test configuration syntax to catch any errors
sudo nginx -t

# Restart Nginx to apply changes
sudo systemctl restart nginx

# Verify Nginx is running properly
sudo systemctl status nginxThe symbolic link approach is a standard Nginx practice that allows you to easily enable and disable site configurations. Testing the configuration before restarting prevents Nginx from failing due to syntax errors.
Step 7: SSL Certificate Setup
7.1 Install Certbot
Certbot provides free SSL certificates from Let’s Encrypt, a certificate authority that has revolutionized web security by making SSL certificates freely available. The Nginx plugin automatically configures your web server:
# Install Certbot and Nginx integration plugin
sudo apt install certbot python3-certbot-nginx -yLet’s Encrypt certificates are trusted by all major browsers and provide the same level of security as paid certificates.
7.2 Obtain SSL Certificate
Generate and install an SSL certificate for your domain:
# Request SSL certificate (replace with your domain)
sudo certbot --nginx -d n8n.example.comCertbot will guide you through an interactive process:
- Email Address: Required for certificate expiration notifications and security notices
- Terms of Service: You must agree to Let’s Encrypt’s terms
- Email Sharing: Optional sharing with the Electronic Frontier Foundation
- Redirect Option: Choose to redirect HTTP to HTTPS (recommended for security)
Certbot automatically modifies your Nginx configuration to use HTTPS and redirect all HTTP traffic to the secure version.
7.3 Verify SSL Configuration
After Certbot completes, your Nginx configuration will include SSL settings and automatic HTTP-to-HTTPS redirects. You can verify the certificate installation by visiting your domain – you should see a lock icon in your browser’s address bar.
Step 8: Access and Initial Configuration
8.1 Access Your n8n Instance
Once DNS has propagated (verify with nslookup n8n.example.com), you can access your automation platform:
- Navigate to
https://n8n.example.comin your web browser - You should see the n8n interface with a valid SSL certificate
- Complete the initial setup wizard
- Create your first user account
8.2 Initial Security Configuration
After first access, configure basic security settings:
- Set Strong Passwords: Use complex passwords for all user accounts
- Configure User Access: Set up additional users if needed for your team
- Test Webhook Functionality: Create a simple webhook workflow to verify external connectivity
- Verify Data Persistence: Create and save a workflow, then restart the container to ensure data persists
Step 9: Maintenance and Updates
9.1 Updating n8n
Docker Compose makes updates straightforward and less error-prone than manual Docker commands:
# Navigate to your project directory
cd ~/n8n-docker

# Pull the latest n8n image
sudo docker-compose pull

# Recreate containers with updated images
sudo docker-compose up -d

# Verify the update was successful
sudo docker-compose logs n8nThe Docker Compose approach preserves all your configuration and data during updates because everything is defined in your compose file and persistent volumes.
9.2 Managing Your Deployment
Docker Compose provides simple commands for common operations:
# Stop all services
sudo docker-compose down

# Start all services
sudo docker-compose up -d

# View logs from all services
sudo docker-compose logs

# View logs from n8n only
sudo docker-compose logs n8n

# Restart a specific service
sudo docker-compose restart n8n9.3 Backup Your Data
Your n8n data is stored in Docker volumes, which need special handling for backups:
# Create backup directory
mkdir -p ~/n8n-backups

# Create timestamped backup of n8n data
sudo docker run --rm \
  -v n8n-docker_n8n_data:/data \
  -v ~/n8n-backups:/backup \
  ubuntu:latest \
  tar czf /backup/n8n-backup-$(date +%Y%m%d_%H%M%S).tar.gz -C /data .

# Keep only the last 10 backups
cd ~/n8n-backups && ls -t n8n-backup-*.tar.gz | tail -n +11 | xargs rm -fThis backup method uses a temporary container to access the Docker volume and create a compressed archive of all your n8n data.
9.4 Monitor System Health
Regular monitoring ensures optimal performance and early problem detection:
# Check container status
sudo docker-compose ps

# View recent n8n logs
sudo docker-compose logs --tail=50 n8n

# Monitor system resources
free -h    # Memory usage
df -h      # Disk space
uptime # System load9.5 SSL Certificate Renewal
Let’s Encrypt certificates expire every 90 days, but Certbot typically installs automatic renewal:
# Test certificate renewal process
sudo certbot renew --dry-run

# Check renewal timer status
sudo systemctl status certbot.timer

# Manually renew if needed
sudo certbot renewTroubleshooting Common Issues
Container Won’t Start
# Check Docker Compose status
sudo docker-compose ps

# View detailed logs
sudo docker-compose logs n8n

# Verify port availability
sudo netstat -tlnp | grep 5678

# Restart the entire stack
sudo docker-compose restartSSL Certificate Issues
# Check certificate status
sudo certbot certificates

# Verify domain DNS resolution
nslookup n8n.example.com

# Re-attempt certificate generation
sudo certbot --nginx -d n8n.example.com --force-renewalNginx Configuration Problems
# Test Nginx configuration
sudo nginx -t

# Check Nginx error logs
sudo tail -f /var/log/nginx/error.log

# Restart Nginx service
sudo systemctl restart nginxDocker Compose Issues
# Validate compose file syntax
sudo docker-compose config

# Rebuild containers from scratch
sudo docker-compose down
sudo docker-compose up -d --force-recreate

# Remove and recreate volumes (WARNING: This deletes data)
sudo docker-compose down -v
sudo docker-compose up -dYour n8n automation platform is now operational with enterprise-grade security, automatic SSL renewal, and a maintainable Docker Compose configuration. This setup provides several advantages over traditional deployments:
- Reproducibility: Your entire configuration is defined in code, making it easy to recreate or move to another server.
- Maintainability: Docker Compose simplifies updates, backups, and troubleshooting compared to manual Docker commands.
- Scalability: The containerized approach makes it easy to add additional services or scale your deployment as your automation needs grow.
- Security: SSL encryption protects your automation data, while the reverse proxy architecture provides an additional security layer.
The combination of Google Cloud’s free tier, Docker Compose’s simplicity, and n8n’s powerful automation capabilities gives you a professional-grade workflow automation platform at minimal cost. This foundation can grow with your needs, whether you’re automating personal tasks or building complex business workflows.
Step 10: Advanced Configuration for Enterprise and Production Use
Now that you have a basic n8n installation running, let’s explore advanced configurations that transform your setup from a simple automation tool into a robust, enterprise-grade platform. These configurations address real-world concerns like security, performance, scalability, and compliance that become critical when n8n handles important business processes.
10.1 Database Migration: From SQLite to PostgreSQL
Your current setup uses SQLite, which works perfectly for getting started and light usage. However, as your automation needs grow, you’ll want to migrate to PostgreSQL for better performance, concurrent access, and data integrity. Think of this transition like moving from a personal filing cabinet to a professional database system.
PostgreSQL offers several advantages over SQLite for production use: better performance with multiple concurrent users, advanced indexing capabilities, robust backup and recovery options, and the ability to handle larger datasets efficiently. Most importantly, PostgreSQL is designed for 24/7 operation and can handle the demanding workloads that come with business-critical automation.
10.1.1 Setting Up PostgreSQL Container
First, let’s modify your Docker Compose configuration to include PostgreSQL. Update your docker-compose.yml file:
services:
  postgres:
    image: postgres:15-alpine
    container_name: n8n_postgres
    restart: unless-stopped
    environment:
      - POSTGRES_DB=n8n
      - POSTGRES_USER=n8n_user
      - POSTGRES_PASSWORD=your_secure_password_here
    volumes:
      - postgres_data:/var/lib/postgresql/data
    networks:
      - n8n_network
    healthcheck:
      test: ["CMD-SHELL", "pg_isready -U n8n_user -d n8n"]
      interval: 30s
      timeout: 10s
      retries: 3

  n8n:
    image: n8nio/n8n:latest
    container_name: n8n
    restart: unless-stopped
    depends_on:
      postgres:
        condition: service_healthy
    ports:
      - "5678:5678"
    environment:
      - N8N_HOST=n8n.example.com
      - WEBHOOK_TUNNEL_URL=https://n8n.example.com/
      - WEBHOOK_URL=https://n8n.example.com/
      - GENERIC_TIMEZONE=UTC
      # Database configuration
      - DB_TYPE=postgresdb
      - DB_POSTGRESDB_HOST=postgres
      - DB_POSTGRESDB_PORT=5432
      - DB_POSTGRESDB_DATABASE=n8n
      - DB_POSTGRESDB_USER=n8n_user
      - DB_POSTGRESDB_PASSWORD=your_secure_password_here
      - DB_POSTGRESDB_POOL_SIZE=10
    volumes:
      - n8n_data:/home/node/.n8n
    networks:
      - n8n_network

volumes:
  n8n_data:
    driver: local
  postgres_data:
    driver: local

networks:
  n8n_network:
driver: bridgeThe health check ensures PostgreSQL is fully ready before n8n attempts to connect, preventing startup failures. The connection pool size of 10 allows n8n to handle multiple concurrent operations efficiently.
10.1.2 Implementing the Database Migration
To migrate your existing SQLite data to PostgreSQL, you’ll need to follow this careful process:
# Stop your current n8n instance
sudo docker-compose down

# Create a backup of your SQLite data before migration
sudo docker run --rm \
  -v n8n-docker_n8n_data:/data \
  -v ~/n8n-backups:/backup \
  ubuntu:latest \
  tar czf /backup/sqlite-backup-$(date +%Y%m%d_%H%M%S).tar.gz -C /data .

# Update your docker-compose.yml with the PostgreSQL configuration above
# Then start the new setup
sudo docker-compose up -d

# Monitor the migration process
sudo docker-compose logs -f n8nN8n will automatically detect the database change and create the necessary PostgreSQL tables. However, your existing workflows and credentials won’t be automatically migrated. For production migrations, you might need to export workflows individually and import them into the new setup.
10.2 Enterprise Security Configuration
Security becomes paramount when n8n handles sensitive business data or integrates with critical systems. Let’s implement enterprise-level security measures that protect your automation platform and the data it processes.
10.2.1 Environment Variable Security
First, let’s implement secure handling of sensitive configuration data. Rather than putting passwords directly in your Docker Compose file, use Docker secrets or environment files:
# Create a secure environment file
sudo nano ~/n8n-docker/.env.secureAdd your sensitive configuration:
# Database credentials
DB_POSTGRESDB_PASSWORD=your_very_secure_database_password
N8N_ENCRYPTION_KEY=your_32_character_encryption_key_here

# Custom encryption key for n8n data
# Generate with: openssl rand -hex 32Update your Docker Compose file to use environment files and add security hardening:
services:
  postgres:
    image: postgres:15-alpine
    container_name: n8n_postgres
    restart: unless-stopped
    environment:
      - POSTGRES_DB=n8n
      - POSTGRES_USER=n8n_user
      - POSTGRES_PASSWORD_FILE=/run/secrets/db_password
    volumes:
      - postgres_data:/var/lib/postgresql/data
    networks:
      - n8n_network
    secrets:
      - db_password

  n8n:
    image: n8nio/n8n:latest
    container_name: n8n
    restart: unless-stopped
    depends_on:
      postgres:
        condition: service_healthy
    ports:
      - "127.0.0.1:5678:5678"  # Bind only to localhost for security
    environment:
      - N8N_HOST=n8n.example.com
      - WEBHOOK_TUNNEL_URL=https://n8n.example.com/
      - WEBHOOK_URL=https://n8n.example.com/

      # Security hardening
      - N8N_BLOCK_ENV_ACCESS_IN_NODE=true
      - N8N_SECURE_COOKIE=true
      - N8N_BLOCK_FILE_ACCESS_TO_N8N_FILES=true
      - N8N_RESTRICT_FILE_ACCESS_TO=/tmp

      # Database configuration
      - DB_TYPE=postgresdb
      - DB_POSTGRESDB_HOST=postgres
      - DB_POSTGRESDB_PASSWORD_FILE=/run/secrets/db_password

    env_file:
      - .env.secure
    volumes:
      - n8n_data:/home/node/.n8n
    networks:
      - n8n_network
    secrets:
      - db_password

secrets:
  db_password:
    file: ./secrets/db_password.txt

volumes:
  n8n_data:
    driver: local
  postgres_data:
    driver: local

networks:
  n8n_network:
driver: bridge10.2.2 Understanding the Security Configurations
Let me explain what each security setting accomplishes:
- N8N_BLOCK_ENV_ACCESS_IN_NODE=true: This prevents workflow creators from accessing environment variables through expressions or code nodes. This is crucial in multi-user environments where you don’t want users to potentially access sensitive configuration data.
- N8N_SECURE_COOKIE=true: Ensures session cookies are only sent over HTTPS connections, preventing cookie theft over unsecured connections.
- N8N_BLOCK_FILE_ACCESS_TO_N8N_FILES=true: Prevents workflows from accessing n8n’s internal files, protecting configuration and credential data.
- N8N_RESTRICT_FILE_ACCESS_TO=/tmp: Limits file system access to only the temporary directory, preventing workflows from reading sensitive system files.
- Port Binding to 127.0.0.1: By binding the port only to localhost, we ensure that n8n is only accessible through Nginx, never directly from the internet.
10.3 Performance Optimization for Production Workloads
As your automation needs grow, you’ll want to optimize n8n’s performance to handle higher workloads efficiently. These optimizations help prevent timeouts, reduce resource usage, and improve overall responsiveness.
10.3.1 Advanced Database Configuration
Optimize your PostgreSQL configuration for n8n workloads:
  postgres:
    image: postgres:15-alpine
    container_name: n8n_postgres
    restart: unless-stopped
    environment:
      - POSTGRES_DB=n8n
      - POSTGRES_USER=n8n_user
      - POSTGRES_PASSWORD_FILE=/run/secrets/db_password
    volumes:
      - postgres_data:/var/lib/postgresql/data
      - ./postgres.conf:/etc/postgresql/postgresql.conf
    networks:
      - n8n_network
command: ["postgres", "-c", "config_file=/etc/postgresql/postgresql.conf"]Create a PostgreSQL configuration file:
# Create optimized PostgreSQL configuration
sudo nano ~/n8n-docker/postgres.confAdd performance optimizations:
# Memory settings optimized for 1GB RAM server
shared_buffers = 256MB
effective_cache_size = 512MB
work_mem = 4MB

# Connection settings
max_connections = 50
shared_preload_libraries = 'pg_stat_statements'

# Logging for monitoring
log_statement = 'all'
log_duration = on
log_min_duration_statement = 1000

# Checkpoint settings for better performance
checkpoint_completion_target = 0.9
wal_buffers = 16MBThese settings optimize PostgreSQL for the typical workload patterns that n8n creates, balancing memory usage with performance.
10.3.2 N8n Performance Configuration
Configure n8n for optimal performance:
  n8n:
    environment:
      # Execution configuration
      - EXECUTIONS_MODE=queue
      - QUEUE_BULL_REDIS_HOST=redis
      - EXECUTIONS_DATA_SAVE_ON_ERROR=all
      - EXECUTIONS_DATA_SAVE_ON_SUCCESS=all
      - EXECUTIONS_DATA_SAVE_MANUAL_EXECUTIONS=true

      # Performance tuning
      - N8N_PAYLOAD_SIZE_MAX=104857600  # 100MB max payload
      - NODE_OPTIONS=--max-old-space-size=2048  # 2GB memory limit

      # Data retention for performance
      - EXECUTIONS_DATA_PRUNE=true
      - EXECUTIONS_DATA_MAX_AGE=336  # Keep executions for 14 days

  redis:
    image: redis:7-alpine
    container_name: n8n_redis
    restart: unless-stopped
    networks:
      - n8n_network
    volumes:
- redis_data:/dataQueue Mode: This is the key to scaling n8n. Instead of executing workflows immediately, n8n queues them and processes them efficiently using Redis as a message broker. This prevents system overload and allows for better resource management.
Data Pruning: Automatically removing old execution data prevents your database from growing infinitely and maintains consistent performance as your usage scales.
Memory Limits: Setting appropriate memory limits prevents individual workflows from consuming all available system memory.
10.4 Enterprise Authentication and User Management
For business environments, you’ll want robust user authentication and access control. N8n supports several enterprise authentication methods.
10.4.1 Basic User Management Configuration
  n8n:
    environment:
      # User management
      - N8N_USER_MANAGEMENT_DISABLED=false
      - N8N_PUBLIC_API_DISABLED=false
      - N8N_PERSONALIZATION_ENABLED=true

      # Email configuration for user invitations
      - N8N_EMAIL_MODE=smtp
      - N8N_SMTP_HOST=smtp.gmail.com
      - N8N_SMTP_PORT=587
      - N8N_SMTP_USER=[email protected]
      - N8N_SMTP_PASS=your-app-password
- N8N_SMTP_SENDER=[email protected]This configuration enables n8n’s user management system, allowing you to invite team members and control access to workflows and credentials.
10.4.2 External Authentication Integration
For enterprise environments, you might want to integrate with existing authentication systems:
  n8n:
    environment:
      # SAML Authentication (Enterprise feature)
      - N8N_SAML_ENABLED=true
      - N8N_SAML_ATTRIBUTES_EMAIL=email
      - N8N_SAML_ATTRIBUTES_FIRSTNAME=firstName
      - N8N_SAML_ATTRIBUTES_LASTNAME=lastName

      # LDAP Authentication (Enterprise feature)
      - N8N_LDAP_ENABLED=true
      - N8N_LDAP_SERVER=ldap://your-ldap-server.com
- N8N_LDAP_PORT=389Note that SAML and LDAP authentication require n8n Enterprise licenses. These features allow integration with existing corporate authentication infrastructure.
10.5 Webhook and API Customization
For production deployments, you’ll often need to customize how n8n handles webhooks and API requests to integrate properly with your existing infrastructure.
10.5.1 Custom Webhook Configuration
  n8n:
    environment:
      # Webhook customization
      - WEBHOOK_URL=https://n8n.example.com/
      - N8N_PAYLOAD_SIZE_MAX=104857600  # 100MB
      - N8N_METRICS=true
      - N8N_METRICS_PREFIX=n8n_

      # API endpoint customization
      - N8N_PUBLIC_API_ENDPOINT=api/v1
      - N8N_PUBLIC_API_SWAGGERUI_DISABLED=false

      # Custom endpoints
      - N8N_ENDPOINT_WEBHOOK=webhook
- N8N_ENDPOINT_WEBHOOK_TEST=webhook-testMetrics Enable: This exposes Prometheus-compatible metrics that you can integrate with monitoring systems like Grafana to track n8n performance and usage.
API Customization: These settings allow you to customize the API endpoints to match your organization’s URL conventions.
10.6 Data Backup and Disaster Recovery
Enterprise deployments require robust backup and recovery procedures. Let’s implement automated backup strategies.
10.6.1 Automated Database Backups
Create a backup service in your Docker Compose:
  backup:
    image: postgres:15-alpine
    container_name: n8n_backup
    restart: "no"
    depends_on:
      - postgres
    environment:
      - PGPASSWORD=your_secure_password_here
    volumes:
      - ./backups:/backups
      - ./backup-script.sh:/backup-script.sh
    networks:
      - n8n_network
command: ["/backup-script.sh"]Create the backup script:
# Create backup script
sudo nano ~/n8n-docker/backup-script.sh
#!/bin/bash
set -e
BACKUP_DIR="/backups"
TIMESTAMP=$(date +%Y%m%d_%H%M%S)
BACKUP_FILE="$BACKUP_DIR/n8n_backup_$TIMESTAMP.sql"
# Create backup directory if it doesn't exist
mkdir -p $BACKUP_DIR
# Create database backup
pg_dump -h postgres -U n8n_user -d n8n > $BACKUP_FILE
# Compress the backup
gzip $BACKUP_FILE
# Keep only last 7 days of backups
find $BACKUP_DIR -name "n8n_backup_*.sql.gz" -mtime +7 -delete
echo "Backup completed: $BACKUP_FILE.gz"# Make the script executable
sudo chmod +x ~/n8n-docker/backup-script.sh10.6.2 Complete System Backup Strategy
# Create comprehensive backup script
sudo nano ~/n8n-docker/full-backup.sh
#!/bin/bash
set -e
BACKUP_BASE_DIR="/home/$(whoami)/n8n-backups"
TIMESTAMP=$(date +%Y%m%d_%H%M%S)
BACKUP_DIR="$BACKUP_BASE_DIR/full_backup_$TIMESTAMP"
mkdir -p $BACKUP_DIR
echo "Creating comprehensive n8n backup..."
# 1. Stop services gracefully
cd ~/n8n-docker
sudo docker-compose down
# 2. Backup Docker volumes
sudo docker run --rm \
-v n8n-docker_n8n_data:/source:ro \
-v $BACKUP_DIR:/backup \
ubuntu:latest \
tar czf /backup/n8n_data.tar.gz -C /source .
sudo docker run --rm \
-v n8n-docker_postgres_data:/source:ro \
-v $BACKUP_DIR:/backup \
ubuntu:latest \
tar czf /backup/postgres_data.tar.gz -C /source .
# 3. Backup configuration files
cp docker-compose.yml $BACKUP_DIR/
cp .env.secure $BACKUP_DIR/
cp -r secrets/ $BACKUP_DIR/ 2>/dev/null || true
# 4. Create restore instructions
cat > $BACKUP_DIR/RESTORE_INSTRUCTIONS.md << EOF
# Restore Instructions
1. Install Docker and Docker Compose
2. Create project directory: mkdir ~/n8n-docker && cd ~/n8n-docker
3. Copy configuration files: cp backup/docker-compose.yml .
4. Copy environment file: cp backup/.env.secure .
5. Copy secrets: cp -r backup/secrets/ .
6. Restore volumes:
- docker volume create n8n-docker_n8n_data
- docker volume create n8n-docker_postgres_data
- docker run --rm -v n8n-docker_n8n_data:/target -v \$(pwd)/backup:/backup ubuntu tar xzf /backup/n8n_data.tar.gz -C /target
- docker run --rm -v n8n-docker_postgres_data:/target -v \$(pwd)/backup:/backup ubuntu tar xzf /backup/postgres_data.tar.gz -C /target
7. Start services: docker-compose up -d
Backup created: $TIMESTAMP
EOF
# 5. Restart services
sudo docker-compose up -d
# 6. Clean old backups (keep last 10)
ls -t $BACKUP_BASE_DIR | tail -n +11 | xargs -r rm -rf
echo "Complete backup created in: $BACKUP_DIR"
echo "Services restarted successfully"# Make executable and test
sudo chmod +x ~/n8n-docker/full-backup.sh10.7 Monitoring and Observability
Production deployments need comprehensive monitoring to ensure reliability and performance.
10.7.1 Health Checks and Monitoring
Add health monitoring to your Docker Compose:
  n8n:
    healthcheck:
      test: ["CMD-SHELL", "curl -f http://localhost:5678/healthz || exit 1"]
      interval: 30s
      timeout: 10s
      retries: 3
      start_period: 60s

    environment:
      # Monitoring and logging
      - N8N_METRICS=true
      - N8N_LOG_LEVEL=info
      - N8N_LOG_OUTPUT=console

      # Diagnostics (can be disabled for privacy)
- N8N_DIAGNOSTICS_ENABLED=false10.7.2 Log Management
Configure structured logging for better troubleshooting:
  n8n:
    logging:
      driver: "json-file"
      options:
        max-size: "100m"
        max-file: "5"
labels: "service=n8n,environment=production"This configuration ensures logs don’t consume excessive disk space while maintaining enough history for troubleshooting.
10.8 Environment-Specific Configurations
For professional deployments, you’ll often need different configurations for development, staging, and production environments.
10.8.1 Multi-Environment Setup
Create environment-specific configuration files:
# Production environment
sudo nano ~/n8n-docker/.env.production
# Production optimizations
N8N_LOG_LEVEL=warn
EXECUTIONS_DATA_PRUNE=true
EXECUTIONS_DATA_MAX_AGE=168 # 7 days in production
N8N_METRICS=true
N8N_SECURE_COOKIE=true
N8N_BLOCK_ENV_ACCESS_IN_NODE=true# Development environment
sudo nano ~/n8n-docker/.env.development# Development settings
N8N_LOG_LEVEL=debug
EXECUTIONS_DATA_PRUNE=false
N8N_METRICS=false
N8N_SECURE_COOKIE=false
N8N_BLOCK_ENV_ACCESS_IN_NODE=falseThen use the appropriate environment file:
# For production
sudo docker-compose --env-file .env.production up -d

# For development
sudo docker-compose --env-file .env.development up -d
This approach allows you to maintain consistent configurations across different deployment environments while optimizing settings for each specific use case.
The configurations covered in this section transform your basic n8n installation into a robust, enterprise-ready automation platform. Each setting addresses specific real-world requirements: security protects your data and systems, performance optimizations ensure reliability under load, backup strategies prevent data loss, and monitoring provides visibility into your automation infrastructure.
Remember that not every configuration is necessary for every deployment. Start with the security and backup configurations, then add performance optimizations and monitoring as your usage grows. The modular nature of Docker Compose makes it easy to add these features incrementally as your needs evolve.
How to update the N8n version?
Keeping your N8n version current delivers the latest features and critical fixes. Update frequently to avoid jumping multiple versions at once, which reduces the risk of disruptive updates. Target monthly updates at minimum.
Check the Release notes for breaking changes before updating. Use Environments to create a test version of your instance and test the update there first.
1. Standard Docker Container
Pull the latest N8n image:
docker pull docker.n8n.io/n8nio/n8n:latestStop your current container and restart with the new image:
docker stop <container_id>
docker rm <container_id>
docker run -it --rm --name n8n -p 5678:5678 -v n8n_data:/home/node/.n8n docker.n8n.io/n8nio/n8n2. Docker Compose Updates
For Docker Compose installations, follow these steps:
# Pull latest version
docker compose pull

# Stop and remove current containers
docker compose down

# Start updated containers
docker compose up -dIf you need to revert an upgrade, install the older version you want to return to. If the upgrade involved a database migration, run n8n db:revert on your current version to roll back the database. Repeat this process for multiple database migration reversals.
What challenges have you encountered when updating workflow automation tools? The update process varies significantly depending on the installation method, but following these specific procedures minimizes downtime and prevents data loss.
Why Choose n8n for Automation?
n8n stands out in the automation landscape by offering complete control over your workflows without vendor lock-in or usage-based pricing. Unlike cloud-based solutions that charge per automation or limit functionality in free tiers, n8n gives you unlimited workflows when self-hosted.
The key advantage is ownership. You control your data, customise the platform to your needs, and aren’t subject to external pricing changes or service limitations. For developers, this means access to the source code, ability to create custom nodes, and integration with your existing infrastructure.
Performance-wise, self-hosted n8n eliminates the latency of external API calls for internal system integrations. Your workflows run on your infrastructure, making them faster and more reliable for complex automation chains.
n8n vs Popular Automation Platforms
| Feature | n8n (Self-hosted) | Zapier | Microsoft Power Automate | IFTTT |
|---|---|---|---|---|
| Cost | Free (hosting costs only) | $19.99+/month | $15+/month | $3.99+/month |
| Workflow Limit | Unlimited | 20-100+ depending on plan | Varies by license | 20+ |
| Data Control | Complete ownership | Third-party servers | Microsoft servers | Third-party servers |
| Custom Code | Full JavaScript support | Limited code steps | Power Fx expressions | None |
| API Access | Unlimited | Rate limited by plan | Rate limited | Limited |
| Conditional Logic | Advanced branching | Basic conditions | Advanced | Basic |
| Error Handling | Built-in retry/error flows | Basic retry | Advanced | Limited |
| Local Integrations | Direct database/file access | API-only | Hybrid options | API-only |
| Workflow Complexity | Unlimited nodes | Plan-dependent | Plan-dependent | Single trigger-action |
| Custom Connectors | Build your own | Request/pay for development | Some customization | None |
| Execution Time | No limits | 1-30 minutes max | Varies | 15 minutes max |
The technical flexibility of n8n becomes apparent in complex scenarios. You can build multi-step workflows with parallel processing, implement sophisticated error handling, and integrate directly with databases or file systems without API overhead. For development teams, the ability to version control workflows as JSON files and deploy them programmatically is invaluable.
Cost scaling is another critical factor. While cloud platforms become expensive as usage grows, your self-hosted n8n costs remain predictable regardless of automation volume. A single Google Cloud instance can handle thousands of workflows that would cost hundreds monthly on traditional platforms.
Conclusion
You now have a production-ready n8n automation platform running on Google Cloud’s free tier at your custom subdomain. This setup provides unlimited workflows, complete data ownership, and enterprise-grade security without monthly subscription costs.
The implementation includes SSL encryption, automated backups, health monitoring, and security hardening that rival paid automation platforms. Your instance can handle complex multi-step workflows, parallel processing, and direct database integrations – capabilities that would cost hundreds monthly on traditional SaaS platforms.
Your current configuration scales efficiently within free tier limits. When automation demands grow, upgrading to larger VM instances, external PostgreSQL databases, or load balancers requires minimal configuration changes to the existing foundation.
The backup system protects your workflows and data, while monitoring ensures reliable operation. Regular maintenance involves checking system updates, reviewing logs, and monitoring Google Cloud usage to stay within free tier boundaries.
Start building workflows that integrate your existing systems, automate repetitive tasks, and create sophisticated business logic. Your self-hosted n8n instance provides the flexibility and control needed for serious automation projects without vendor limitations or usage-based pricing constraints.
Frequently Asked Questions
How do I monitor my Google Cloud usage to stay within free tier limits?
Check usage in Google Cloud Console > Billing > Reports. Monitor compute hours (744 hours/month limit for e2-micro), storage (30 GB limit), and network egress (1 GB/month). Set billing alerts at 50% and 90% thresholds. The e2-micro instance runs 24/7 within limits, but high network traffic can exceed free egress allowance.
What are the performance limitations of the e2-micro instance for n8n?
The 1 GB RAM limits concurrent workflow execution to 3-5 simple workflows or 1-2 complex ones. Database operations slow down with large datasets. CPU constraints affect workflows with heavy processing. For production workloads exceeding 10-15 daily workflows, upgrade to e2-small ($13/month) or implement workflow scheduling during off-peak hours.
What should I do if n8n stops working or becomes inaccessible?
Check service status with sudo systemctl status n8n. Restart if needed: sudo systemctl restart n8n. For SSL issues, run sudo certbot certificates and renew if expired. Verify DNS resolution with nslookup n8n.yourdomain.com. Check nginx logs: sudo tail -f /var/log/nginx/error.log. The monitoring script automatically restarts failed services every 5 minutes.
How do I upgrade to a larger VM when I outgrow the free tier?
Stop the VM, go to Compute Engine > VM instances, click your instance, select “Edit”, change machine type to e2-small or larger, then restart. Update your budget alerts accordingly. No configuration changes needed – all services continue running with improved performance.
Can multiple users access my n8n instance securely?
The current setup uses basic authentication suitable for personal use. For team access, upgrade to n8n’s user management by setting N8N_USER_MANAGEMENT_DISABLED=false and configuring individual accounts through the web interface. Consider implementing OAuth integration or VPN access for enhanced security in multi-user environments.