If you’ve ever tried to connect a custom app, script, or automation tool to your WordPress site, chances are you’ve come across Application Passwords. This built-in WordPress feature allows external applications to authenticate through the REST API without exposing your actual login credentials.
But here’s the twist: if you’re using Wordfence Security (and honestly, you should), you might notice that Application Passwords are disabled by default. That can be frustrating when you’re setting up API integrations, but it’s actually Wordfence doing its job — locking things down until you decide otherwise.
In this guide, I’ll show you exactly how to enable and create Application Passwords in WordPress, while keeping your site protected with Wordfence.
What Are Application Passwords and Why Do They Matter?
Application Passwords were introduced in WordPress 5.6. Instead of reusing your main admin password for integrations, WordPress generates unique, 24-character keys that external tools can use. Each password can be tied to a specific service, making them both more secure and easier to manage.
Common use cases include:
- Connecting a mobile app that posts content to your site
- Automating publishing via scheduling tools
- Allowing analytics platforms to pull data through the REST API
- Running custom integrations with tools like n8n, Zapier, or Make
Think of it this way: instead of giving out the keys to your entire house, you’re handing a duplicate key that only opens the front door — and you can revoke it anytime.
Why Wordfence Disables Application Passwords by Default
Here’s where things get interesting. Wordfence ships with Application Passwords turned off by default. This might feel restrictive, but it’s part of Wordfence’s “secure by default” philosophy.
Here’s why they do it:
- Full user permissions – Application Passwords grant the same permissions as the user who created them. If it’s an admin, the key can do anything.
- REST API exposure – If a key is compromised, attackers can create posts, change settings, or even add new users.
- Attack surface minimization – Disabling the feature reduces potential entry points until you explicitly need them.
That said, there are many cases where you do need Application Passwords — so let’s see how to enable them safely.
Step-by-Step: Enabling Application Passwords in Wordfence
Step 1: Access Wordfence Settings
- Log in to your WordPress dashboard.
- Go to Wordfence → All Options.
- Scroll down to the Firewall Options section.
- Expand Brute Force Protection.
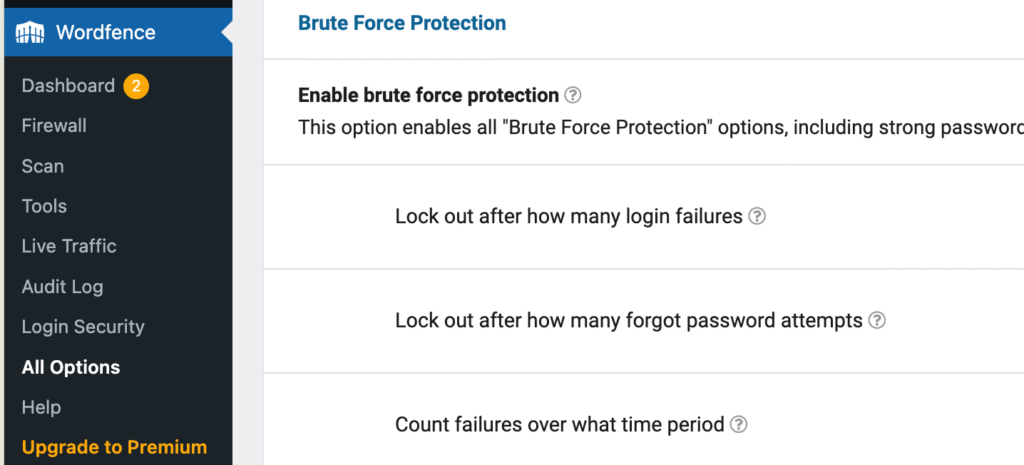
Step 2: Enable Application Passwords

- Find the option labeled “Disable WordPress application passwords.”
- Uncheck this box. (Yep, you’re unchecking “disable” to turn them on — a bit confusing, but that’s how it’s worded.)
- Click Save Changes.
At this point, WordPress will allow Application Passwords to be created and used, while Wordfence continues to protect against other brute force or login attacks.
Creating Your First Application Password
Once you’ve enabled them in Wordfence, it’s time to actually generate a key.
Step 1: Navigate to Your Profile
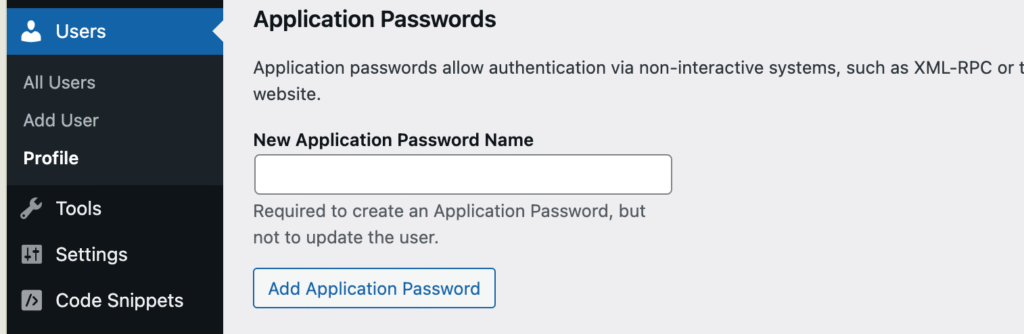
- In your dashboard, go to Users → Profile.
- Scroll down until you see the Application Passwords section.
Step 2: Generate a New Password
- In the New Application Password Name field, type something descriptive (e.g., “Zapier Sync”, “Mobile App”, “Analytics Tool”).
- Avoid generic names like “App1” — future you will thank present you for being clear.
- Click Add New Application Password.
Step 3: Copy and Store It Securely
WordPress will generate a 24-character password and display it once. Copy it immediately and keep it somewhere safe (password manager recommended).
The password format looks like this:
abcd efgh 1234 ijkl 5678 mnop
Use this in your API requests instead of your real WordPress password.
How to Use Your Application Password?
Creating an Application Password is only half the job — the real step is using it with the tool or script you want to connect.
Here’s how authentication works:
- Username: Use your WordPress username (the one tied to the account that generated the Application Password).
- Password: Use the generated Application Password instead of your regular login password.
- Site URL: Point your application to your WordPress site URL, usually through the REST API (
https://yoursite.com/wp-json/).
For example, if you want to test with curl, you’d run something like:
curl --user "your-username:your-application-password" \
https://example.com/wp-json/wp/v2/posts
If everything is set up correctly, this command will return a list of posts from your WordPress site in JSON format.
How Permissions Work?
- An Application Password inherits the exact same capabilities as the user who created it.
- If an admin generates the password, the application can do anything that admin can do (publish posts, manage plugins, add users, etc.).
- If an author generates the password, the application will only be able to create and edit their own posts.
That means the safest approach is to generate passwords from the lowest-privileged account that still allows the integration to function. For example, if a service only needs to publish blog posts, don’t generate the key from an administrator account — create a dedicated “API User” with author/editor permissions instead.
Important Requirements and Limitations
Before you get too excited and start creating passwords for everything, keep these in mind:
- HTTPS required – Your site must run over SSL (https://) for Application Passwords to work.
- Permissions match user role – A password inherits the permissions of the user who created it. An admin key is much more powerful than an author key.
- User self-control – Any user who can edit their profile can generate their own Application Passwords.
Security Best Practices with Wordfence + Application Passwords
- Use descriptive names – Makes it easy to track which key belongs to which integration.
- Review periodically – Revoke keys you no longer use. Treat it like cleaning out old SSH keys.
- Limit high-privilege users – Only grant admin-level Application Passwords if absolutely necessary.
- Monitor activity logs – Use Wordfence or other logging plugins to confirm how keys are being used.
When You Shouldn’t Use Application Passwords
Sometimes the safest approach is simply not using them. Consider skipping Application Passwords if:
- You don’t actually need API access.
- Your site manages highly sensitive data (e.g., medical, financial).
- You’re not confident in monitoring or revoking credentials regularly.
- There’s an alternative method (like OAuth) that fits better.
If any of these apply, you’re better off leaving the feature disabled entirely.
Troubleshooting Common Issues
- Application Passwords not showing up? Double-check Wordfence’s settings and clear your site cache.
- Authentication errors? Confirm your site runs over HTTPS and that you copied the password exactly.
- Still stuck? The WordPress.org support forums are full of discussions around this exact feature.
Wrapping Up
Application Passwords make it easy to connect third-party tools to WordPress without handing out your main login credentials. When Wordfence is active, the only extra step is re-enabling them in the settings.
Used wisely, they’re a great way to integrate WordPress with automation tools, mobile apps, and analytics platforms while still keeping security in check. Just remember — with great power comes great responsibility. Manage your keys, monitor usage, and revoke them when no longer needed.
Have you used Application Passwords with WordPress and Wordfence? I’d love to hear what kind of integrations you’ve built — drop a comment and share your experience.