
Are you an Android app developer? Or maybe you’re an Android app user who wants to convert a website into an app. Either way, you’re in the right place. In this blog, we’ll show you how to convert a website into an Android app using Android Studio.
But first, let’s answer a couple of questions you might have. For example, why would you want to convert a website into an app? And what are the benefits of doing so?
Why Convert a Website into an Android App?
There are a few reasons why you might want to convert a website into an Android app. Maybe you have a website that you want to make more accessible to your mobile users. Or maybe you want to take advantage of some of the features that are unique to apps, like push notifications.
Whatever your reasons, there are a few benefits of converting a website into an Android app. For one, it can make your content more accessible to your users. If they have your app on their phone, they can open it up and access your content more easily than if they had to search for your website on the web.
Another benefit is that you can take advantage of features that are unique to apps. For example, you can send push notifications to your users to let them know when new content is available. This can be a great way to keep them engaged with your app.
Finally, an Android app can give your brand a boost. Having an app can make you look more professional and polished, and it can help you stand out from the competition.
Now that we’ve answered some of the questions you might have, let’s get into how to convert a website into an Android app.
Convert a Website into an Android App using Android Studio:
There are a few different ways to convert a website into an Android app. In this blog, we’ll show you how to do it using Android Studio. Android Studio is a popular development environment for Android apps, and it’s the recommended environment for developing Android apps by Google.
If you’re not familiar with Android Studio, don’t worry. We’ll walk you through the process step-by-step.
Before we get started, there are a few things you’ll need to have in order to convert a website into an Android app. First, you’ll need the website itself. You’ll also need an Android device with Android Studio installed.
Once you have done installing Android Studio, you’re ready to get started.
- Open Android Studio and create a new project. When prompted, choose the “Empty Activity” template.
- Name your project and click “Finish.”
Now, let’s create the logo of your app first.
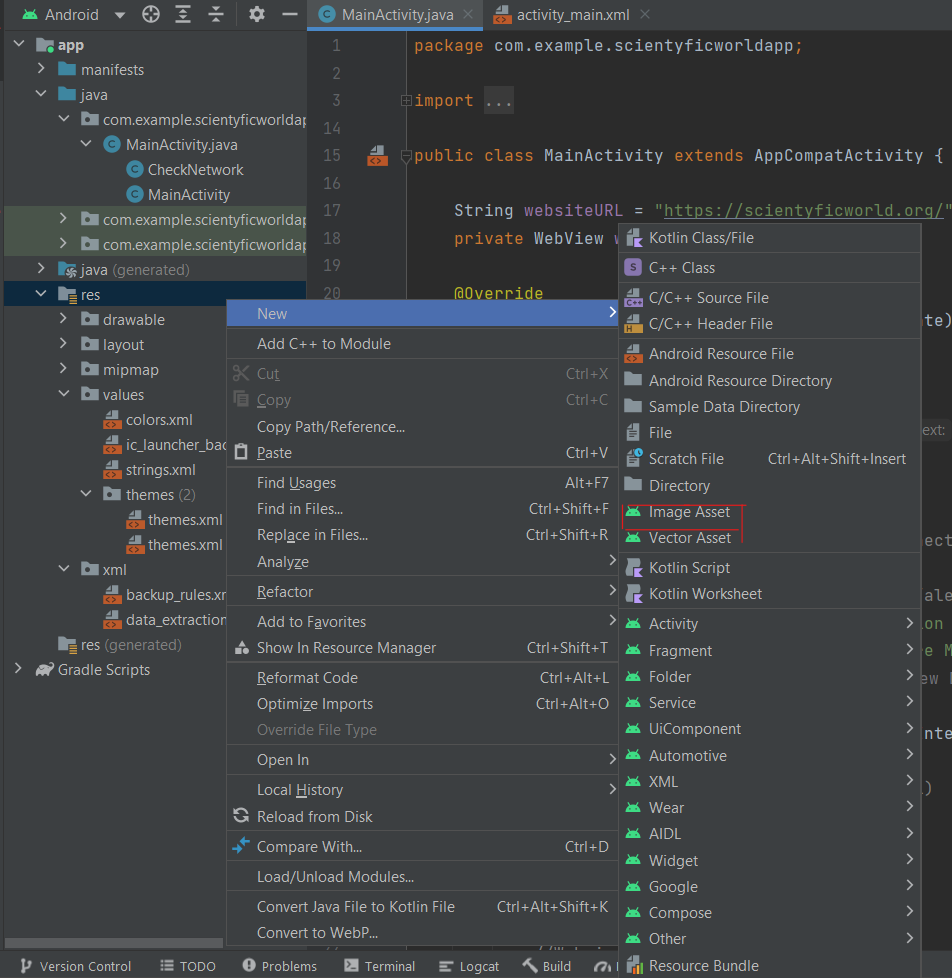
- In the project navigator, open the “app” folder and then the “res” folder.
- Right-click on the “drawable” folder and select “New > Image Asset.”
- In the “Icon Type” drop-down, select “Action Bar and Tab Icons.”
- Click the “Choose File” button and select the website’s favicon. This is the icon that appears in the browser’s address bar.
- Click the “Next” button and then the “Finish” button.

After doing this we now will edit 3 files to create our Application.
- MainActivity.java
- AndroidManifest.xml
- activity_main.xml
Step 1: Android Webview
What is Android Webview?
Android Webview is a system component powered by Chrome that allows Android apps to display web content. Webview is used by a majority of apps on the Android platform, providing a consistent set of features and a powerful web engine to make sure that web content is rendered correctly on all Android devices. Thanks to Webview, users can enjoy a desktop-like web experience on their mobile devices.
Webview is based on the open-source Chromium project, and it shares a lot of code with Chrome for Android. This means that any changes that are made to the web engine in Chrome are automatically reflected in Webview, and vice versa. This close relationship ensures that users always have access to the latest web technologies, whether they’re using Chrome or Webview.
While Webview is very powerful, it is also a potential security risk. Any app that uses Webview is effectively running a miniature version of Chrome, which means that any vulnerabilities that are found in Chrome are also present in Webview. For this reason, it’s important to keep Webview up-to-date and to only use apps that come from trusted sources.
Okay so first we’ll go to activity_main.xml file and paste this code snippet.
<WebView
    android:layout_width="fill_parent"
    android:layout_height="fill_parent"
    android:id="@+id/webView"
    android:layout_alignParentTop="true"
    android:layout_alignParentLeft="true"
    android:layout_alignParentStart="true"
    android:layout_alignParentBottom="true"
    android:layout_alignParentRight="true"
    android:layout_alignParentEnd="true"
    tools:ignore="MissingConstraints" />
Now finally in AndroidManifest.xml you’ve to paste the following line of code.
<uses-permission android:name="android.permission.INTERNET" />We've to add another segment of code into MainActivity.java file, but as we've to update it again in the next step, so I've written the updated code in the next section. So paste the code from there.
Step 2: Internet Connectivity
As you’re coverting your website into application, so your app will also need the connectivity of Internet to be rendered.
For this we’ll again go to the files AndroidManifest.xml and MainActivity.java.
First we’ll add this single line of code in AndroidManifest.xml file.
<uses-permission android:name="android.permission.ACCESS_NETWORK_STATE"/>Now, we’ll go to the file MainActivity.java and paste the following code there.(Don’t forget to change the url, else you’ll end up making Scientyfic World’s App😂)
import android.app.AlertDialog;
import android.content.Context;
import android.content.DialogInterface;
import android.net.ConnectivityManager;
import android.net.NetworkInfo;
import android.os.Bundle;
import android.util.Log;
import android.webkit.WebView;
import android.webkit.WebViewClient;

import androidx.appcompat.app.AppCompatActivity;

public class MainActivity extends AppCompatActivity {

    String websiteURL = "https://scientyficworld.org/"; // sets web url
    private WebView webview;

    @Override
    protected void onCreate(Bundle savedInstanceState) {
        super.onCreate(savedInstanceState);
        setContentView(R.layout.activity_main);

        if( ! CheckNetwork.isInternetAvailable(this)) //returns true if internet available
        {
            //if there is no internet do this
            setContentView(R.layout.activity_main);
            //Toast.makeText(this,"No Internet Connection, Chris",Toast.LENGTH_LONG).show();

            new AlertDialog.Builder(this) //alert the person knowing they are about to close
                    .setTitle("No internet connection available")
                    .setMessage("Please Check you're Mobile data or Wifi network.")
                    .setPositiveButton("Ok", new DialogInterface.OnClickListener() {
                        @Override
                        public void onClick(DialogInterface dialog, int which) {
                            finish();
                        }
                    })
                    //.setNegativeButton("No", null)
                    .show();

        }
        else
        {
            //Webview stuff
            webview = findViewById(R.id.webView);
            webview.getSettings().setJavaScriptEnabled(true);
            webview.getSettings().setDomStorageEnabled(true);
            webview.setOverScrollMode(WebView.OVER_SCROLL_NEVER);
            webview.loadUrl(websiteURL);
            webview.setWebViewClient(new WebViewClientDemo());

        }
    }


    private class WebViewClientDemo extends WebViewClient {
        @Override
        //Keep webview in app when clicking links
        public boolean shouldOverrideUrlLoading(WebView view, String url) {
            view.loadUrl(url);
            return true;
        }
    }


}

class CheckNetwork {

    private static final String TAG = CheckNetwork.class.getSimpleName();

    public static boolean isInternetAvailable(Context context)
    {
        NetworkInfo info = (NetworkInfo) ((ConnectivityManager)
                context.getSystemService(Context.CONNECTIVITY_SERVICE)).getActiveNetworkInfo();

        if (info == null)
        {
            Log.d(TAG,"no internet connection");
            return false;
        }
        else
        {
            if(info.isConnected())
            {
                Log.d(TAG," internet connection available...");
                return true;
            }
            else
            {
                Log.d(TAG," internet connection");
                return true;
            }

        }
    }
}
Okay if you’ve followed till now then we’ve just one step left to get our app.
Step 3: Back to previous page
Before adding this code snippet, run your App once and check if you can back to previous page by clicking the back icon of your mobile envioronment device.
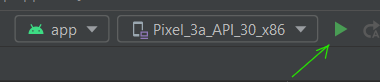
If you don’t know how to run an App on Android studio, you just have to click green button you can see here and you can see a prototype in the running emulator.
Now, if in the emulator you see that the back to previous page is already working, then you don’t have to paste this code, other wise paste this code snippet in your MainActivity.java file.
//set back button functionality
@Override
public void onBackPressed() { //if user presses the back button do this
    if (webview.isFocused() && webview.canGoBack()) { //check if in webview and the user can go back
        webview.goBack(); //go back in webview
    } else { //do this if the webview cannot go back any further

        new AlertDialog.Builder(this) //alert the person knowing they are about to close
                .setTitle("EXIT")
                .setMessage("Are you sure. You want to close this app?")
                .setPositiveButton("Yes", new DialogInterface.OnClickListener() {
                    @Override
                    public void onClick(DialogInterface dialog, int which) {
                        finish();
                    }
                })
                .setNegativeButton("No", null)
                .show();
    }
}
Hurray! your Application is created. Now how you can the apk file?
Follow these steps I’ve shared in this following video👉
Now, enjoy your Application and share it with your friends
So, that’s all for this blog. I hope this blog was not bored you.
If you found this blog useful, then share this with your friends too.
See you in the next blog.


