Creating dynamic, user-friendly, and SEO-friendly applications is essential in modern web development. Server-side rendering (SSR) in React is a technique that significantly enhances these aspects. SSR enables React components to be rendered on the server instead of the user’s browser, providing numerous benefits.
This guide will explain how to implement SSR in a React application. It aims to simplify SSR’s complexities, making it accessible even for beginners. The explanations will be clear and straightforward, avoiding complex jargon.
First, we will explore SSR, its core principles, and its importance in contemporary web development. Then, we’ll walk through the implementation process, from setting up your React project to deploying your SSR application in a production environment. We’ll also cover best practices, performance considerations, and the SEO advantages of SSR.
By the end of this tutorial, you will understand SSR in React and be ready to create web applications that load faster, rank higher in search engines, and provide a seamless user experience. Let’s begin the journey to mastering Server-Side Rendering in React.
What is Server-Side Rendering?
Server-side rendering (SSR) is a fundamental concept in modern web development, particularly in single-page applications (SPAs) like those built with React. In this section, we’ll provide a clear and non-technical understanding of SSR, its core principles, and why it’s essential in today’s web landscape.
SSR is a technique used to build web pages that can be initially rendered on the server and then sent to the user’s browser. In contrast to the traditional client-side rendering, where the entire rendering process occurs in the browser, SSR pre-renders parts or all of the web page on the server.
What is the difference between server-side and client-side rendering?
Now, before going to the steps directly, I think we should first get the idea of the difference between server-side rendering (SSR) and client-side rendering (CSR). Here none of them are bad or good, both methods have their unique advantages and are suitable for different scenarios. Let’s break down how each one works.
Client-Side Rendering (CSR)
In CSR, the browser downloads a minimal HTML shell and a JavaScript bundle. The JavaScript bundle then executes in the browser, generating the content dynamically. This process involves:
- Initial Load: The server sends an HTML file containing a basic structure with a
<div>to hold the React app and links to the JavaScript bundle. - JavaScript Execution: The browser downloads and executes the JavaScript, which then generates and injects the necessary HTML into the
<div>. - User Interaction: Once the JavaScript is fully loaded and executed, the app becomes interactive, handling user inputs and updates in real time.
Server-Side Rendering (SSR)
In SSR, the server pre-renders the HTML for each request and sends the fully populated HTML to the client. This involves:
- Initial Request: The server receives a request and uses React to generate the complete HTML for the page.
- Response: The server sends the fully rendered HTML to the browser, allowing users to see the content immediately.
- Hydration: After the initial HTML is rendered, the JavaScript bundle is downloaded and executed, making the page interactive.
Here is an illustration that can help you to visualize these processes side-by-side. showing how CSR waits for JavaScript to execute before rendering content, while SSR delivers a fully rendered page that is immediately visible to the user. This comparison will highlight the differences in user experience, particularly in terms of initial load time and perceived performance.
Client-Side Rendering (CSR)
Initial HTML with JS sent from server
Browser loads HTML and downloads JS
JS executes and renders content
User sees the fully rendered content
Server-Side Rendering (SSR)
Server renders the HTML
Fully rendered HTML sent to browser
Browser loads the HTML
User sees the content immediately
JS executes and makes the page interactive
Client-side rendering vs Server-Side Rendering:
| Feature/Aspect | Client-Side Rendering (CSR) | Server-Side Rendering (SSR) |
|---|---|---|
| Initial Load Time | Slower, as the browser waits for JavaScript to download and execute before rendering content. | Faster, as the server sends fully rendered HTML, reducing initial load time. |
| SEO | Less SEO-friendly, as search engines might struggle to index JavaScript-heavy pages. | More SEO-friendly, as search engines can easily index the pre-rendered HTML. |
| User Experience | Content appears after JavaScript execution, which may lead to a delay. | Immediate content display, enhancing the user experience. |
| Complexity | Easier to implement and maintain for single-page applications. | More complex setup, but beneficial for large-scale applications requiring better performance and SEO. |
| Data Fetching | Data fetching happens on the client side after initial load. | Data fetching can be handled on the server, ensuring data is available when the page is rendered. |
| Performance | Depends heavily on the client’s device and network speed. | More consistent performance, as the server handles the heavy lifting of rendering. |
| Interactivity | Fully interactive after the initial load. | Fully interactive after hydration, with immediate content display. |
This comprehensive comparison outlines the fundamental differences and benefits of both CSR and SSR, guiding you to choose the appropriate rendering strategy based on your project requirements.
Why SSR Matters?
SSR offers several significant advantages:
- Improved SEO: Search engines can easily index content from server-rendered pages because they receive the complete HTML content from the server. This helps your web pages rank higher in search results.
- Faster Initial Load Times: Users see the content quicker because it’s pre-rendered on the server, which can lead to a better user experience.
- Accessibility and Performance: SSR is beneficial for users with slower devices or limited network connections, as it ensures the content is available as soon as the initial HTML loads.
- Social Sharing: When users share links to your web pages on social media, server-rendered pages provide rich previews, improving the sharing experience.
Setting Up Your React Project
Before directly diving into the implementation of Server-Side Rendering (SSR) in a React application, you need to ensure your project is set up correctly. This section will guide you through the necessary steps to get your React project ready for SSR implementation.
Before starting your SSR journey, you should have some prerequisites in place:
- Node.js: Make sure you have Node.js installed on your development machine. SSR relies heavily on server-side JavaScript execution, and Node.js is the runtime environment that makes this possible.
- React Basics: A fundamental understanding of React is essential. Ensure you are familiar with React components, state management, and lifecycle methods.
Now, if you’re starting a new project from scratch, you can use the following steps:
- Initialize a New React Project: You can create a new React application using tools like Create React App, Next.js, or a custom setup. These tools provide a solid foundation for SSR. For example, with Create React App, you can initialize a new project by running:
npx create-react-app my-ssr-app - Custom SSR Setup: If you prefer more control over your project’s configuration, consider setting up SSR manually. This approach allows you to tailor your project to specific requirements. You can use Node.js, Express.js, and a bundler like Webpack for this purpose.
But if you already have an existing React project and want to introduce SSR, follow these steps:
- Review Project Structure: Examine your project’s structure and make any necessary adjustments to facilitate SSR. You’ll need to segregate client-side and server-side code, as we’ll discuss in the subsequent sections.
- Add SSR Dependencies: Install the necessary dependencies for SSR, such as Express.js and React Router, if you haven’t already. You can use npm or yarn for package management.
With your React project set up or modified to accommodate SSR, you’re now ready to proceed to the next sections, where we’ll explore the ideal project structure for SSR and begin integrating Express.js into your project for server-side rendering. This foundational preparation will be crucial for successfully implementing SSR in React.
Project Structure
To implement Server-Side Rendering (SSR) effectively in your React application, it’s crucial to establish a well-organized project structure. A clear project structure simplifies development, maintenance, and collaboration. In this section, we’ll discuss the recommended project structure for SSR in React.
One of the key principles in designing your project structure for SSR is the separation of concerns. By separating client-side and server-side code, you can ensure that your application remains organized, maintainable, and efficient.
Here’s how you can structure your project:
- Client-Side Code: This section contains code that is specific to the browser. It includes React components, client-side routing, and any code related to the user interface. Keep this code in a designated directory, such as
/src. - Server-Side Code: This section houses code that is specific to the server. It includes the server setup, routing on the server, and the server-rendered components. Store this code in a separate directory, often named
/serveror/server-rendering.
Your project structure should include the following key elements:
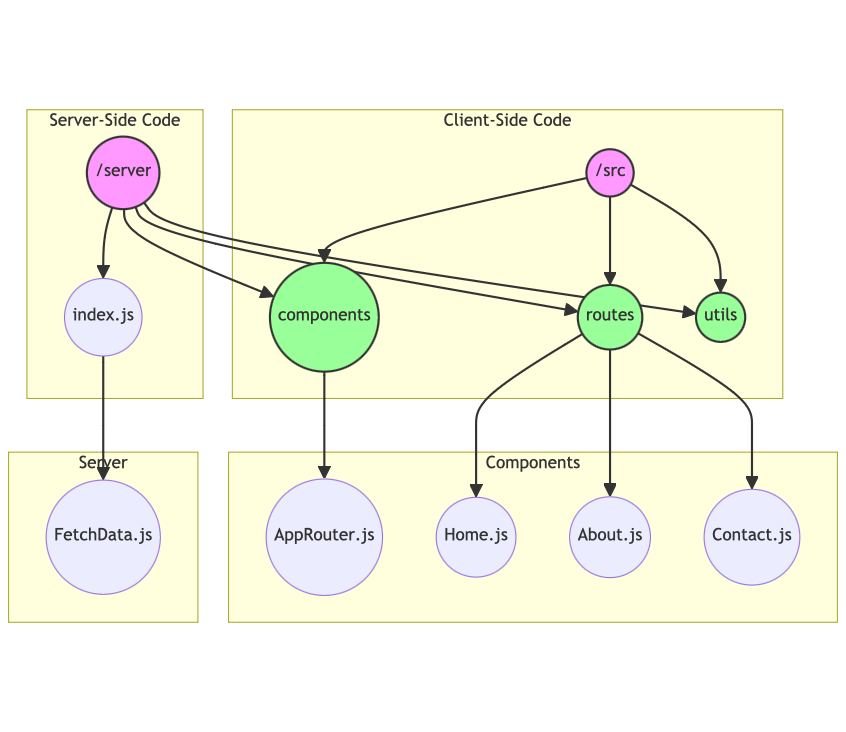
- Client-Side Code:
/src: The main source directory for client-side code, containing your React components, styles, and application logic./src/components: Organize your React components here./src/routes: Define client-side routes and route components for your application./src/utils: Store utility functions and shared code.
- Server-Side Code:
/server: The directory for server-side code./server/index.js: The entry point for your server-side application./server/routes: Define server-side routes and handlers./server/components: Place React components that are meant to be server-rendered here./server/utils: Store utility functions specific to server-side rendering.
A well-organized project structure will serve as a solid foundation for implementing SSR in your React application. With your code clearly separated into client-side and server-side concerns, you’ll be better equipped to manage and extend your application while keeping it maintainable and efficient. In the following sections, we will explore the integration of Express.js for setting up the server and React Router for handling client-side routing, further enhancing your SSR project.
Integrating Express.js
In this section, we will guide you through the process of integrating Express.js into your React project for Server-Side Rendering (SSR). This integration will serve as the foundation for setting up a server to handle SSR requests. Make sure you have your project structure ready as discussed in the previous section.
- First, navigate to your project’s root directory using your command line tool. This is where you should already have your React application set up.
- To add Express.js as a dependency to your project, run the following command:
npm install express
or if you prefer using Yarn:yarn add express
Creating the Express Server
In your project’s root directory, create a new JavaScript file, typically named server.js or index.js, which will serve as the entry point for your Express server.
In this server file, you’ll need to set up your Express application. Here’s a basic example of what the server setup might look like:
   const express = require('express');
   const app = express();
   const port = process.env.PORT || 3000; // You can choose your preferred port

   // Serve static assets from the build folder (your client-side code)
   app.use(express.static('build'));

   // Define your SSR route and rendering logic here

   app.listen(port, () => {
     console.log(`Server is running on port ${port}`);
});In this code, we’ve set up a basic Express application, specified a port to listen on, and added a middleware to serve static assets (i.e., your client-side code) from the build directory. Make sure to adjust the path to your client-side build directory accordingly.
To enable SSR, you’ll need to define a route that handles SSR rendering. For instance, you can create a route for rendering a specific page of your React application, or a catch-all route to handle different routes. Here’s an example route:
   app.get('*', (req, res) => {
     // Implement your SSR rendering logic here
});Within this route, you will implement the logic to render your React components on the server. You’ll typically use the ReactDOMServer module from React to achieve this. We’ll explore this in more detail in the upcoming sections.
With Express.js integrated into your project and the basic server setup in place, you’re now ready to move on to handling SSR, data fetching on the server, and the client-side hydration process. Express will serve as the backbone of your SSR React application, allowing you to respond to requests with server-rendered content and dynamically handle routing. This integration sets the stage for building a powerful SSR application.
Routing with React Router
In this section, we will walk you through the process of setting up client-side routing for your React application using React Router. This step is crucial for providing a seamless user experience and ensuring that your application behaves like a traditional single-page application (SPA) while benefiting from server-side rendering (SSR).
- To get started, make sure you’re in your project’s root directory in your command line tool.
- Install React Router by running the following command:
npm install react-router-dom
or if you prefer using Yarn:yarn add react-router-dom
Creating the Router
In your client-side code directory, i.e. /src, create a file to set up your React Router. This file will contain the routing configuration for your application.
Here’s a basic example of how to set up the routing in your React Router file:
   // src/AppRouter.js

   import React from 'react';
   import { BrowserRouter as Router, Route, Switch } from 'react-router-dom';

   // Import your React components for different routes
   import Home from './components/Home';
   import About from './components/About';
   import Contact from './components/Contact';

   const AppRouter = () => {
     return (
       <Router>
         <Switch>
           <Route path="/" exact component={Home} />
           <Route path="/about" component={About} />
           <Route path="/contact" component={Contact} />
         </Switch>
       </Router>
     );
   };

export default AppRouter;In this code, we’ve imported React Router components like BrowserRouter, Route, and Switch and used them to define the routes for your application. Adjust the routes and components as per your application’s requirements.
Integrating the Router
Finally, integrate the AppRouter component into your main application component. This component should wrap your entire application to enable client-side routing.
   // src/App.js

   import React from 'react';
   import AppRouter from './AppRouter';

   function App() {
     return (
       <div className="App">
         <AppRouter />
       </div>
     );
   }

export default App;With these steps, you’ve successfully set up client-side routing for your React application using React Router. The BrowserRouter component provides client-side navigation and handles the routing on the client side, allowing your application to behave like a traditional SPA.
Server-Side Rendering with ReactDOMServer
In this section, we will dive into the core concept of Server-Side Rendering (SSR) with ReactDOMServer in React. We’ll explore how to render React components on the server, pre-populate them with data, and send the resulting HTML to the client.
Introducing ReactDOMServer
- First, ensure you’ve structured your project as discussed in previous sections, and you have Express.js set up for server-side rendering.
- Import
reactandreact-domon the server. You might need to create a dedicated server entry point file (e.g.,server.js) to house your server-side rendering logic.
   // server.js

   import React from 'react';
import ReactDOMServer from 'react-dom/server';Server-Side Rendering Logic
Within your server route, add the server-side rendering logic to render React components. Here’s an example of how to render a React component and send it as HTML:
   // server.js

   app.get('*', (req, res) => {
     // Import your React component
     const App = require('./src/App').default;

     // Create an initial state, if needed
     const initialState = { /* Your initial state data */ };

     // Render the component to HTML
     const html = ReactDOMServer.renderToString(<App initialState={initialState} />);

     // Send the HTML to the client
     res.send(`
       <!DOCTYPE html>
       <html>
       <head>
         <title>Your SSR React App</title>
       </head>
       <body>
         <div id="app">${html}</div>
       </body>
       </html>
     `);
});The ReactDOMServer.renderToString method takes a React component as input and returns its HTML representation as a string. You can pass any initial state or data to the component as props.
Client-Side Hydration
To ensure a seamless transition to the client side and enable client-side interactivity, it’s essential to hydrate the HTML sent from the server. In your client-side JavaScript, use ReactDOM.hydrate to attach event handlers and make the application interactive:
   // src/client.js

   import React from 'react';
   import ReactDOM from 'react-dom';
   import App from './App';

   // Use ReactDOM.hydrate to add interactivity
ReactDOM.hydrate(<App />, document.getElementById('app'));With these steps, you’ve implemented Server-Side Rendering with ReactDOMServer in your React application. Your server now sends pre-rendered React components as HTML to the client, providing faster initial page loads and improved SEO, while the client-side hydration process ensures interactivity. In the next sections, we’ll explore data fetching on the server and other crucial aspects of SSR.
Data Fetching on the Server
In this section, we will guide you through the process of fetching data on the server for your React application’s Server-Side Rendering (SSR). Data fetching on the server is a crucial aspect of SSR, as it enables you to prepopulate your React components with data before sending them to the client.
Before we dive into the data fetching process, ensure that your project structure is set up correctly, and you’ve integrated Express.js and React Router as discussed in previous sections. Data fetching on the server often depends on the route and component that is being rendered.
Fetching Data with Express.js
Define a route handler in your Express server to handle SSR with data fetching. Within this route handler, you can use asynchronous code to fetch data from various sources like databases, APIs, or other services. For instance:
   // server.js

   app.get('/your-data-route', async (req, res) => {
     try {
       // Fetch data from a database, API, or other source
       const data = await fetchDataFromDatabase();

       // Import your React component
       const App = require('./src/App').default;

       // Render the component with fetched data
       const html = ReactDOMServer.renderToString(<App data={data} />);

       // Send the HTML to the client
       res.send(`
         <!DOCTYPE html>
         <html>
         <head>
           <title>Your SSR React App</title>
         </head>
         <body>
           <div id="app">${html}</div>
         </body>
         </html>
       `);
     } catch (error) {
       console.error('Data fetching error:', error);
       res.status(500).send('Server Error');
     }
});In the example above, we’ve added a new route handler /your-data-route that fetches data, renders the React component with the fetched data, and sends it to the client. If an error occurs during data fetching, we’ve set up an error handler to respond with a 500 status code.
Using Data in Your React Component
In your React component, access the data that was passed as a prop, and use it to populate your component’s content:
   // src/App.js

   import React from 'react';

   function App({ data }) {
     return (
       <div>
         <h1>Your SSR React App</h1>
         <p>Data from the server: {data}</p>
       </div>
     );
   }

export default App;By following these steps, you can fetch data on the server, incorporate it into your React components, and send pre-rendered components to the client. Data fetching on the server is a critical part of SSR, as it ensures that your application’s content is readily available to users upon the initial page load, improving performance and SEO. In the following sections, we’ll continue exploring other essential aspects of SSR.
Deployment and Production Build
In this section, we will guide you through the process of creating a production build for your server-side rendering (SSR) React application and suggest some popular platforms for deployment. Deployment decisions can vary depending on your specific needs, so we’ll provide options and let you choose the platform that best suits your requirements.
Before deployment, you need to generate a production-ready build of your React application. Use the build tools provided by your project setup, such as Create React App or your custom Webpack configuration, to create optimized production code. Here are the general steps:
Build your application by running: npm run build
This command compiles and minifies your JavaScript, CSS, and assets, resulting in a build directory containing the production-ready code.
Choosing a Deployment Platform
To deploy your SSR React application, consider several popular platforms:
- Heroku: Heroku provides an easy-to-use platform for deploying web applications. You can deploy your app via Git, containerization, or GitHub integration.
- AWS (Amazon Web Services): AWS offers a wide range of services for hosting applications, such as EC2 (Elastic Compute Cloud) for virtual servers, S3 for static assets, and Lambda for serverless functions.
- Vercel: Vercel is an excellent platform for hosting static and serverless applications. It seamlessly integrates with Git repositories and offers serverless functions for SSR.
- Netlify: Netlify is another popular option for hosting JAMstack applications. It supports serverless functions, continuous deployment, and easy custom domain setup.
- Firebase Hosting: Firebase Hosting is ideal for hosting web applications, especially if your project already uses Firebase for other features. It provides a content delivery network (CDN) and supports server-side rendering.
Deployment Process
The specific deployment process can vary based on your chosen platform. Each platform has its own set of tools and documentation to help you get started. Typically, you will need to:
- Create an account or log in to your chosen deployment platform.
- Configure your deployment settings, including specifying your build directory, setting environment variables, and linking your Git repository if necessary.
- Deploy your application to the platform, which might involve using CLI commands, Git integration, or direct uploads.
- Once deployed, you will receive a public URL where your SSR React application can be accessed.
Choose the deployment platform that aligns with your project’s requirements, development workflow, and scalability goals. It’s essential to thoroughly review each platform’s documentation to understand the specific deployment steps and consider factors like cost, scalability, and support for SSR as you make your decision. In the next section, we’ll address performance considerations for SSR applications.
Thus far, we’ve provided a comprehensive guide to implementing server-side rendering (SSR) in React, covering the fundamental steps involved. However, SSR is a complex topic with several nuances, and there are still more aspects to delve into. In the upcoming sections, we will address critical considerations such as SEO optimization and troubleshooting in detail.
Troubleshooting and Debugging
In this section, we will explore the common challenges that can arise during the implementation of server-side rendering (SSR) in a React application and provide a guide on troubleshooting and debugging these issues. Debugging is a critical skill in web development, and understanding how to address problems that may arise with SSR will help you maintain a smoothly running application.
Identifying Common SSR Issues
- Client-Side Hydration Errors: If you encounter issues with client-side hydration, check if the server-rendered HTML and the client-side JavaScript code are in sync. Ensure that React components are rehydrated correctly.
- Data Fetching Errors: Data fetching on the server can be tricky. If your data is not being fetched or populated correctly, review your server route for data fetching, error handling, and ensure the data is passed to the component properly.
- Client-Side Routing Problems: If client-side routes are not working as expected, verify that your routing configuration, such as React Router, is correctly set up on both the server and the client.
- Performance Bottlenecks: SSR can sometimes introduce performance bottlenecks. If your application is slow to render on the server, consider optimizations such as code splitting, caching, or utilizing serverless functions.
Debugging SSR Issues
When troubleshooting SSR issues, you can follow these steps:
- Check the Server Logs: Review server logs for any errors or exceptions. They can provide valuable insights into what’s going wrong on the server.
- Use Debugging Tools: Utilize browser development tools to inspect network requests, console logs, and the Elements panel to identify client-side issues during hydration.
- Console Logging: Place strategically located console logs in your code to track the flow of data and logic, both on the server and the client.
- Testing: Write tests for your server-side code, React components, and data-fetching logic to identify issues early in the development process.
Handling SSR Troubleshooting
- Error Handling: Implement proper error handling in your SSR code. This includes handling errors during data fetching, routing, and rendering. Return meaningful error responses when issues occur.
- Logging and Monitoring: Set up logging and monitoring for your SSR application. Tools like New Relic, Sentry, or custom logging solutions can help you track and diagnose problems.
- Version Control: Use version control systems like Git to track changes and easily revert to a known good state if issues arise.
Testing in a Development Environment
Before deploying SSR changes to production, thoroughly test your application in a development environment. This will help you identify and fix issues before they affect users.
- Local Testing: Test your SSR application locally to catch bugs early in the development process. Use local development servers and inspect console output for errors.
- Staging Environment: Create a staging or pre-production environment that closely mimics your production setup. Use this environment to test SSR changes in a controlled setting.
By following these troubleshooting and debugging guidelines, you can effectively address common issues that may arise during the implementation of SSR in your React application. Remember to use development tools, logs, and thorough testing to identify and resolve problems efficiently. In the next section, we’ll explore best practices for optimizing the performance of SSR applications.
SEO Optimization
In this section, we will explore how to optimize your React application for search engine optimization (SEO) when implementing server-side rendering (SSR). SEO is a critical aspect of web development, and SSR provides a significant advantage in this regard. By pre-rendering your pages on the server, you ensure that search engines can easily crawl and index your content, leading to better search rankings and increased visibility.
SEO Benefits of SSR
Server-side rendering offers several key advantages for SEO:
- Improved Indexing: SSR allows search engine bots to quickly discover and index the content of your web pages. This results in better visibility in search engine results pages (SERPs).
- Content Accessibility: With pre-rendered content, your web pages load faster, making them accessible to both users and search engines. This enhances the user experience and search engine ranking.
- Rich Previews: Server-rendered pages typically provide rich previews when shared on social media or other platforms, increasing the chances of user engagement and click-throughs.
SEO Considerations
To maximize SEO benefits with SSR:
- Meta Tags: Ensure your server-rendered pages contain the appropriate meta tags, including title, description, and social media meta tags.
- Proper URL Structure: Implement clean and meaningful URLs for your web pages. This makes it easier for users and search engines to understand the content.
- Structured Data: Use structured data (schema.org) to provide additional context to search engines, improving the chances of rich snippets in search results.
- Mobile-Friendly Design: Maintain a mobile-friendly design and optimize page speed for better search rankings, especially in mobile search.
By following these SEO best practices and implementing server-side rendering in your React application, you can significantly enhance your website’s visibility and ranking on search engines, driving more organic traffic and providing a better user experience. In the subsequent sections, we will continue to explore additional aspects of SSR, including performance considerations and the deployment process.
Conclusion
Throughout this comprehensive guide, we’ve covered the essential steps to implement server-side rendering in React, offering you a solid foundation for creating high-performance web applications. You’ve learned the significance of SSR, from SEO benefits to improved initial page load times. You’ve explored how to set up your project, integrate Express.js, handle client-side routing, and perform server-side rendering with data fetching. We’ve discussed deployment options, including popular platforms, and offered insights into debugging and troubleshooting common issues.
By mastering these techniques, you can take full advantage of SSR to build web applications that are not only search engine-friendly but also provide an exceptional user experience. Remember to stay updated with the latest practices and continually refine your SSR skills to ensure your React applications perform at their best. Server-side rendering is a powerful tool, and with practice, you can harness its potential to create lightning-fast and SEO-optimized web applications.