In today’s increasingly mobile-centric world, app users expect a seamless experience regardless of their internet connectivity. That’s where offline support comes into play. In this guide, we will walk you through the process of implementing Firebase offline support in a React Native app. Please note that this guide assumes you have a fundamental understanding of React Native and Firebase.
When developing a mobile app, one of the key challenges is ensuring that it remains functional even when the user’s device goes offline. This is where Firebase, Google’s mobile and web application development platform, can be a powerful ally. Firebase provides a range of tools to make your app work smoothly in offline mode, and we’ll explore those in this guide.
Before we dive into the specifics, let’s establish the prerequisites you need to have in place for this implementation. Once you have these in order, you’ll be ready to embark on the journey of creating a reliable offline experience for your React Native app users.
Prerequisites:
Before you get started with implementing Firebase offline support in your React Native app, you need to ensure that you have a few essential elements in place. Here are the prerequisites:
- React Native Development Environment:
Make sure you have a working React Native development environment set up. If you haven’t already, you can follow the official React Native installation guide: React Native Getting Started. - Firebase Project Setup:
You should have an active Firebase project created on the Firebase Console. If you don’t have one, follow these steps to set up your project:- Go to the Firebase Console and click on “Add Project.”
- Follow the setup wizard to configure your project details.
- Once your project is created, make a note of your Firebase project’s configuration, which you’ll use to initialize Firebase in your React Native app.
- React Native Firebase Library:
To connect your React Native app to Firebase, you’ll need to have the@react-native-firebase/apppackage installed. You can add it to your project using npm or yarn:npm install @react-native-firebase/app
# oryarn add @react-native-firebase/app
Make sure to follow the installation instructions provided by the library, including any native module linking that may be required.
With these prerequisites in place, you are ready to proceed with configuring your Firebase project for offline support and integrating it into your React Native app.
Setting Up Firebase Offline Support:
To enable Firebase offline support in your React Native app, you need to configure Firebase to work seamlessly in offline mode. Follow these steps to set up Firebase for offline support:
- Enabling Firebase Offline Persistence:
Firebase Offline Persistence allows your app to store data locally and synchronize it with the server when the device regains an internet connection. To enable this feature, you need to do the following: In your app’s main entry point (typically inApp.jsorindex.js), initialize Firebase, and enable offline persistence using the following code:
   import { AppRegistry } from 'react-native';
   import App from './App';
   import { name as appName } from './app.json';
   import { initializeApp } from '@react-native-firebase/app';

   const firebaseConfig = {
     // Your Firebase project configuration here
   };

   // Initialize Firebase
   initializeApp(firebaseConfig, {
     persistence: true, // Enable Firebase offline persistence
   });

AppRegistry.registerComponent(appName, () => App);Replace 'Your Firebase project configuration here' with your actual Firebase project configuration details. By setting persistence: true, you enable Firebase offline persistence for your app.
- Handling Authentication for Offline Users:
If your app requires user authentication, Firebase also supports offline authentication. When a user logs in or is authenticated while offline, Firebase will remember their authentication status and update it with the server when online. There’s no additional code required for this; Firebase handles it automatically.
With these setup steps completed, your Firebase project is configured to provide offline support for your React Native app. The app can now cache data locally and sync it with the Firebase server once a connection is reestablished.
Initializing Firebase in Your React Native App:
Now that you’ve configured Firebase for offline support, the next step is to initialize Firebase in your React Native project. This allows your app to interact with Firebase services seamlessly. Here’s how to do it:
- Import Required Modules:
In your React Native project, you need to import the Firebase module. Depending on your project structure, you might do this in yourApp.js,index.js, or another appropriate entry point for your app.
   import { AppRegistry } from 'react-native';
   import App from './App';
   import { name as appName } from './app.json';
   import { initializeApp } from '@react-native-firebase/app';
   import { getFirestore } from '@react-native-firebase/firestore'; // Import Firestore

   const firebaseConfig = {
     // Your Firebase project configuration here
   };

   // Initialize Firebase
   initializeApp(firebaseConfig, {
     persistence: true,
   });

const firestore = getFirestore(); // Initialize FirestoreMake sure to import the appropriate Firebase module for the services you plan to use in your app. In this example, we’ve imported Firestore using @react-native-firebase/firestore. Replace 'Your Firebase project configuration here' with your actual Firebase project configuration details.
- Accessing Firebase Services:
Now, you can access Firebase services throughout your app using thefirestoreobject (or other Firebase service objects, depending on your needs). For example, to create a reference to a Firestore collection and add a document, you can use the following code:
   import { collection, addDoc } from '@react-native-firebase/firestore';

   const exampleCollectionRef = collection(firestore, 'exampleCollection');

   // Add a document to the collection
   addDoc(exampleCollectionRef, {
     field1: 'Value1',
     field2: 'Value2',
});You can replace 'exampleCollection' with the name of your Firestore collection and customize the fields and values accordingly.
By initializing Firebase in your React Native app and importing the necessary modules, your app is now ready to work with Firebase services both online and offline.
Firestore offline Data Caching:
Firestore seamlessly handles offline data caching. This means that your React Native app can access and modify Firestore data even when the device is offline. Firestore automatically caches the necessary data for offline use and synchronizes it with the server when a connection is re-established.
How Firestore Caches Data Automatically?
Firestore’s automatic data caching simplifies your app’s offline functionality. Here’s how it works:
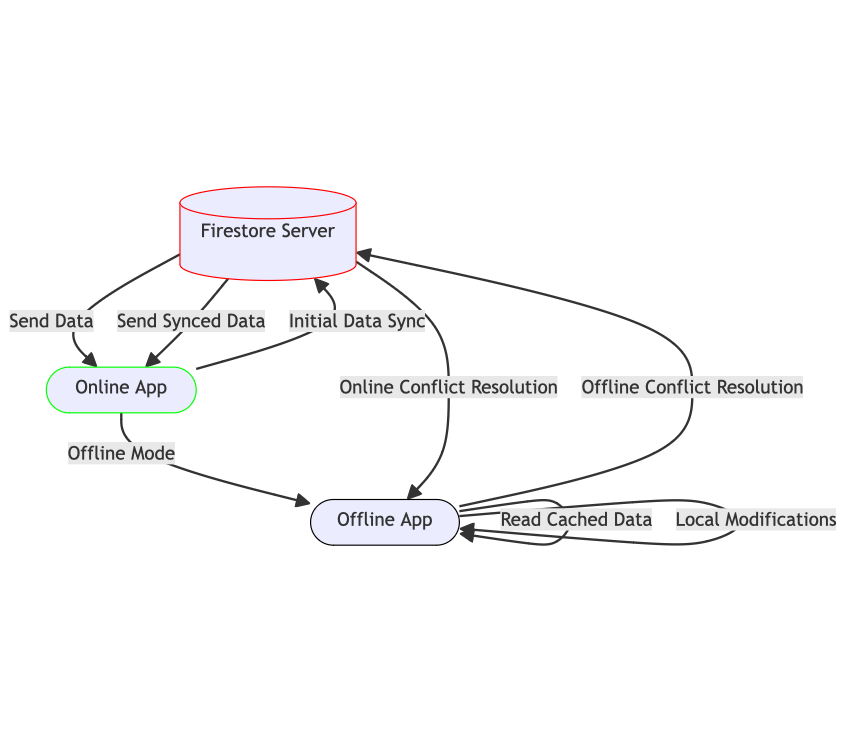
- Initial Data Synchronization:
When your app is online, Firestore syncs data with the Firebase server. Any data that your app reads is automatically cached locally. This includes documents, collections, and queries. - Offline Access:
When your app goes offline, Firestore automatically switches to the cached data mode. This means your app can still read, write, and query data, even without an internet connection. - Local Modifications:
While offline, any data modifications made by your app, such as creating new documents or updating existing ones, are stored in the local cache. Firestore acknowledges these changes as pending writes. - Conflict Resolution:
In the event of concurrent edits (e.g., multiple users making changes while offline), Firestore handles conflict resolution once the app reconnects to the server. You can define custom rules for conflict resolution, or Firestore may use a “last-write-wins” approach.
Here’s an example of how you can work with Firestore in your React Native app, both online and offline:
import { collection, getDocs, addDoc } from '@react-native-firebase/firestore';

const exampleCollectionRef = collection(firestore, 'exampleCollection');

// Reading data (automatically uses cached data if offline)
getDocs(exampleCollectionRef)
  .then((querySnapshot) => {
    querySnapshot.forEach((doc) => {
      console.log('Document data:', doc.data());
    });
  })
  .catch((error) => {
    console.error('Error getting documents: ', error);
  });

// Adding a document (cached locally when offline, synced when online)
addDoc(exampleCollectionRef, {
  field1: 'Value1',
  field2: 'Value2',
})
  .then((docRef) => {
    console.log('Document written with ID: ', docRef.id);
  })
  .catch((error) => {
    console.error('Error adding document: ', error);
});Firestore’s automatic data caching simplifies the development of offline-capable React Native apps. It ensures that your app remains functional and can interact with Firestore data even when there’s no internet connection.
Real-time Database Data Persistence:
In addition to Firestore, Firebase provides a Real-time Database that allows your React Native app to persist data locally and synchronize it with the server when the device is back online. Here’s how to enable data persistence for Firebase Real-time Database:
- Enable Offline Data Persistence:
Firebase Real-time Database also supports data persistence. By default, Firebase Real-time Database stores data in memory, which means that data is lost when the app is closed or restarted. To enable data persistence, you can setdatabasePersistenceEnabledtotrueduring initialization.
   import { initializeApp } from '@react-native-firebase/app';
   import { getDatabase } from '@react-native-firebase/database';

   const firebaseConfig = {
     // Your Firebase project configuration here
   };

   // Initialize Firebase with data persistence enabled
   const firebaseApp = initializeApp(firebaseConfig, {
     persistence: true,
     databaseURL: 'https://your-firebase-project.firebaseio.com',
   });

const database = getDatabase(firebaseApp);Ensure you replace 'https://your-firebase-project.firebaseio.com' with your actual Firebase Real-time Database URL.
- Working with Real-time Database Offline:
With data persistence enabled, Firebase Real-time Database stores a local copy of your data on the device. Your app can read, write, and listen to data even when offline. Any changes made in offline mode are stored locally and will be synchronized with the server once the device is back online. Here’s an example of reading and writing data with Firebase Real-time Database:
   import { ref, get, set } from '@react-native-firebase/database';

   const exampleRef = ref(database, 'exampleData');

   // Reading data (uses cached data when offline)
   get(exampleRef)
     .then((snapshot) => {
       if (snapshot.exists()) {
         console.log('Data:', snapshot.val());
       } else {
         console.log('Data not found');
       }
     })
     .catch((error) => {
       console.error('Error reading data: ', error);
     });

   // Writing data (saves data locally when offline, syncs when online)
   set(exampleRef, {
     field1: 'Value1',
     field2: 'Value2',
   })
     .then(() => {
       console.log('Data written successfully');
     })
     .catch((error) => {
       console.error('Error writing data: ', error);
});By enabling data persistence for Firebase Real-time Database, your React Native app can offer a consistent user experience, whether online or offline. The database seamlessly stores and synchronizes data, ensuring that your app remains functional and responsive in various network conditions.
Caching Data Locally:
In addition to Firebase’s built-in caching mechanisms, you may want to implement your own data caching strategy for specific use cases in your React Native app. This allows you to have more control over the cached data and how it’s managed. Here’s how you can cache data locally in your app:
- Using AsyncStorage:
React Native provides theAsyncStoragemodule, which is a simple key-value store that can be used to cache data locally on the device. You can use it to store data that needs to be accessible when the app is offline. Here’s an example of how to useAsyncStorageto cache data:
   import AsyncStorage from '@react-native-async-storage/async-storage';

   // Storing data
   const dataToCache = {
     key: 'value',
     anotherKey: 'anotherValue',
   };

   AsyncStorage.setItem('cachedData', JSON.stringify(dataToCache))
     .then(() => {
       console.log('Data cached successfully');
     })
     .catch((error) => {
       console.error('Error caching data: ', error);
     });

   // Retrieving cached data
   AsyncStorage.getItem('cachedData')
     .then((cachedData) => {
       if (cachedData) {
         const parsedData = JSON.parse(cachedData);
         console.log('Cached data:', parsedData);
       } else {
         console.log('No cached data found');
       }
     })
     .catch((error) => {
       console.error('Error retrieving cached data: ', error);
});With AsyncStorage, you can store and retrieve data as needed, providing a level of flexibility and control over your app’s local caching strategy.
- Implementing Custom Caching Logic:
Depending on the complexity of your app and specific requirements, you may choose to implement custom caching logic using local databases or other storage solutions. This allows you to fine-tune how data is cached and managed in your app.
For custom caching solutions, you’ll need to set up your chosen storage mechanism and implement your caching and retrieval logic accordingly.
By incorporating your own local data caching strategy, you can ensure that specific data is always available for your React Native app, even when the device is offline. This can be particularly useful for scenarios where you want to provide users with specific cached content or reduce network requests for frequently used data.
Handling Data Sync When Online:
One of the key advantages of Firebase is its seamless data synchronization with the server when your React Native app is back online. Here, we’ll explore how to handle data synchronization effectively when the app regains an internet connection.
- Automatic Data Sync:
Firebase handles data synchronization automatically when your app transitions from offline to online. Any changes made to your data while offline are queued and synchronized with the server. - Real-time Updates:
Firebase offers real-time data synchronization. This means that any changes made by other users or devices are automatically pushed to your app in real time. You can listen for updates to specific data nodes and react to changes as they occur. Here’s an example of how to listen for real-time updates to a Firebase Real-time Database node:
   import { ref, onValue } from '@react-native-firebase/database';

   const exampleRef = ref(database, 'exampleData');

   // Listen for real-time updates to the data
   onValue(exampleRef, (snapshot) => {
     if (snapshot.exists()) {
       const data = snapshot.val();
       console.log('Real-time update:', data);
     } else {
       console.log('Data not found');
     }
});This code sets up a listener for changes to the ‘exampleData’ node and automatically updates your app’s data when changes occur.
- Handling Data Conflict Resolution:
If multiple users or devices make conflicting changes to the same data while offline, Firebase provides conflict resolution strategies. By default, Firebase may use a “last-write-wins” approach, but you can also implement your own custom rules for conflict resolution. To define custom conflict resolution rules, you can use Firebase Security Rules. These rules allow you to specify how conflicts should be resolved based on your app’s requirements.
By effectively handling data synchronization when the app is back online, your React Native app can provide users with a real-time, up-to-date experience. Whether it’s real-time chat messages, live updates to shared documents, or any other data-driven feature, Firebase simplifies the process of keeping your app in sync with the server.
Handling Data Conflicts:
In a distributed environment where multiple users or devices can access and modify data, data conflicts may arise. Firebase provides mechanisms to handle these conflicts effectively, ensuring data consistency. Here’s how to manage data conflicts in your React Native app:
- Default Conflict Resolution (Last-Write-Wins):
By default, Firebase uses a “last-write-wins” strategy to resolve data conflicts. When conflicts occur, the most recent write operation is considered the winner, and its changes are applied to the data. For instance, if two users modify the same data simultaneously, the change made by the user who writes the last update will take precedence. - Custom Conflict Resolution Rules:
While the default conflict resolution may work for many scenarios, your app might have specific requirements that demand a custom approach. Firebase allows you to define custom conflict resolution rules using Firebase Security Rules.
These rules determine how conflicts should be resolved based on your app’s unique logic. You can specify which changes should take precedence and how to merge conflicting data. Here’s a simple example of a custom rule that ensures users can only update their data and restricts access to others’ data:
   {
     "rules": {
       ".read": "auth != null",
       ".write": "auth != null",
       "users": {
         "$uid": {
           ".validate": "newData.child('uid').val() === auth.uid",
           "data": {
             ".validate": "newData.child('uid').val() === auth.uid",
           }
         }
       }
     }
}In this rule, users are only allowed to write data if the uid in the new data matches their authentication UID. This rule ensures that users can only modify their own data.
By implementing custom conflict resolution rules or relying on the default “last-write-wins” strategy, your React Native app can effectively manage data conflicts and maintain data integrity. Firebase’s flexible approach enables you to tailor the conflict resolution process to your app’s specific needs.
Implementing a Network Status Indicator:
Having a clear and user-friendly network status indicator in your React Native app is crucial to informing users about their connectivity status. Implementing such an indicator helps users understand whether they are online or offline, enhancing their experience. Here’s how to add a network status indicator to your app:
- Check Network Connectivity:
React Native provides a handy library calledNetInfothat allows you to monitor network connectivity. You can install it using npm or yarn:npm install @react-native-community/netinfo
# oryarn add @react-native-community/netinfo
- Initialize NetInfo:
ImportNetInfoand initialize it in your app to listen for network state changes:
   import NetInfo from '@react-native-community/netinfo';

   NetInfo.addEventListener((state) => {
     console.log('Connection type:', state.type);
     console.log('Is connected?', state.isConnected);
});The state object provides information about the current network state, including the connection type and whether the device is connected.
- Display Network Status to Users:
Create a user interface component that displays the network status to users. You can use a simple text message or an icon to indicate whether the app is online or offline. Here’s an example of displaying a network status message in your app:
   import React, { useState, useEffect } from 'react';
   import { View, Text } from 'react-native';
   import NetInfo from '@react-native-community/netinfo';

   const NetworkStatusIndicator = () => {
     const [isConnected, setIsConnected] = useState(true);

     useEffect(() => {
       const unsubscribe = NetInfo.addEventListener((state) => {
         setIsConnected(state.isConnected);
       });

       return () => unsubscribe();
     }, []);

     return (
       <View>
         {isConnected ? (
           <Text style={{ color: 'green' }}>Online</Text>
         ) : (
           <Text style={{ color: 'red' }}>Offline</Text>
         )}
       </View>
     );
   };

export default NetworkStatusIndicator;This component listens for network state changes and displays “Online” or “Offline” based on the current network status.
- Integrate the Network Status Indicator:
Finally, integrate theNetworkStatusIndicatorcomponent into your app’s user interface, making it visible to users.
   import React from 'react';
   import { View, Text } from 'react-native';
   import NetworkStatusIndicator from './NetworkStatusIndicator';

   const App = () => {
     return (
       <View>
         <Text>My App Content</Text>
         <NetworkStatusIndicator />
       </View>
     );
   };

export default App;By implementing a network status indicator in your React Native app, you enhance the user experience by providing clarity about their connectivity status. Users can easily determine whether they are online or offline, allowing them to make informed decisions within your app.
Testing Firebase Offline Support:
Before deploying your React Native app with Firebase offline support, it’s crucial to thoroughly test its behavior in offline and online conditions. Ensuring that your app functions as expected is essential for a seamless user experience. Here’s how to test offline support effectively:
- Simulate Offline Conditions: You can simulate offline conditions during development to test how your app behaves. This allows you to verify that data is cached correctly and that your app gracefully handles a lack of internet connectivity.
- Testing Tools: Consider using testing tools and libraries that allow you to simulate offline and online states in your app. For React Native, libraries like
react-native-offlinecan help with this. You can install it using npm or yarn:npm install react-native-offline
# oryarn add react-native-offline
- Offline Testing Scenarios: Test your app’s offline capabilities in various scenarios, such as:
- Loading cached data when the app starts without internet connectivity.
- Ensuring that new data created while offline is cached and synchronized when back online.
- Validating that real-time updates are paused during offline mode and resumed when online.
- User Interface Feedback: Provide visual feedback to users when the app is in offline mode. Indicate clearly that the app is offline and any changes they make will be synchronized later.
- Conflict Resolution Testing: Create test cases for handling data conflicts and test them thoroughly. Confirm that your app resolves conflicts according to your defined rules.
- Network Transition Testing: Test how your app handles transitions between offline and online modes. Ensure that pending data is synchronized correctly and in the right order.
- Unit Testing: If you have implemented custom caching or conflict resolution logic, conduct unit tests to verify the correctness of these components under various scenarios.
- User Testing: Finally, consider involving users or testers in the offline support testing process. They can provide valuable feedback on real-world usage and uncover potential issues that may not be apparent during development.
By conducting comprehensive testing of your app’s offline support, you can identify and resolve any issues related to offline data caching, synchronization, conflict resolution, and user experience. Testing ensures that your React Native app with Firebase provides a reliable and seamless experience for users, whether they are online or offline.
Conclusion:
In this guide, we’ve explored the process of implementing Firebase offline support in a React Native app. By enabling Firebase offline persistence and initializing it in your app, you can ensure a seamless user experience, even in the absence of an internet connection. We discussed how Firebase automatically caches data for offline use and handles real-time data synchronization when the app is back online. We covered the concepts of data conflict resolution and provided guidelines for testing your app’s offline capabilities. Additionally, we introduced the idea of implementing a network status indicator to inform users of their connectivity status, enhancing the user experience.
By following these steps and understanding the core principles of firebase offline persistence, you can create robust and reliable React Native applications that cater to the needs of users in diverse network conditions. Firebase’s powerful features simplify the process of implementing offline support, making it a valuable choice for building mobile applications that work seamlessly whether online or offline.
Additional Resources:
Here are some reading resources to further explore Firebase offline support in React Native:
- Firebase Documentation: The official Firebase documentation will provide you with in-depth information about using Firebase services, including offline support.
- React Native Firebase Documentation: The React Native Firebase documentation will offer you specific guidance on using Firebase with React Native, including offline data persistence.
- NetInfo Documentation: The NetInfo library documentation will help you understand how to monitor network connectivity in your React Native app.
- React Native Offline Documentation: The React Native Offline library documentation will provide you with details on how to simulate offline and online conditions for testing purposes.
These resources offer comprehensive information and tutorials to enhance your understanding of offline support and Firebase integration in React Native.


