Jake’s resume is one of the most widely shared LaTeX resume templates: a single-column, one-page layout with clean section rules and right-aligned dates. This guide shows how to open Jake’s resume template in Overleaf or compile it locally, how each custom command works, how to edit every section, and how to fix the compile errors people hit most often. Every LaTeX snippet below was compiled for this article.
TL;DR
- Open the template from its Overleaf page with Open as Template, or copy
resume.texfrom the GitHub repository (MIT license, by Jake Gutierrez). - Edit the content between
\begin{document}and\end{document}. Leave the custom commands in the preamble alone unless you want to change the layout. - The template is written for pdfLaTeX. On XeLaTeX, LuaLaTeX or Tectonic it stops at
\pdfglyphtounicode; wrap two lines in\ifPDFTeX(shown below) and it compiles. - Escape
&,%and$as\&,\%and\$. Most broken builds come from these three characters.
What is Jake’s resume template?
Jake Gutierrez published the template in 2020, based on Sourabh Bajaj’s earlier LaTeX resume. It is released under the MIT license, so you can use and modify it freely. The sample content uses the placeholder name “Jake Ryan”, which is why you will see that name in every copy.
Three things explain its popularity with students and engineers:
- One column, no graphics. Applicant tracking systems (ATS) read the text in order, with no sidebars or icons to confuse the parser.
- Machine-readable PDF. The preamble loads
glyphtounicodeand sets\pdfgentounicode=1, so pdfLaTeX writes a Unicode map and copied text comes out as real letters. - Short, reusable commands. Each entry is one command with four arguments, so adding a job takes seconds and spacing stays consistent.
If LaTeX itself is new to you, start with our beginner LaTeX tutorial, then come back here.
How to open Jake’s resume in Overleaf
- Go to the Jake’s Resume template page on Overleaf and sign in.
- Click Open as Template. Overleaf copies the project into your account.
- Rename the project from the project menu so you can find it later.
- Edit
resume.texand press Recompile to refresh the PDF preview. - Download the PDF from the download icon above the preview.
We confirmed the template page and the Open as Template button exist, but we did not click through these steps inside an Overleaf account for this article. Overleaf compiles with pdfLaTeX by default, which is the engine the template was written for. For a tour of the editor, see our Overleaf guide.
How to compile Jake’s resume locally (XeLaTeX, LuaLaTeX or Tectonic)
We compiled the unmodified resume.tex from the GitHub repository with Tectonic 0.17.0, which uses the XeTeX engine. It failed straight away:
! Undefined control sequence.
l.7 \pdfglyphtounicode
                      {A}{0041}
glyphtounicode and \pdfgentounicode are pdfTeX primitives, so XeTeX and LuaTeX do not know them. Those engines already write Unicode text into the PDF, so you only need the lines under pdfLaTeX. Replace the \input{glyphtounicode} line with this block and delete the later \pdfgentounicode=1 line:
\usepackage{iftex}
\ifPDFTeX
  \input{glyphtounicode}
  \pdfgentounicode=1
\fi
With that change the template compiled with Tectonic with no errors. Under pdfLaTeX the \ifPDFTeX branch keeps the original two lines, so nothing should change there, but we had no pdfLaTeX install to confirm it. The command we used:
tectonic -X compile my-resume.texHow the template is organized
The file has two halves. The preamble (everything before \begin{document}) loads packages, sets the margins and defines the custom commands. The body holds your content. Here is the most important command, exactly as it appears in the template:
\newcommand{\resumeSubheading}[4]{
  \vspace{-2pt}\item
    \begin{tabular*}{0.97\textwidth}[t]{l@{\extracolsep{\fill}}r}
      \textbf{#1} & #2 \\
      \textit{\small#3} & \textit{\small #4} \\
    \end{tabular*}\vspace{-7pt}
}
It draws a two-row table: argument 1 in bold on the left, argument 2 on the right, then arguments 3 and 4 in small italics underneath. The other commands follow the same pattern:
| Command | Arguments | Use it for |
|---|---|---|
\resumeSubheading | 4: left top, right top, left bottom, right bottom | Jobs and degrees |
\resumeSubSubheading | 2: title, dates | A second role at the same company |
\resumeProjectHeading | 2: title line, date | Projects, certifications, awards |
\resumeItem | 1: the bullet text | One bullet point |
\resumeSubHeadingListStart / End | none | Wrap every group of headings |
\resumeItemListStart / End | none | Wrap every group of bullets |
The order of the arguments in \resumeSubheading is the same everywhere, but what you put in them is up to you. The sample uses organization, location, role, dates for Education and role, dates, organization, location for Experience. Pick one order and keep it for the whole page.
How to customize each section
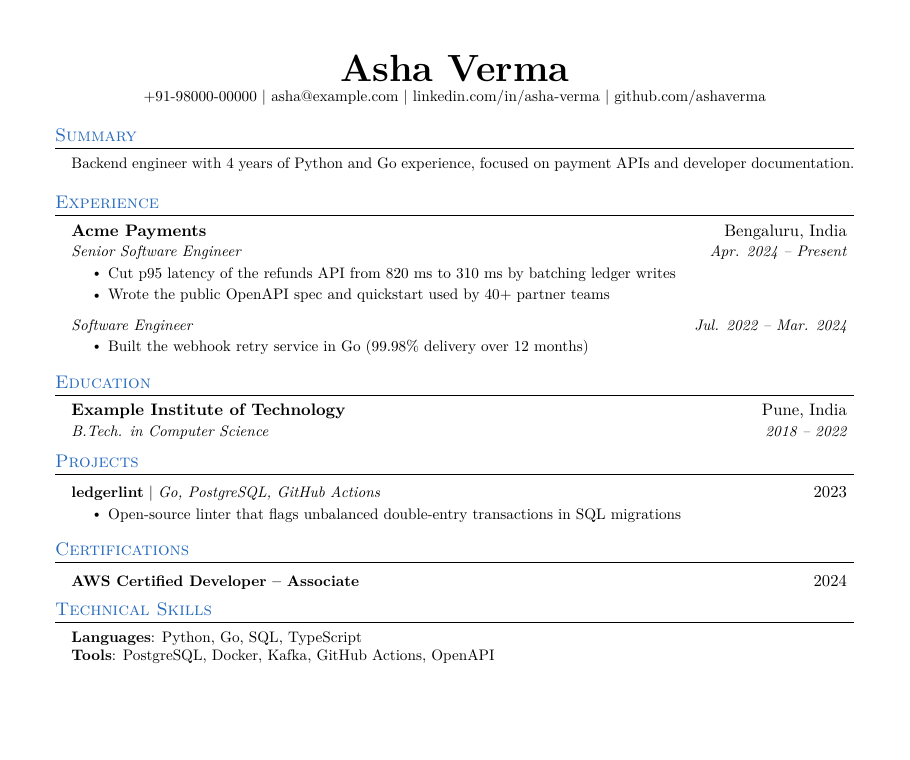
The example below is the version we built and compiled: a backend engineer’s one-page resume. Copy the parts you need into your own file.
Header: name and contact links
The original wraps each link text in \underline{}. We removed it for a cleaner line; links still work because hyperref is loaded with hidelinks.
\begin{center}
    \textbf{\Huge \scshape Asha Verma} \\ \vspace{1pt}
    \small +91-98000-00000 $|$ \href{mailto:[email protected]}{[email protected]} $|$
    \href{https://linkedin.com/in/asha-verma}{linkedin.com/in/asha-verma} $|$
    \href{https://github.com/ashaverma}{github.com/ashaverma}
\end{center}
Experience, including two roles at one company
Use \resumeSubheading for the company and the latest role, then \resumeSubSubheading for the earlier role. Each role gets its own bullet list. (The commented-out example in the original file passes two arguments to \resumeItem and closes the outer list too early, so do not copy it as is.)
\section{Experience}
  \resumeSubHeadingListStart

    \resumeSubheading
      {Acme Payments}{Bengaluru, India}
      {Senior Software Engineer}{Apr. 2024 -- Present}
      \resumeItemListStart
        \resumeItem{Cut p95 latency of the refunds API from 820 ms to 310 ms by batching ledger writes}
        \resumeItem{Wrote the public OpenAPI spec and quickstart used by 40+ partner teams}
      \resumeItemListEnd
    \resumeSubSubheading
      {Software Engineer}{Jul. 2022 -- Mar. 2024}
      \resumeItemListStart
        \resumeItem{Built the webhook retry service in Go (99.98\% delivery over 12 months)}
      \resumeItemListEnd

  \resumeSubHeadingListEnd
Note the \% in the last bullet. A bare % starts a LaTeX comment and breaks the build (see the errors section).
Add a Summary section
The template has no summary. This block reuses the borderless list from the skills section, so the indent matches the rest of the page (the label={} option comes from the enumitem package):
\section{Summary}
 \begin{itemize}[leftmargin=0.15in, label={}]
    \small{\item{Backend engineer with 4 years of Python and Go experience, focused on payment APIs and developer documentation.}}
 \end{itemize}
Add Certifications or Awards
\resumeProjectHeading gives a bold title with a right-aligned date, which suits certifications:
\section{Certifications}
  \resumeSubHeadingListStart
    \resumeProjectHeading
      {\textbf{AWS Certified Developer -- Associate}}{2024}
  \resumeSubHeadingListEnd
Technical skills
Each line is a bold label followed by a list. End every line except the last with \\:
\section{Technical Skills}
 \begin{itemize}[leftmargin=0.15in, label={}]
    \small{\item{
     \textbf{Languages}{: Python, Go, SQL, TypeScript} \\
     \textbf{Tools}{: PostgreSQL, Docker, Kafka, GitHub Actions, OpenAPI}
    }}
 \end{itemize}
Reorder or remove sections
Each section is a self-contained block that starts with \section{...} and ends with the matching ...ListEnd. Cut and paste whole blocks to reorder them. Experienced engineers usually put Experience above Education; students often do the reverse.
Change the paper size, color and font
A4 instead of US Letter
The template uses letterpaper. For A4, change the first line to:
\documentclass[a4paper,11pt]{article}Check the page count after switching: A4 is narrower than Letter, so long lines can wrap and push content onto a second page.
Colored section headings
Swap the color package for xcolor (same options) and add a color to the section format. The rule under the heading stays black:
\usepackage[usenames,dvipsnames]{xcolor}\titleformat{\section}{
\vspace{-4pt}\scshape\raggedright\large\color{NavyBlue}
}{}{0em}{}[\color{black}\titlerule \vspace{-5pt}]For more control over the rule itself, see our guide to LaTeX horizontal lines.
Fonts
The preamble lists commented-out font packages such as charter and FiraSans; under pdfLaTeX you uncomment one line. Under XeTeX we found a catch: uncommenting \usepackage{charter} alone produced Font shape `TU/bch/m/n' undefined warnings, the PDF fell back to Latin Modern, and bold and small caps disappeared. Loading the T1 font encoding first fixed it:
\usepackage[T1]{fontenc}
\usepackage{charter}
One more thing to check after any font change: with Charter, pdftotext read our small-caps headings as “S UMMARY” and “E XPERIENCE”, with a space after the first letter. The default font extracted cleanly. If ATS parsing matters to you, keep the default font or test the PDF as shown next.
Is Jake’s resume ATS-friendly? How to check your PDF
The layout is ATS-friendly by design, but your edits can change that. The quickest check is to extract the text and read it in order. We ran pdftotext (from Poppler) on our build:
pdftotext -layout my-resume-default.pdf - | head -7 Asha Verma
+91-98000-00000 | [email protected] | linkedin.com/in/asha-verma | github.com/ashaverma
Summary
Backend engineer with 4 years of Python and Go experience, focused on payment APIs and developer documentation.
ExperienceThe name, contact line and headings come out as normal words in reading order, which is what a parser needs. We tested the XeTeX build only; we did not run a pdfLaTeX build or any commercial ATS. If you do not have Poppler, open the PDF, select all, paste into a plain-text editor and check the result the same way.
Common Jake’s resume errors and how to fix them
We broke our working file on purpose to capture these exact messages:
| Error message | Cause | Fix |
|---|---|---|
Forbidden control sequence found while scanning use of \check@nocorr@ | A bare & inside a heading argument, e.g. {Acme Payments & Co}. Inside the template’s table, & means “next column”. | Write \&, as the sample does in Texas A\&M. |
File ended while scanning use of \resumeItem | A bare % in a bullet. Everything after it, including the closing brace, becomes a comment. | Write \%. |
\begin{itemize} on input line … ended by \end{document} | A missing \resumeSubHeadingListEnd (or \resumeItemListEnd). | Add the matching …ListEnd at the end of the section. |
Lonely \item--perhaps a missing list environment | A \resumeItem outside any list. | Put bullets between \resumeItemListStart and \resumeItemListEnd. |
Undefined control sequence at \pdfglyphtounicode | Compiling with XeLaTeX, LuaLaTeX or Tectonic. | Use the \ifPDFTeX block above, or switch the compiler to pdfLaTeX. |
LaTeX reports the line where it noticed the problem, which is often a line or two after the real mistake. Look just above the reported line first.
Tips for keeping it to one page
- Cut bullets before you shrink spacing. Three strong bullets per role beat six weak ones.
- Lead each bullet with a result and a number, as in the example: cut p95 latency from 820 ms to 310 ms.
- Keep the template’s 11pt base size and trim content instead of shrinking the text.
- Keep your
resume.texin Git so you can tailor a copy per application and still see what changed. Our guide to version control for documentation covers the workflow.
Conclusion
Jake’s resume works because it stays out of the way: one column, consistent spacing and short commands. Overleaf’s pdfLaTeX is the engine it was written for. Compile it with XeTeX-based tools such as Tectonic and add the four-line \ifPDFTeX guard. After that, most of the work is writing good bullets, escaping & and %, and checking the extracted text before you send it.
FAQ
Is Jake’s resume template free to use?
Yes. Jake Gutierrez released it under the MIT license, so you can use and modify it for personal or commercial purposes. Keep the license comment at the top of the file.
Why does Jake’s resume fail to compile in XeLaTeX or Tectonic?
The preamble uses \input{glyphtounicode} and \pdfgentounicode=1, which only exist in pdfTeX. Wrap them in \ifPDFTeX … \fi (load the iftex package first) or compile with pdfLaTeX.
How do I change Jake’s resume from Letter to A4?
Change the first line to \documentclass[a4paper,11pt]{article}, then recompile and check that the content still fits on one page.
Is Jake’s resume ATS-friendly?
The single-column, text-only layout is easy for parsers to read. Confirm it for your own file by extracting the text with pdftotext or by copying it into a plain-text editor and checking that it reads in the right order.
How do I add a second job title at the same company?
Use \resumeSubheading for the company and latest role, then \resumeSubSubheading{Title}{Dates} for the earlier role, each followed by its own \resumeItemListStart … \resumeItemListEnd block.
Can I use Jake’s resume without Overleaf?
Yes. Download resume.tex from the GitHub repository and compile it with any TeX distribution. It is written for pdfLaTeX; with XeLaTeX, LuaLaTeX or Tectonic, add the \ifPDFTeX guard.