Integrating Firebase Real-time Database with IoT devices significantly enhances the functionality and responsiveness of smart applications. This guide offers a comprehensive walkthrough for developers on how to achieve this integration, step-by-step. Firebase’s cloud-hosted solution allows for real-time data synchronization between IoT devices and the Firebase database, ensuring data consistency and accessibility.
This blog specifically caters to developers working on both small-scale projects and larger IoT solutions. We’ll explore setting up the Firebase environment, preparing IoT devices for integration, developing the necessary firmware, and managing secure data handling and synchronization. We aim to provide the essential knowledge and tools to effectively leverage Firebase Real-time Database in your IoT applications, enhancing their dynamism, responsiveness, and efficiency. Let’s dive into building more advanced and connected IoT solutions.
Firebase Realtime Database and Its Relevance in IoT
The Firebase Realtime Database is a cloud-hosted NoSQL database that allows for the storage and synchronization of data in real-time. This section explores its functionalities and significance in the context of IoT (Internet of Things) applications.
What is Firebase Realtime Database?
Firebase Realtime Database offers a flexible, scalable database solution for mobile and web applications. It stores data in JSON format, making it easily accessible across various platforms and devices. One of the key features of this database is its ability to synchronize data in real-time. Whenever data changes, every connected device receives these updates almost instantaneously. This feature is particularly beneficial for IoT scenarios, where timely and accurate data is crucial for the efficient operation of connected devices.
Why Use Firebase Realtime Database for IoT?
- Real-Time Data Synchronization: In IoT applications, the state of devices can change frequently and rapidly. Firebase Realtime Database ensures that these changes are reflected across all connected devices and user interfaces without delay. This real-time update is essential for tasks like monitoring sensor data or controlling IoT devices remotely.
- Scalability: As IoT applications can involve a large number of devices, scalability is a critical factor. Firebase provides an infrastructure that effortlessly scales with your application’s needs, handling the data load from numerous devices without compromising performance.
- Accessibility and Offline Support: Firebase Realtime Database allows data access from any device with an internet connection, enhancing the flexibility of IoT applications. It also supports offline scenarios. When a device goes offline, the database stores the changes locally and syncs them with the cloud once the connection is reestablished, ensuring data integrity.
- Security and Authentication: Securing IoT data is paramount. Firebase offers robust security features, including authentication and data encryption. It allows developers to set rules for who can access or modify data, providing a secure environment for sensitive IoT data.
- Ease of Use and Integration: Firebase’s intuitive interface and straightforward setup process make it an accessible choice for developers. The Realtime Database integrates seamlessly with other Firebase services and many IoT platforms, simplifying the development process.
Basic Workflow of IoT Device Connection with Firebase Real-time Database
Understanding the workflow of how an IoT device interacts with the Firebase Real-time Database is crucial for developers. This subsection outlines the typical cycle of data flow between an IoT device and Firebase, detailing the process of data collection, transmission, storage, and retrieval.
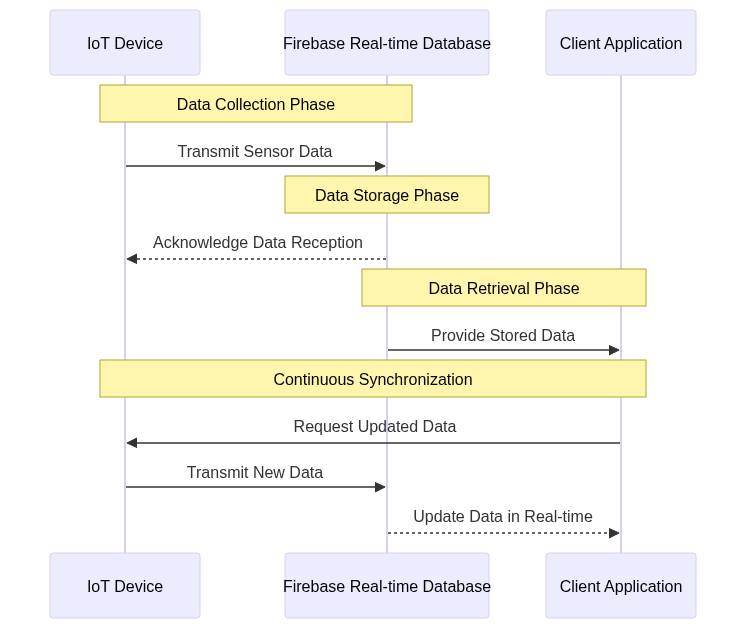
- Data Collection: The IoT device collects real-time data from its environment. This can include various types of sensor data like temperature, humidity, motion, etc.
- Data Transmission: The collected data is then transmitted to the Firebase Real-time Database. This transmission typically occurs over a secure internet connection, ensuring the data’s integrity and security.
- Data Storage in Firebase: Upon receiving the data, Firebase’s Real-time Database stores it efficiently. The database’s real-time nature ensures that any changes or updates in the data are instantly reflected and accessible.
- Data Retrieval and Further Processing: The IoT device or other connected clients can then retrieve this data from Firebase for further processing or action. This step is crucial for applications that rely on immediate data analysis and decision-making based on the collected data.
- Continuous Synchronization: The cycle continues with the IoT device constantly collecting and sending new data, while Firebase updates and synchronizes these changes in real-time across all connected clients.
This workflow highlights the seamless and continuous interaction between IoT devices and Firebase, enabling real-time data handling and responsive IoT applications.
In summary, the Firebase Realtime Database is a powerful tool for IoT applications due to its real-time data synchronization, scalability, accessibility, robust security features, and ease of use. These qualities make it an excellent choice for developers looking to enhance the functionality and responsiveness of their IoT devices. In the next sections, we’ll delve into the practical aspects of setting up the Firebase environment and preparing your IoT device for integration.
Setting Up the Environment
For integrating an IoT device with Firebase Real-time Database, setting up the environment is a critical first step. This involves creating a Firebase project, initializing the Realtime Database, and preparing the IoT device. This section provides detailed instructions and code snippets to guide you through this process.
1. Creating a Firebase Project
To start, you need a Firebase project. Here’s how to set it up:
- Visit the Firebase Console: Navigate to the Firebase Console and sign in with your Google account.
- Create a New Project: Click on “Add project,” and follow the prompts to create a new Firebase project. Enter your project name and agree to the terms and conditions.
- Configure Your Project Settings: Once your project is created, select ‘Project settings’ from the gear icon. Here, you can manage your project’s settings, including public-facing name, support email, etc.
2. Initializing the Realtime Database
After setting up your Firebase project, the next step is to initialize the Realtime Database.
- Navigate to the Database Section: In the Firebase Console, go to the ‘Database’ section under the ‘Build’ category.
- Create a Realtime Database: Click on ‘Create Database’ for the Realtime Database. Choose the database’s location closest to your users to reduce latency.
- Set Database Rules: For initial setup and testing, you can start in test mode, which allows read and write access to your database. Remember to secure your database before going to production.
{
  "rules": {
    ".read": true,
    ".write": true
  }
}3. Preparing the IoT Device
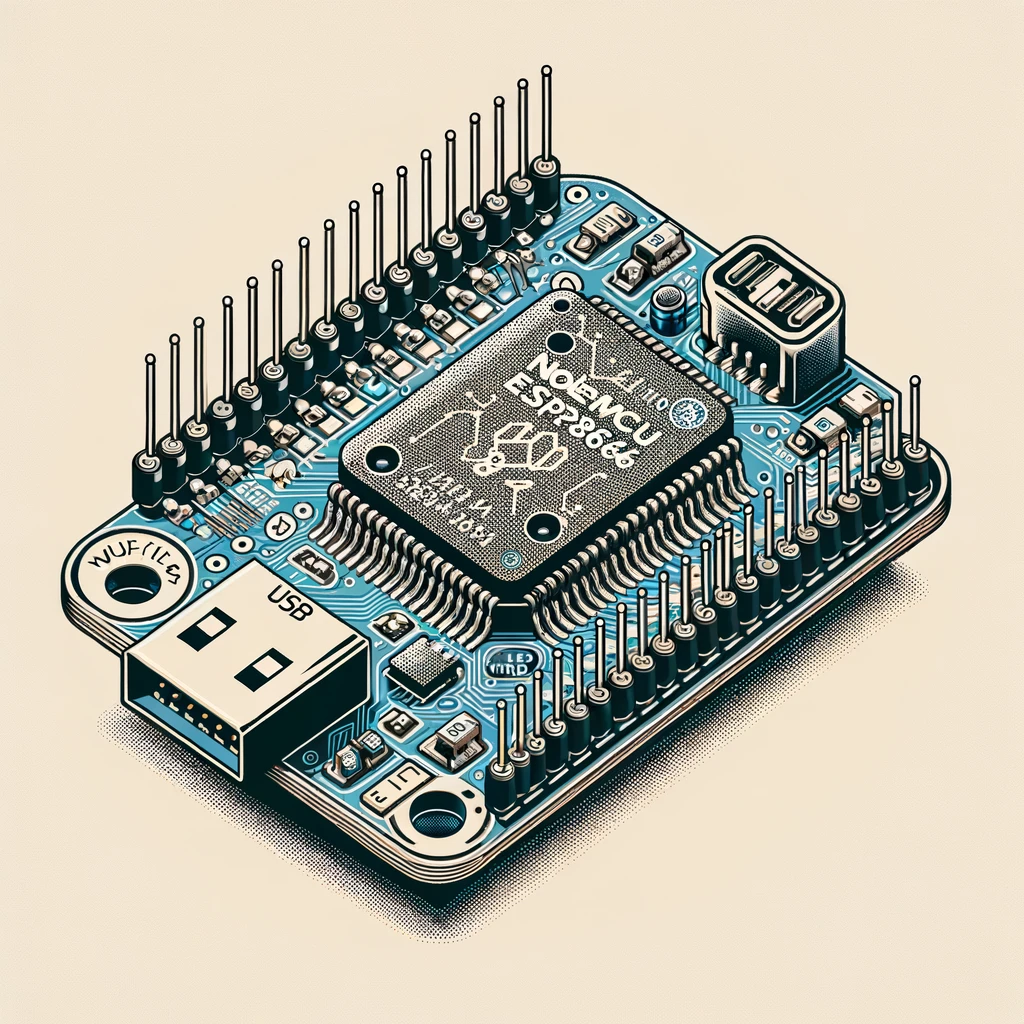
Once the Firebase environment is set up, the next crucial step is preparing your IoT device for integration with the Firebase Real-time Database. This involves configuring the device to connect to the internet and setting up the code to communicate with Firebase. In this section, we will focus on a commonly used IoT device, the NodeMCU & ESP8266, for demonstration purposes.
Selecting and Setting Up the IoT Device
- Choose an IoT Device: For this guide, we use NodeMCU ESP8266 due to its built-in WiFi capability and compatibility with Firebase. However, the process is similar for other IoT devices like Arduino or ESP32.
- Connect the Device to Your Computer: Using a micro USB cable, connect your NodeMCU ESP8266 to your computer.
Programming the IoT Device
- Open Arduino IDE: Launch the Arduino IDE on your computer.
- Configure the IDE for NodeMCU ESP8266:
- Go to File > Preferences in the Arduino IDE.
- In the “Additional Board Manager URLs” field, add the following URL for the ESP8266 board:
http://arduino.esp8266.com/stable/package_esp8266com_index.json. - Open Tools > Board > Boards Manager, search for “ESP8266”, and install the latest version.
- Select the NodeMCU ESP8266 Board:
- In the Arduino IDE, go to Tools > Board, and select “NodeMCU 1.0 (ESP-12E Module)”.
- Write the Initial Code:
- Create a new sketch in the Arduino IDE.
- Include necessary libraries for connecting to WiFi and Firebase.
#include <ESP8266WiFi.h>
#include <FirebaseArduino.h>

// Replace with your network credentials
const char* ssid = "YOUR_WIFI_SSID";
const char* password = "YOUR_WIFI_PASSWORD";

// Replace with your Firebase project details
const char* firebaseHost = "YOUR_FIREBASE_PROJECT_HOST";
const char* firebaseAuth = "YOUR_FIREBASE_DATABASE_SECRET";

void setup() {
  Serial.begin(115200);

  // Connect to WiFi network
  WiFi.begin(ssid, password);
  while (WiFi.status() != WL_CONNECTED) {
    delay(500);
    Serial.print(".");
  }
  Serial.println("");
  Serial.println("WiFi connected");

  // Connect to Firebase
  Firebase.begin(firebaseHost, firebaseAuth);
}

void loop() {
  // IoT device logic here
}- Customize the Code for Your IoT Project:
- Modify the
setup()andloop()functions to include the logic specific to your IoT application, such as reading sensor data or sending commands.
- Modify the
- Upload the Code to NodeMCU ESP8266:
- With the NodeMCU connected to your computer, click the “Upload” button in the Arduino IDE to compile and upload the sketch to your device.
Testing the Connection
- Monitor the Serial Output:
- Open the Serial Monitor in the Arduino IDE to observe the output and confirm that the device connects to WiFi and Firebase successfully.
- Verify Data Exchange:
- Perform a test by sending and retrieving data from the Firebase Real-time Database using your NodeMCU ESP8266. Ensure that the operations are successful and data is accurately reflected in Firebase.
By completing these steps, your IoT device (NodeMCU ESP8266 in this case) is now prepared and capable of integrating with Firebase Real-time Database. You can now proceed to develop the specific functionalities of your IoT application, leveraging the real-time capabilities of Firebase.
Developing the Firmware for IoT Devices
Developing the firmware for an IoT device is a critical step in ensuring successful integration with the Firebase Real-time Database. The firmware controls how the device interacts with its environment and communicates with Firebase. In this section, we’ll focus on extending the basic setup to include functionality for handling sensor data and communicating with Firebase.
Understanding Firmware Development
- Firmware Basics: The firmware is the software that runs on the IoT device. It reads inputs (like sensor data), processes this information, and performs actions (like sending data to Firebase).
- Development Approach: The firmware should be efficient, considering the limited resources (memory, processing power) of IoT devices.
Example: Temperature and Humidity Sensor Integration
We’ll use a DHT11 temperature and humidity sensor as an example. This sensor is popular in IoT projects due to its simplicity and effectiveness.
- Include Required Libraries: Besides the previously included libraries, you’ll need the DHT sensor library.
#include <DHT.h>

// DHT Sensor setup
#define DHTPIN D4     // Pin where the DHT11 is connected
#define DHTTYPE DHT11  // DHT 11
DHT dht(DHTPIN, DHTTYPE);- Initialize Sensor in
setup(): Initialize the DHT sensor within thesetup()function.
void setup() {
  // ...previous setup code...

  // Initialize the DHT sensor
  dht.begin();
}- Reading Sensor Data: In the
loop()function, read the temperature and humidity data.
void loop() {
  // Read temperature as Celsius
  float temp = dht.readTemperature();
  // Read humidity (percentage)
  float humidity = dht.readHumidity();

  // Check if any reads failed and exit early (to try again).
  if (isnan(temp) || isnan(humidity)) {
    Serial.println("Failed to read from DHT sensor!");
    return;
  }

  Serial.print("Temperature: ");
  Serial.print(temp);
  Serial.print(" °C, Humidity: ");
  Serial.print(humidity);
  Serial.println(" %");

  // ...code to send data to Firebase...
}- Sending Data to Firebase: Send the sensor data to the Firebase Real-time Database.
// Replace these with appropriate Firebase paths
const char* tempPath = "/temperature";
const char* humidityPath = "/humidity";

void loop() {
  // ...previous loop code...

  // Send data to Firebase
  Firebase.setFloat(tempPath, temp);
  Firebase.setFloat(humidityPath, humidity);

  if (Firebase.failed()) {
      Serial.print("Firebase error: ");
      Serial.println(Firebase.error());
      return;
  }

  // Wait for a few seconds before the next read
  delay(2000);
}Tips for Effective Firmware Development
- Efficient Coding: Optimize your code for memory and processing efficiency. Avoid unnecessary computations or delays.
- Error Handling: Implement robust error handling, especially for sensor readings and network communications.
- Modular Design: Keep your code modular for easy testing and maintenance. Separate the logic for sensor handling, data processing, and Firebase communication.
- Frequent Testing: Regularly test the firmware during development to identify and fix issues early.
- Documentation: Comment your code for clarity. This helps in troubleshooting and future modifications.
By following these steps and guidelines, you will develop effective firmware that enables your IoT device to interact seamlessly with the Firebase Real-time Database. The key is to ensure reliable sensor data reading and efficient communication with Firebase for real-time data handling.
Integrating Firebase Credentials in the IoT Application
Integrating Firebase credentials into your IoT application is a critical step to ensure secure and authenticated communication between your IoT device and the Firebase Real-time Database. This section will guide you through obtaining and integrating Firebase credentials into your IoT application’s firmware.
Obtaining Firebase Credentials
- Access Your Firebase Project: Go to the Firebase Console, and select your project.
- Find the Database Secret:
- Navigate to the ‘Project Settings’ by clicking the gear icon.
- Select the ‘Service accounts’ tab.
- Here, you will find your database URL and a link to generate a new database secret. Click on ‘Database secrets’ and then ‘Add Secret’. Take note of this secret as it will be used in your IoT application.
- Firebase Database URL: Your Firebase Database URL is typically in the format:
https://<your-project-id>.firebaseio.com/. This can be found in the Firebase Console under ‘Data’ in the Realtime Database section.
Integrating Credentials in Firmware
- Define Firebase Credentials: In your IoT application’s firmware, define constants to store the Firebase URL and the Database Secret.
// Replace with your Firebase project details
const char* firebaseHost = "YOUR_FIREBASE_PROJECT_HOST"; // Firebase Database URL
const char* firebaseAuth = "YOUR_FIREBASE_DATABASE_SECRET"; // Database Secret- Initialize Firebase Connection: Use these credentials to initialize a connection to Firebase in your
setup()function.
#include <FirebaseArduino.h>
#include <ESP8266WiFi.h>

// ... (other code for WiFi connection)

void setup() {
  // ... (previous setup code for WiFi)

  // Initialize Firebase connection
  Firebase.begin(firebaseHost, firebaseAuth);
}- Secure Data Transfer:
- When the IoT device communicates with Firebase, the data transfer is secured using these credentials, ensuring that only authenticated users/devices can read/write data to your Firebase database.
Verifying the Connection
- Test Data Transmission:
- After integrating the credentials and uploading the firmware to your IoT device, test the connection by sending a test data point to Firebase.
- Check your Firebase Real-time Database through the Firebase Console to see if the data appears as expected.
- Monitor for Errors:
- Use the Serial Monitor in the Arduino IDE to check for any connectivity or authentication errors.
- Implement error handling in your firmware to manage any connection issues.
void loop() {
  // ... (code to read sensors and prepare data)

  // Send data to Firebase
  if (Firebase.push("/test-path", "Hello Firebase") == false) {
    Serial.println("Failed to write to Firebase");
    Serial.println(Firebase.error());
  }

  // ... (rest of your loop code)
}By properly integrating Firebase credentials into your IoT application, you establish a secure and authenticated connection with the Firebase Real-time Database. This ensures that the data exchanged between your IoT device and Firebase is protected, maintaining the integrity and confidentiality of your IoT application’s data.
Real-Time Data Handling and Synchronization
After integrating Firebase credentials, the next crucial aspect is to implement real-time data handling and synchronization between the IoT device and the Firebase Real-time Database. This process ensures that the data on your IoT device and the database remains consistent and up-to-date in real-time.
Real-Time Data Handling Basics
- Understanding the Process: Real-time data handling involves continuously monitoring and updating data between the IoT device and Firebase. When data on the device changes (e.g., sensor readings), these updates are immediately sent to Firebase. Conversely, changes made in the Firebase database can be fetched and reflected on the device.
- Optimizing for Efficiency: Given the constrained resources of IoT devices, it’s important to handle data efficiently, ensuring minimal delay and bandwidth usage.
Implementing Data Sending to Firebase
- Sending Data to Firebase: Set up a function to send data to Firebase. This function is called whenever there’s new data from the IoT device (e.g., sensor readings).
void sendDataToFirbase(String path, float data) {
  if (Firebase.setFloat(path, data)) {
    Serial.println("Data sent to Firebase successfully.");
  } else {
    Serial.print("Failed to send data: ");
    Serial.println(Firebase.error());
  }
}- Calling the Send Function: In the
loop()function or within a sensor data reading section, call this function with the appropriate path and data.
void loop() {
  // Assume 'temp' and 'humidity' hold sensor data
  sendDataToFirbase("/temperature", temp);
  sendDataToFirbase("/humidity", humidity);

  // Add a delay to prevent too frequent updates
  delay(2000); // Delay for 2 seconds
}Implementing Data Retrieval from Firebase
- Retrieving Data: To retrieve and act upon data changes in Firebase, set up listeners or periodically check for data.
- Example: Listening for Changes: Firebase allows you to listen for changes at a specific path in the database.
void setup() {
  // ... (previous setup code)

  // Listen for changes on a specified path
  Firebase.stream("/some-path");
}

void loop() {
  if (Firebase.available()) {
    FirebaseObject event = Firebase.readEvent();
    String path = event.getString("path");
    String value = event.getString("data");
    Serial.println("Path: " + path + ", Data: " + value);

    // Handle data change
    // ...
  }

  // ... (rest of your loop code)
}- Handling Data Changes: When a change is detected, the event handler can be used to update the device’s state or trigger actions based on the new data.
Through these steps, you’ll establish a robust system for real-time data handling and synchronization between your IoT device and Firebase. This setup is key to developing interactive and responsive IoT applications that rely on up-to-date data.
Testing and Debugging
After developing the firmware and integrating Firebase into your IoT application, it’s crucial to rigorously test and debug the system to ensure it functions as expected. This section covers essential steps and strategies for effective testing and debugging of your IoT application’s integration with Firebase Real-time Database.
Testing Strategy
- Unit Testing:
- Purpose: Verify the functionality of individual components or functions.
- Approach: Test each function in your firmware independently, such as sensor data collection, data transmission to Firebase, and response to data changes from Firebase.
- Tools: Use the Serial Monitor in Arduino IDE for logging and monitoring the output of individual functions.
- Integration Testing:
- Purpose: Ensure that different parts of your application work together seamlessly.
- Approach: Test the interaction between your IoT device and Firebase, verifying that data is correctly sent and received.
- Tools: Monitor Firebase Real-time Database through the Firebase Console to verify data synchronization.
- End-to-End Testing:
- Purpose: Validate the complete workflow of your application.
- Approach: Simulate real-world scenarios, including how the device handles various sensor inputs and communicates with Firebase under different conditions.
- Tools: Use a combination of Serial Monitor and Firebase Console, and potentially create a client application to simulate user interaction.
Debugging Techniques
- Serial Logging:
- Continuously output status messages and variable values to the Serial Monitor. This helps in tracking down where and why a failure occurs.
- Example:
Serial.println("Temperature data sent to Firebase.");
- Error Handling and Reporting:
- Implement error handling in your code and report errors to the Serial Monitor:
if (Firebase.failed()) {
    Serial.print("Firebase error: ");
    Serial.println(Firebase.error());
}- Monitoring Firebase Real-time Database:
- Regularly check the Firebase Console to ensure data is being updated as expected.
- Look for inconsistencies or delays in data updates.
- Network Troubleshooting:
- Verify the stability and quality of the network connection, as connectivity issues are common in IoT applications.
- Implement reconnection strategies in your firmware to handle intermittent network failures.
Best Practices for Effective Testing and Debugging
- Incremental Testing: Start by testing small parts of your application and gradually move to more complex scenarios.
- Use of Debug Flags: Implement debug flags in your firmware to enable or disable debugging logs without changing the core code.
- Consistent Testing Environment: Ensure your testing environment closely replicates the conditions in which your IoT device will operate.
- Documentation of Tests and Results: Keep a record of tests performed, including the conditions, inputs, and observed outcomes. This helps in identifying patterns and recurring issues.
- Peer Review and Collaborative Debugging: Sometimes, a fresh pair of eyes can spot issues more quickly. Collaborate with peers for reviewing and debugging the code.
By methodically applying these testing and debugging strategies, you can identify and resolve issues in your IoT application, ensuring reliable and efficient operation of your integration with Firebase Real-time Database. This process is crucial for the development of a robust and dependable IoT solution.
Conclusion
Throughout this blog, we’ve navigated the intricate process of integrating Firebase Real-time Database with an IoT device. Beginning with the initial setup of the Firebase environment, we progressed through preparing the IoT device, in this case, NodeMCU ESP8266, for seamless integration. This journey included essential steps like configuring the device in the Arduino IDE and establishing a stable internet connection.
The heart of our discussion focused on the development of firmware capable of handling real-time data processing and secure communication with Firebase. We emphasized the criticality of incorporating Firebase credentials into the IoT application to ensure authenticated and secure data exchanges. Moreover, we explored the implementation of real-time data handling and synchronization, ensuring consistent and updated data across both the IoT device and Firebase.
Concluding, the process culminated in comprehensive testing and debugging strategies, underscoring the importance of creating a reliable and robust IoT application. This guide aimed to equip developers with a clear, structured approach to integrating Firebase in IoT projects, thus enabling the creation of dynamic, responsive, and secure IoT applications. The convergence of Firebase and IoT technology opens new avenues for innovative solutions in the world of connected devices, offering enhanced user experiences and improved device functionality.


