Welcome to our comprehensive guide on integrating Firebase ML Kit with your React Native application. In today’s fast-paced app development world, machine learning (ML) has become a cornerstone for creating intuitive and intelligent applications. Firebase ML Kit, a part of Google’s Firebase suite, offers a seamless and efficient way to incorporate ML capabilities into your app, enhancing user experience and functionality.
Firebase ML Kit stands out for its ease of use and integration, especially for developers working with React Native, a popular framework for building cross-platform mobile apps. This toolkit empowers you to implement a wide range of ML features, from text recognition to image labeling, without the need for deep knowledge in machine learning.
In this guide, we’ll walk you through the essential steps to successfully add Firebase ML Kit to your React Native app. Whether you’re looking to enrich your app with advanced ML features or exploring ways to improve user interaction, this guide will provide you with a clear pathway to achieve your goals.
Our focus will be on practical implementation, providing you with straightforward, step-by-step instructions and essential tips to navigate through the process smoothly. By the end of this guide, you’ll be equipped with the knowledge and skills to integrate Firebase ML Kit into your React Native app, unlocking new possibilities for your app development journey.
Prerequisites:
Before integrating Firebase with the React Native app, it’s essential to ensure that you meet certain prerequisites. These prerequisites are crucial for a smooth and successful setup process. Here’s what you need:
- Understanding of React & React Native: A basic understanding of React and React Native is necessary. This knowledge will help you in effectively setting up the environment and integrating Firebase ML Kit into your application.
- Firebase Project with Blaze Plan: To access the Cloud Vision APIs, you will need a Firebase project. More importantly, this project should be upgraded to the Blaze plan, which is a pay-as-you-go plan offering additional functionalities needed for the Cloud Vision APIs.
- React Native Environment Setup: Ensure that your React Native development environment is properly set up. This setup includes the installation of Node.js, Watchman, React Native command line interface, Xcode for iOS development, and Android Studio for Android development.
- Installation of Firebase and ML Kit Modules:
- First, you need to have the
@react-native-firebase/appmodule set up and installed. This module serves as the core module for interacting with Firebase services. - Next, install the Firebase ML module using yarn by running the following commands:
yarn add @react-native-firebase/app
yarn add @react-native-firebase/ml - For iOS development, navigate to the iOS directory of your project and run
pod installto ensure all CocoaPod dependencies are installed.
- First, you need to have the
- Cloud Vision API Setup: If you intend to use Cloud Vision API features, it’s recommended to use Firebase Authentication and Functions. This approach provides a managed, serverless gateway to Google Cloud Vision APIs.
- Handling Older Versions of React Native: If you’re using an older version of React Native that does not support auto-linking, or if you’re integrating Firebase ML Kit into an existing project, follow the manual installation steps for iOS and Android as needed.
By ensuring these prerequisites are met, you’ll have a solid foundation to begin integrating Firebase ML Kit into your React Native application. The process involves setting up the necessary modules, configuring your Firebase project, and preparing your development environment for the tasks ahead.
Setting Up the Development Environment
Properly setting up the development environment is vital for integrating Firebase ML Kit into a React Native application. Here’s a streamlined approach:
- Install Node.js: Begin with installing Node.js, which is essential for running npm, a package manager used in React Native development.
- Setting up React Native Environment: Use the React Native CLI for project setup and management. Install it globally via npm:
npm install -g react-native-cli - Install Development Tools:
- For iOS: Install Xcode from the Mac App Store, which provides an iOS simulator and necessary development tools.
- For Android: Download and install Android Studio, which includes the Android SDK and emulator for app testing.
- Initialize a React Native Project: Create a new project using:
npx react-native init MyFirebaseApp
ReplaceMyFirebaseAppwith your project name. - Set Up Version Control: Initialize a Git repository in your project directory. This step is essential for tracking changes and managing different versions of your project.
- Understand the Basic Structure: Familiarize yourself with the React Native project structure, particularly the locations for components, assets, and configuration files.
This environment setup focuses on the essential tools and steps needed to start integrating Firebase ML Kit with your React Native app, ensuring an efficient and effective development process.
Installing Dependencies
For a successful integration of Firebase ML Kit in a React Native app, it’s essential to install certain dependencies beyond the basic setup:
- React and React Native Versions: Ensure you are using compatible versions of React and React Native. Check the latest compatible versions on the official React Native and Firebase documentation.
- React Native Image Picker: For functionalities like selecting images from the gallery or camera, install
react-native-image-picker:npm install react-native-image-picker
This package is crucial for apps that require image selection capabilities, which is often a part of ML feature implementations. - Android Configuration: For Android, you might need to adjust the
build.gradlefile to accommodate the new dependencies. Pay attention to any version conflicts or additional settings that Firebase ML might require. - iOS Configuration: Similarly, for iOS, ensure that your
Podfileis configured correctly after installing new dependencies. Thepod installcommand should align your project with the necessary CocoaPods dependencies for Firebase and other React Native packages. - Verification of Installation: After installing these dependencies, verify that everything is correctly set up by running your React Native app in a simulator or a real device. Look out for any warnings or errors that might indicate missing or improperly configured dependencies.
By carefully managing these dependencies, your React Native environment will be well-prepared for the addition of Firebase ML Kit functionalities. This step is crucial in ensuring that the later stages of integration proceed smoothly.
Project Folder Structure
A well-organized folder structure is crucial for maintaining and scaling your React Native project, especially when integrating complex functionalities like Firebase ML Kit. Below is a demonstration of an effective folder structure for your project:
- Root Directory (
/): Contains configuration files likepackage.json,babel.config.js, and others necessary for the React Native environment. - Source Folder (
/src): The main folder where the bulk of your application code resides. - Components (
/src/components): This directory holds reusable UI components like buttons, input fields, and custom views. - Screens (
/src/screens): Contains different screens of your app, for example,HomeScreen.js,ImagePickerScreen.js, etc., which are the main views users interact with. - Utilities (
/src/utils): For utility functions and helper methods, such as a function to process the image path or format text recognition results. - Firebase Services (
/src/firebase): Dedicated to Firebase-related functionalities. This can include initialization files and custom Firebase service handlers, such asFirebaseMLService.js. - Navigation (
/src/navigation): If your app uses navigation, this folder contains the navigators and related configurations, such asStackNavigator.jsorTabNavigator.js. - Assets (
/assets): Store static files like images, fonts, and external libraries that are not part of the source code. - iOS and Android Folders (
/ios,/android): These are generated by React Native and contain platform-specific code. They are crucial for linking native modules and configuring platform-specific settings. - Tests (
/__tests__): For your Jest tests or other testing files.
Here’s a simple representation of the folder structure:
MyFirebaseApp/
├── __tests__/
├── android/
├── ios/
├── src/
│   ├── components/
│   ├── firebase/
│   ├── navigation/
│   ├── screens/
│   └── utils/
├── assets/
├── index.js
├── package.json
└── ...This structure is modular and scalable, allowing for easy maintenance and clear separation of concerns. As your project grows or integrates more features, this organization will help keep your codebase manageable and understandable.
Configuring Firebase Project and Cloud Vision API
After setting up your development environment and installing the necessary dependencies, the next crucial step is configuring your Firebase project and the Cloud Vision API for your React Native app.
- Create or Select Your Firebase Project:
- Navigate to the Firebase Console.
- If you haven’t already, create a new Firebase project or select an existing one.
- Upgrade to Blaze Plan:
- Within your Firebase project dashboard, upgrade to the Blaze plan. This step is essential to access Cloud Vision APIs.
- Add Your App to Firebase Project:
- Click on the Android or iOS icon to add your respective app.
- For Android, you will need the package name from
AndroidManifest.xmllocated inandroid/app/src/main/. - Follow the instructions to download the
google-services.jsonfor Android or theGoogleService-Info.plistfor iOS. - Place these files in their respective directories (
android/app/for Android and the root of your project for iOS).
- Configure
build.gradleFiles:- For Android, update your
build.gradlefiles as instructed by Firebase. This usually involves adding Firebase SDK and plugin configurations.
- For Android, update your
- Setting Up Cloud Vision API:
- Go to the Google Cloud Console and select your project.
- Navigate to the API & Services tab and then to the Libraries section.
- Search for the Cloud Vision API and enable it.
- Once enabled, you’ll have access to Cloud Vision API functionalities in your Firebase project.
- Integrate Firebase in Your App:
- Initialize Firebase in your React Native app. This typically involves importing Firebase in your app’s entry point and configuring it with your project’s details.
By following these steps, your Firebase project will be correctly set up and configured, and the Cloud Vision API will be enabled, allowing you to leverage its capabilities in your React Native app. Remember, accurate configuration is key to ensuring smooth communication between your app and Firebase services.
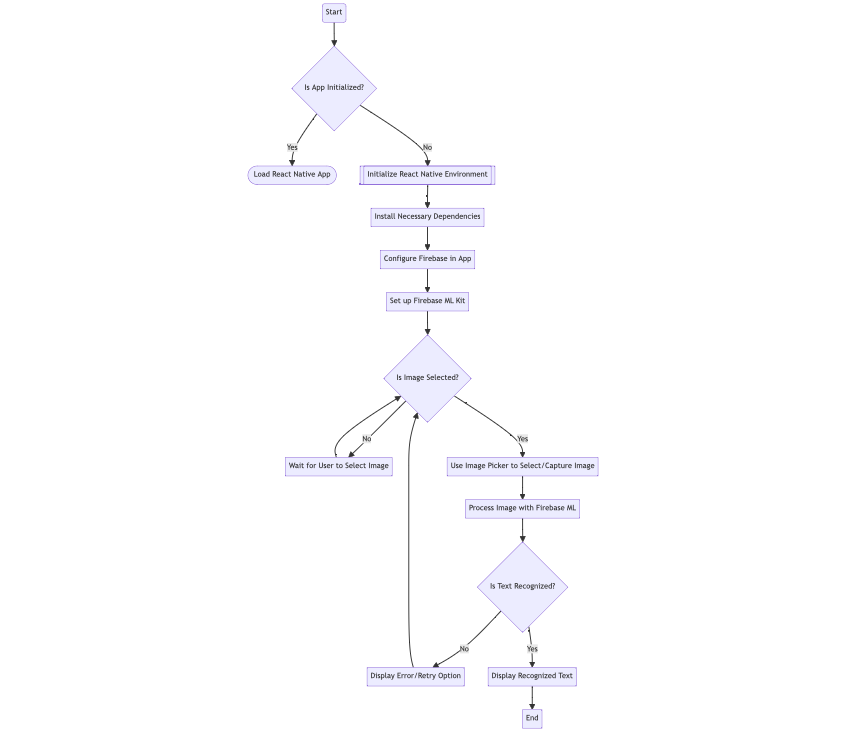
Visualizing the Firebase ML Workflow with Mermaid
Incorporating a visual workflow into the documentation or development process can significantly aid in understanding and communicating the steps involved in integrating Firebase ML with a React Native application. Below is a diagram that outlines the workflow:
This flowchart outlines the steps involved in using Firebase ML Kit for text recognition in a React Native app. It starts from initializing the app environment, installing dependencies, setting up Firebase, and finally using Firebase ML Kit to recognize text from images selected or captured by the user. The workflow also includes decision points for error handling and user interactions.
Building the User Interface
To effectively build a user interface (UI) for a React Native app that integrates Firebase ML Kit, follow these steps:
- Design the UI Layout:
- Plan a simple and intuitive layout that will allow users to interact with the ML features.
- Common components include buttons for selecting images and a display area to show the results of ML processing.
- Create UI Components:
- Use React Native’s built-in components like
View,Text,Button, andImageto construct your UI. - For image selection, you might have buttons labeled “Select Image from Gallery” and “Capture Image”.
- Use React Native’s built-in components like
- Implement Image Selection Handlers:
- Write functions to handle image selection from the gallery or camera using the
react-native-image-pickerlibrary. - These handlers will be tied to your buttons.
- Write functions to handle image selection from the gallery or camera using the
- Display Results:
- Allocate a section in your UI to display the results from Firebase ML Kit, such as recognized text from images.
- This could be a simple
Textcomponent that updates based on the ML processing results.
- Styling:
- Use React Native’s StyleSheet to style your components. Keep the styling simple and focused on usability.
- For example, ensure that buttons are easily accessible and results are readable.
- Testing UI Interactions:
- Test your UI on both Android and iOS emulators to ensure compatibility and responsiveness.
- Make adjustments as needed to improve user experience.
Here is a basic example of what the code structure might look like:
import React from 'react';
import { StyleSheet, View, Button, Text } from 'react-native';

const App = () => {
  // Functions to handle image selection and ML processing will go here

  return (
    <View style={styles.container}>
      <Button title="Select Image from Gallery" onPress={/* Handler Function */} />
      <Button title="Capture Image" onPress={/* Handler Function */} />
      {/* Display area for ML results */}
      <Text style={styles.resultText}>ML Processing Results Display Here</Text>
    </View>
  );
};

const styles = StyleSheet.create({
  container: {
    flex: 1,
    justifyContent: 'center',
    alignItems: 'center',
    padding: 20,
  },
  resultText: {
    marginTop: 20,
    fontSize: 16,
  },
});

export default App;Adding Media Picker Functionality
To add media picker functionality in your React Native app for Firebase ML integration, you’ll use the react-native-image-picker library. This allows users to select images from their gallery or capture new images using the camera, which can then be processed by Firebase ML Kit.
- Install the Image Picker Package: First, install the package using npm:
npm install react-native-image-picker - Import the Package: In your main app file or the specific component where you want to add the image picker, import
launchCameraandlaunchImageLibraryfromreact-native-image-picker:
import { launchCamera, launchImageLibrary } from 'react-native-image-picker';- Creating Handler Functions: Create functions to handle image selection from the gallery and camera. These functions will use
launchImageLibraryandlaunchCamerarespectively.
const selectImageFromGallery = () => {
  const options = {
    mediaType: 'photo',
  };
  launchImageLibrary(options, (response) => {
    // Handle the response (process the image)
  });
};

const captureImage = () => {
  const options = {
    mediaType: 'photo',
    cameraType: 'back',
  };
  launchCamera(options, (response) => {
    // Handle the response (process the image)
  });
};- Integrating Handlers with UI: Connect these handler functions to your UI buttons for selecting and capturing images.
<Button title="Select Image from Gallery" onPress={selectImageFromGallery} />
<Button title="Capture Image" onPress={captureImage} />- Handling the Image Response:
- In the callback of
launchImageLibraryandlaunchCamera, handle the response which contains the image data. - Check for any errors, cancellations, or the actual image data.
- Once you have the image data, you can pass it to Firebase ML Kit for processing.
- In the callback of
This integration allows users to easily provide images for ML processing, making your app more interactive and user-friendly. Remember to test extensively to handle different scenarios like permission denials or cancellations.
Integrating Firebase ML for Text Recognition
After setting up the media picker functionality, the next step is integrating Firebase ML for text recognition in your React Native app. This process involves leveraging Firebase ML Kit’s text recognition capabilities to analyze images selected by users.
- Firebase ML Setup: Ensure you have installed Firebase ML in your project as outlined in previous sections.
- Importing Firebase ML: Import the necessary Firebase ML modules in your component file:
import ml from '@react-native-firebase/ml';- Creating Text Recognition Function: Write a function that takes an image path and uses Firebase ML Kit to recognize text in the image:
const recognizeTextFromImage = async (imagePath) => {
  try {
    const processedImage = await ml().cloudDocumentTextRecognizerProcessImage(imagePath);
    console.log('Recognized Text: ', processedImage.text);
    return processedImage.text;
  } catch (error) {
    console.error('Error recognizing text from image: ', error);
  }
};- Handling Image Picker Response:
- Modify the image picker response handler to call the
recognizeTextFromImagefunction with the selected image. - Ensure that your handler function handles different response scenarios (like cancellation or error).
- Modify the image picker response handler to call the
const handleImagePickerResponse = (response) => {
  if (response.didCancel) {
    console.log('User cancelled image picker');
  } else if (response.errorCode) {
    console.error('ImagePicker Error: ', response.errorMessage);
  } else {
    const source = { uri: response.uri };
    // Call the text recognition function
    recognizeTextFromImage(source.uri);
  }
};- Displaying Recognized Text: Update your UI to display the recognized text. This could be in a
Textcomponent that gets updated with the results fromrecognizeTextFromImage. - Testing and Validation:
- Test the text recognition feature with various images to ensure it works correctly.
- Handle potential errors gracefully and provide feedback to the user.
By integrating Firebase ML for text recognition, your app will gain the ability to extract text from images, enhancing its functionality and user experience. Remember to test thoroughly with different types of images to ensure robustness and accuracy.
Handling Additional Configurations
After integrating Firebase ML for text recognition, you might encounter scenarios that require additional configurations for optimization and accuracy. Handling these effectively can enhance the performance and user experience of your app.
- Configuring Text Recognition Options:
- Firebase ML Kit offers several configuration options for text recognition. For instance, you can set language hints to improve accuracy for specific languages.
- In your text recognition function, you can pass a configuration object:
const options = {
  languageHints: ['en', 'fr'], // List of language hints
};
const processedImage = await ml().cloudDocumentTextRecognizerProcessImage(imagePath, options);- Handling Large Text Recognition Tasks: For processing large documents or images with a lot of text, consider implementing a progress indicator or asynchronous handling in your app to improve user experience.
- Error Handling and Logging: Robust error handling is crucial for a seamless user experience. Implement comprehensive error-catching and logging mechanisms to track and resolve issues efficiently.
- Security and Privacy Considerations: Ensure that your implementation complies with data privacy laws and guidelines, especially when handling user-uploaded images and data.
- Testing Different Scenarios: Test your app under different scenarios and conditions to ensure that your additional configurations are effective. This includes testing with images in different languages, formats, and quality.
- Performance Optimization: Monitor the performance of the text recognition feature, especially in terms of speed and accuracy. Optimize as necessary, considering the trade-offs between speed and accuracy.
By attentively handling these additional configurations, you can fine-tune the Firebase ML integration to meet the specific needs of your app and its users. This attention to detail will contribute significantly to the overall quality and robustness of your app’s machine-learning features.
Conclusion
Integrating Firebase ML Kit for text recognition in a React Native app is a strategic step towards enhancing app functionality and user engagement. Throughout this guide, we have explored the key aspects of this integration, from setting up the development environment and installing dependencies to configuring Firebase and Cloud Vision API, building a user-friendly interface, and adding media picker functionality. We also delved into the core feature of text recognition with Firebase ML, handling additional configurations for optimization, and ensuring the app’s robustness and efficiency.
As you embark on implementing these features in your app, remember that each step plays a crucial role in the seamless operation and user experience of your app. Testing and iterating based on user feedback are crucial to refining the app’s functionality. The integration of Firebase ML Kit not only adds significant value to your app but also opens doors to future enhancements and features.
By following the steps and principles outlined in this guide, you’re now equipped to successfully implement Firebase ML Kit in your React Native app, paving the way for a more interactive and intelligent application.
FAQs:
How do I handle permissions for accessing the camera and photo library in React Native when using Firebase ML Kit?
Handling permissions is crucial for accessing the camera and photo library. In React Native, you can use packages like react-native-permissions to request and manage these permissions. For iOS, you need to add the appropriate keys (NSCameraUsageDescription and NSPhotoLibraryUsageDescription) with descriptions in your Info.plist file. For Android, permissions must be declared in the AndroidManifest.xml file and requested at runtime using the PermissionsAndroid API from React Native.
Can Firebase ML Kit be used offline with React Native, and what are its limitations?
Firebase ML Kit offers certain features that can be used offline, such as on-device text recognition. However, the offline capabilities are limited compared to the online mode. For instance, offline text recognition might not be as comprehensive in terms of language support and might lack advanced features available in the cloud-based API. It’s important to evaluate the specific needs of your app to determine if the offline features are sufficient.
What are the best practices for optimizing image size and quality for text recognition in Firebase ML Kit?
To optimize image size and quality for text recognition:
1. Ensure images are clear and well-lit.
2. Avoid unnecessary high resolution, as it increases processing time without significant gains in accuracy.
3. Crop the image to include only the relevant text area, reducing the processing load.
4. Experiment with different compression formats to find a balance between image quality and file size.
How do I customize the Firebase ML Kit for specific text recognition needs, like recognizing handwriting or different languages?
Firebase ML Kit allows customization for specific needs:
1. For different languages: You can set language hints to improve recognition accuracy for specific languages.
2. Recognizing handwriting is more challenging, as Firebase ML Kit primarily focuses on printed text. For handwriting, you may need to use other ML models or services specialized in handwriting recognition.
What are common challenges and troubleshooting tips when integrating Firebase ML Kit with React Native?
Common challenges include:
1. Compatibility issues between Firebase and React Native versions.
2. Properly configuring Firebase in both Android and iOS projects.
3. Handling permissions and user data securely and in compliance with privacy laws.
Troubleshooting tips:
1. Always refer to the latest Firebase and React Native documentation.
2. Test on multiple devices and OS versions.
3. Use logging extensively to catch and understand errors.
4. Engage with the developer community on platforms like Stack Overflow or GitHub for specific issues.


