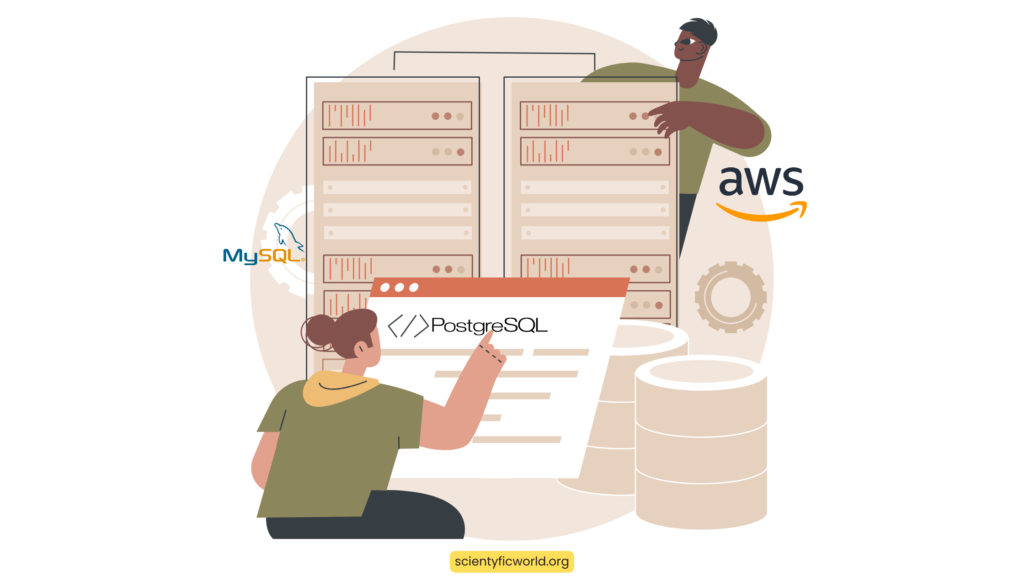
AWS Amplify and the AWS Cloud Development Kit (CDK) play a pivotal role in the evolving landscape of cloud computing and database management, especially in integrating MySQL and PostgreSQL databases with AWS services. This guide focuses on connecting and querying these databases using AWS Amplify and AWS CDK. AWS Amplify, with its comprehensive suite of tools and services for app development, now extends support to existing MySQL and PostgreSQL databases. This crucial integration allows for the streamlined creation of GraphQL APIs, significantly enhancing backend development for both web and mobile applications.
The focus of this guide is to provide a clear and concise roadmap for developers looking to leverage AWS Amplify and AWS CDK for their database needs. Whether you are managing data spread across various databases or looking to harness the power of cloud computing for database operations, this guide will walk you through the necessary steps. From setting up your AWS environment to deploying a functional GraphQL API, each phase is outlined with a focus on simplicity and technical accuracy, ensuring a smooth implementation process.
Understanding the Basics
Before diving into the technicalities of connecting and querying databases using AWS Amplify and AWS CDK, it’s crucial to establish a foundational understanding of the key components involved in this process.
- AWS Amplify: AWS Amplify is a development platform provided by Amazon Web Services (AWS) that simplifies the process of building, deploying, and managing cloud-enabled applications. It integrates a variety of services and features, such as authentication, data storage, and API creation, making it a versatile tool for developers.
- AWS Cloud Development Kit (CDK): The AWS CDK is an open-source software development framework for defining cloud infrastructure in code. It allows developers to use familiar programming languages to model and provision AWS resources efficiently and predictably.
- MySQL and PostgreSQL Databases: MySQL and PostgreSQL are widely used open-source relational database management systems. MySQL is known for its reliability and ease of use, making it a popular choice for web-based applications. PostgreSQL, on the other hand, is renowned for its advanced features and standards compliance, often preferred for complex and large-scale data handling.
Understanding how these technologies interact is key to successfully implementing the integration. AWS Amplify and AWS CDK work in tandem to bridge the gap between your application and the cloud, offering a scalable and secure environment for your databases. By leveraging these tools, developers can efficiently manage their MySQL and PostgreSQL databases, allowing for more focus on the core functionality of their applications rather than the intricacies of cloud infrastructure management. The upcoming sections will guide you through the practical steps of setting up and utilizing these technologies for your database management needs.
Prerequisites
Before embarking on the journey of connecting and querying MySQL and PostgreSQL databases with AWS Amplify and AWS CDK, certain prerequisites need to be in place. Ensuring these elements are set up will facilitate a smooth and efficient integration process.
- CDK CLI Installation:
- The AWS Cloud Development Kit (CDK) Command Line Interface (CLI) is essential for this process. It provides the tools to define and deploy your cloud resources using familiar programming languages.
- To install the CDK CLI, you need to have Node.js and npm (Node Package Manager) installed on your system. Once Node.js is installed, you can install the CDK CLI globally using npm with the following command:
npm install -g aws-cdk - Verify the installation by running
cdk --versionin your command line. This will display the installed version of the AWS CDK.
- Existing MySQL and PostgreSQL Database:
- It is assumed that you already have a MySQL or PostgreSQL database deployed. This guide applies to databases deployed with Amazon Relational Database Service (Amazon RDS) or any publicly accessible MySQL and PostgreSQL databases.
- Ensure that your database is accessible and that you have the necessary credentials (hostname, username, password, port, and database name) for connecting to the database.
- Familiarity with AWS Services:
Basic knowledge of AWS services, especially those related to database management and cloud computing, is beneficial. Familiarity with Amazon RDS, AWS Systems Manager, and AWS AppSync will be advantageous as they are integral to the processes discussed in this guide. - Development Environment Setup: A suitable development environment is required for writing and testing the code. This includes a code editor or Integrated Development Environment (IDE) and access to a terminal or command prompt.
- AWS Account and Permissions:
- An active AWS account is necessary. If you don’t have an AWS account, you can create one at https://aws.amazon.com/.
- Ensure that your AWS account has the necessary permissions to work with AWS Amplify, AWS CDK, and related services like Amazon RDS and AWS Systems Manager.
By meeting these prerequisites, you are well-prepared to start integrating your MySQL and PostgreSQL databases with AWS Amplify and AWS CDK. The next sections will guide you through the detailed steps of this integration process.
Step-by-Step Guide
This section provides a detailed, step-by-step guide to connect and query MySQL and PostgreSQL databases using AWS Amplify and AWS CDK. Each step is crucial for a successful integration, so follow them carefully.
Step 1: Store Database Credentials Securely in Systems Manager
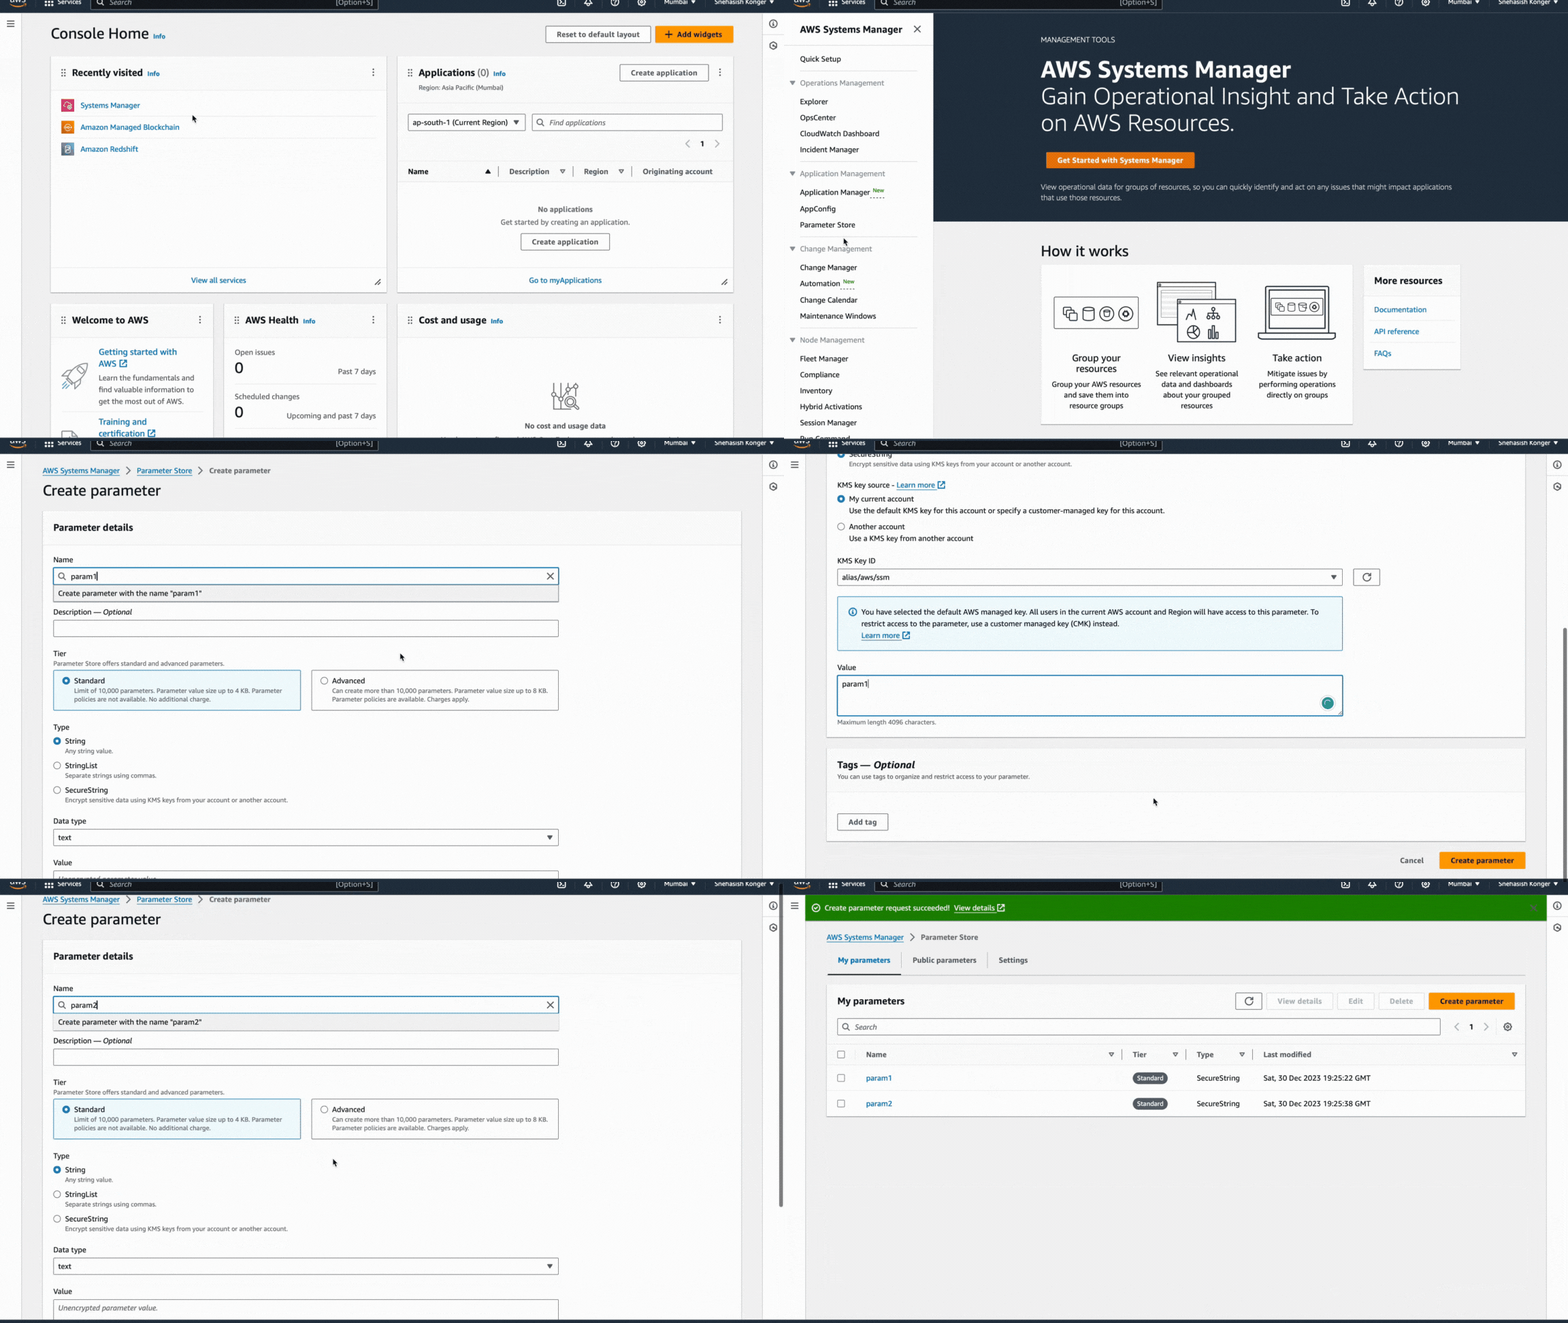
Properly storing and managing database credentials is critical for security and accessibility. AWS Systems Manager’s Parameter Store offers a secure location to store configuration data, including sensitive information like database credentials. Here’s how to securely store your database connection details:
- Access AWS Systems Manager:
- Log into your AWS Management Console.
- Navigate to the AWS Systems Manager service. This can typically be found under the “Management & Governance” section or by searching for “Systems Manager” in the AWS services search bar.
- Using Parameter Store: Within Systems Manager, locate and select “Parameter Store” from the left-hand navigation menu. This is where you’ll store your database connection details.
- Create SecureString Parameters:
- Click on “Create Parameter” to begin setting up your database credentials.
- You will create five different parameters, each as a
SecureString, which is the Parameter Store’s method for handling sensitive information like passwords securely.
- Storing Individual Credentials:
- For each of the following database connection details, create a separate
SecureString:- Hostname: The address of your database server.
- Username: The username for database access.
- Password: The password for the database user.
- Port: The port number your database listens on.
- Database Name: The name of your specific database on the server.
- For each of the following database connection details, create a separate
- Creating Each SecureString:
- For each parameter:
- Name: Give a descriptive name, such as
db-username,db-password, etc. - Description (optional): Provide a clear description for future reference.
- Tier: Choose the Standard tier, which is sufficient for most use cases.
- Type: Select
SecureString. - Value: Enter the specific connection detail (e.g., username, password).
- KMS Key Source: Choose the default “My current account” unless you have a custom Key Management Service (KMS) key you prefer to use.
- Click “Create Parameter” after filling in the details for each.
- Name: Give a descriptive name, such as
- For each parameter:
- Organizing Parameters: Consider using consistent naming conventions or a structured hierarchy for easy identification and retrieval of these parameters later in the process.
After creating all five SecureStrings, review them for accuracy. Ensure that the names and values are correct and correspond to your database credentials.
By securely storing your database credentials in the AWS Systems Manager Parameter Store, you ensure that sensitive information is handled appropriately, reducing the risk of accidental exposure or unauthorized access. This step is fundamental for maintaining the security and integrity of your database connections in the AWS environment.
Step 2: Set Up AWS CDK Project and Install Amplify GraphQL Construct
Setting up your AWS Cloud Development Kit (CDK) project correctly is a foundational step in integrating your MySQL and PostgreSQL databases with AWS Amplify. Here’s how to establish your project and install the necessary Amplify GraphQL construct:
- Creating a New Project Directory:
- Open your command line interface (CLI).
- Create a new directory for your AWS CDK project using the
mkdircommand. For example,mkdir my-cdk-project. - Navigate into your new project directory with
cd my-cdk-project. This directory will house all the necessary files for your project.
- Initializing a CDK Application:
- Within your project directory, initialize a new AWS CDK application. This step lays the groundwork for your cloud infrastructure as code.
- Use the command
cdk init app --language=typescriptto create a TypeScript-based CDK project. TypeScript is chosen for its strong typing and compatibility with AWS CDK, but you can select a different language if it fits your expertise better. - This command creates several files and folders in your project directory, setting up the basic structure of your CDK application.
- Verifying AWS CDK Initialization:
- After initialization, you should see a confirmation message in your CLI indicating successful creation.
- You can also check the contents of your project directory. You should see folders like
binandlib, and files such ascdk.json, confirming a successful CDK initialization.
- Installing Amplify GraphQL API Construct:
- The Amplify GraphQL API construct is a critical component that allows the CDK application to interface effectively with AWS Amplify and your databases.
- Within your project directory, run the command
npm install @aws-amplify/graphql-api-construct. - This command adds the Amplify GraphQL API construct to your project dependencies, allowing you to use it in your CDK application.
- Confirming Installation of Dependencies:
- After running the install command, check your
package.jsonfile. It should now include@aws-amplify/graphql-api-constructin the list of dependencies. - Ensuring this dependency is correctly installed is crucial for the next steps, where you will define and deploy your GraphQL API.
- After running the install command, check your
- Preparing for the Next Steps: With your AWS CDK project set up and the Amplify GraphQL API construct installed, your environment is now ready to start defining the GraphQL schema and integrating it with your database.
By completing these steps, you have successfully established a solid foundation for your AWS CDK application. This setup will enable you to leverage AWS Amplify’s capabilities effectively, particularly in creating and managing GraphQL APIs for your MySQL and PostgreSQL databases. The subsequent steps will build upon this foundation, guiding you through the process of defining your API and connecting it to your database.
Step 3: Define API Queries and Mutations with a GraphQL Schema
Defining your API queries and mutations in a GraphQL schema is a critical step in creating a functional interface for your MySQL and PostgreSQL databases. This process involves outlining the structure of the data your API will handle and the operations that can be performed on it.
1. Creating the GraphQL Schema File:
- In your AWS CDK project directory, navigate to the
lib/folder. This is where most of your application’s logic will reside. - Within this folder, create a new file named
schema.graphql. This file will contain your GraphQL schema definition. - The naming convention
schema.graphqlis standard for GraphQL schema files, making it easily recognizable.
2. Defining Object Types:
- In the
schema.graphqlfile, start by defining GraphQL object types. These types should mirror the structure of your database tables. - For example, if you have a
Userstable in your database, you might define aUsertype in GraphQL with fields corresponding to the table columns likeid,name, andemail. - Use GraphQL’s schema definition language (SDL) to define these types. For instance:
type User {
  id: ID!
  name: String!
  email: String
}3. Outlining Queries and Mutations:
- After defining object types, outline the queries (for retrieving data) and mutations (for creating, updating, or deleting data).
- For example, to fetch a list of users, define a query like:
type Query {
  listUsers: [User]
}- Similarly, to add a new user, define a mutation such as:
type Mutation {
  addUser(name: String!, email: String): User
}4. Integrating with SQL Databases:
- With AWS Amplify’s support for SQL databases, you can further enhance your GraphQL schema using the
@sqldirective. - This directive allows you to embed SQL queries and mutations directly within your GraphQL schema. For example:
type Query {
  getUserById(id: ID!): User @sql(statement: "SELECT * FROM Users WHERE id = :id;")
}5. Ensuring Authorization and Security:
- Incorporate authorization rules within your schema using directives like
@authto control access to your API. - For instance, you might restrict certain queries or mutations to authenticated users or users with specific roles.
6. Validating the Schema: After defining your object types, queries, and mutations, validate the schema to ensure there are no syntax errors and that it accurately represents your database structure and required operations.
By carefully defining your API queries and mutations within the GraphQL schema, you create a robust and flexible API layer for your MySQL and PostgreSQL databases. This schema acts as a blueprint for your API, guiding how data is retrieved, manipulated, and secured. With your schema in place, you’re well-prepared to move on to configuring the GraphQL API construct and integrating it with your database.
Step 4: Configure GraphQL API Construct and VPC Settings
After defining the GraphQL schema, the next crucial step involves configuring the AWS Amplify GraphQL API construct in your AWS CDK project and setting up Virtual Private Cloud (VPC) configurations if necessary. This step bridges your schema with the AWS infrastructure, enabling efficient communication between your application and the database.
1. Importing GraphQL API Construct:
- Open the main stack file in your CDK project, usually named
lib/<your-project-name>-stack.ts. - At the beginning of this file, import the required constructs for the GraphQL API. Add the following import statement:
import { AmplifyGraphqlApi, AmplifyGraphqlDefinition } from '@aws-amplify/graphql-api-construct';- These imports will allow you to use the Amplify GraphQL API constructs in your CDK stack.
2. Configuring the GraphQL API Instance:
- Inside your main stack class, instantiate the Amplify GraphQL API construct. This step involves defining various properties such as the API name and the database connection configuration.
- Here’s an example of how to configure the GraphQL API instance:
new AmplifyGraphqlApi(this, 'MyGraphQLApi', {
  apiName: 'MyApi',
  definition: AmplifyGraphqlDefinition.fromFilesAndStrategy(
    [path.join(__dirname, 'schema.graphql')],
    {
      name: 'MyDatabase',
      dbType: 'MYSQL', // or 'POSTGRES'
      // other configurations...
    }
  ),
  // additional configurations...
});
- Replace
MyApi,MyDatabase, and other placeholders with appropriate names and settings for your project.
3. VPC Configuration (If Applicable):
- If your database instance is within an Amazon VPC, such as an Amazon RDS instance, you need to configure the
vpcConfigurationproperty in the GraphQL API construct. - Specify the VPC ID, security group IDs, and subnet configurations to ensure that the GraphQL API can communicate securely with the database inside the VPC.
- Here’s an example of setting the VPC configuration:
vpcConfiguration: {
  vpcId: 'vpc-1234567890abcdef0',
  securityGroupIds: ['sg-1234567890abcdef0'],
  subnetIds: ['subnet-abcdef01234567890', 'subnet-0123456789abcdef0']
}- Replace the example VPC and subnet IDs with the actual IDs of your VPC and subnets.
4. Integrating Database Connection Details:
- Within the GraphQL API construct, include the database connection details that you stored securely in the Systems Manager Parameter Store.
- Refer to the SSM parameter paths for the database hostname, port, username, password, and database name in the construct configuration.
5. Deploying the Stack:
- Once the GraphQL API construct and VPC settings are configured, deploy the stack to create the resources in your AWS account.
- Run
cdk deployin the root directory of your CDK project. This command compiles your TypeScript code, synthesizes the CloudFormation template, and deploys the resources to AWS.
Read More: How to deploy a web app on AWS?
By completing these steps, you have successfully configured the GraphQL API construct with your AWS CDK application and established the necessary connections and settings for secure communication with your MySQL or PostgreSQL database. This configuration lays the groundwork for deploying your API and enabling database queries and mutations through it.
Advanced Techniques
After setting up the basic infrastructure for connecting and querying MySQL and PostgreSQL databases with AWS Amplify and AWS CDK, you can explore advanced techniques to enhance your API’s functionality and manageability. These techniques involve refining your GraphQL API and optimizing its interaction with the databases.
Refactoring SQL Statements into File References
- Manage Complexity with Separate SQL Files:
- As your GraphQL API grows, managing inline SQL statements can become cumbersome. To simplify this, you can author SQL statements in separate
.sqlfiles and reference them in your GraphQL schema. - This approach promotes cleaner code, easier maintenance, and better scalability.
- As your GraphQL API grows, managing inline SQL statements can become cumbersome. To simplify this, you can author SQL statements in separate
- Creating a Directory for SQL Statements:
- Create a new folder in your project directory, typically named
lib/sql-statements, to organize your SQL files. - This dedicated directory helps in maintaining a clear structure for your database-related queries and mutations.
- Create a new folder in your project directory, typically named
- Authoring SQL Files:
- Within the
lib/sql-statementsfolder, create individual.sqlfiles for different queries or mutations. - For example, you might have a file named
getUsers.sqlwith a SQL query to fetch user data from your database.
- Within the
- Integrating SQL Files in GraphQL Schema:
- Update your GraphQL schema to reference these SQL files. Instead of writing inline SQL statements, use the
@sqldirective with a reference attribute. - For instance:
type Query { getUsers: [User] @sql(reference: "getUsers") } - This method links your GraphQL queries and mutations to the respective SQL files, keeping your schema concise and more readable.
- Update your GraphQL schema to reference these SQL files. Instead of writing inline SQL statements, use the
Customizing GraphQL Queries and Mutations
- Using the
@sqlDirective for Flexibility:- The
@sqldirective in Amplify GraphQL API provides flexibility to define custom SQL statements directly in your GraphQL schema. - This allows you to go beyond the default, auto-generated CRUD operations, enabling more complex and tailored database interactions.
- The
- Inline SQL vs. File References:
- Depending on the complexity and length of your SQL statements, you can choose between inline SQL or file references.
- Inline SQL is suitable for shorter, straightforward queries, while file references are better for longer and more complex SQL statements.
- Creating Custom Queries and Mutations:
- Define custom queries and mutations to suit specific needs that are not covered by the standard CRUD operations.
- For instance, you might create a mutation for a bulk update operation or a query that joins data from multiple tables.
- Dynamic SQL for Complex Scenarios:
- For scenarios requiring dynamic SQL, such as conditional queries or complex joins, carefully craft your SQL statements to ensure they are efficient and secure.
- Be mindful of SQL injection risks and validate inputs when constructing dynamic SQL queries.
By applying these advanced techniques, you can significantly enhance the functionality and scalability of your GraphQL API. These methods allow for greater customization, enabling your API to cater to more complex and specific database operations. Additionally, they contribute to better organization and management of your codebase, making it easier to maintain and update your API as your application evolves.
Conclusion
In this guide, we’ve navigated through the intricate process of connecting and querying MySQL and PostgreSQL databases using AWS Amplify and the AWS Cloud Development Kit (CDK). Starting with the secure storage of database credentials in the Systems Manager, we progressed through setting up the AWS CDK project, defining GraphQL schemas, and configuring the GraphQL API construct along with necessary VPC settings. Advanced techniques like refactoring SQL statements and customizing GraphQL queries further refined our approach, enhancing the API’s capabilities.
This integration not only streamlines the development process but also leverages the robustness and scalability of AWS services. By harnessing the power of AWS Amplify and AWS CDK, developers can efficiently manage and interact with their databases, enabling them to focus more on core application features rather than infrastructure complexities.
As technology evolves, so do the methodologies and best practices in cloud computing and database management. Keeping abreast of these changes and continuously refining your skills will ensure that your applications remain efficient, secure, and scalable. Remember, the journey doesn’t end here; it’s an ongoing process of learning and adaptation to meet the dynamic demands of modern software development.
FAQs:
Can AWS Amplify connect to existing MySQL and PostgreSQL databases?
Yes, AWS Amplify now supports connecting to existing MySQL and PostgreSQL databases. This feature allows developers to create GraphQL APIs with AWS Amplify’s Cloud Development Kit (CDK) construct, enabling easy integration with these databases for web and mobile applications.
What are the prerequisites for integrating MySQL or PostgreSQL databases with AWS Amplify and AWS CDK?
The prerequisites include having the CDK CLI installed, an existing MySQL or PostgreSQL database (deployed with Amazon RDS or publicly accessible), and a basic understanding of AWS services and GraphQL. Additionally, a suitable development environment and an AWS account with the necessary permissions are required.
How do I store database credentials securely when using AWS Amplify with MySQL or PostgreSQL?
Database credentials should be stored securely using AWS Systems Manager’s Parameter Store. Credentials including hostname, username, password, port, and database name should be stored as SecureString parameters, ensuring sensitive information is handled securely and reducing the risk of unauthorized access.
What advanced techniques can be used for optimizing GraphQL APIs in AWS Amplify when connected to SQL databases?
Advanced techniques include refactoring SQL statements into separate .sql files for better manageability and defining custom GraphQL queries and mutations using the @sql directive for more complex database interactions. This allows for greater flexibility and scalability in managing the API.
How do I handle VPC settings when connecting AWS Amplify to a database within a VPC?
If your database is deployed within an Amazon VPC, such as with Amazon RDS, you need to configure the vpcConfiguration property in the GraphQL API construct. This includes specifying the VPC ID, security group IDs, and subnet configurations to ensure secure communication between the GraphQL API and the database.
Happy Coding 🙂
