Follow Us:
How to Implement Stack Data Structure using ReactJS?

Data structures are an essential aspect of computer science and programming. They allow us to organize and manage data efficiently, making our programs more robust and scalable. The stack data structure is a popular data structure used in many applications, such as web browsers and compilers. In simple terms, a stack is a collection of elements that can be added or removed only from the top.
ReactJS is a popular front-end framework used for building complex and dynamic user interfaces. It allows developers to create reusable UI components and manage state effortlessly. In this article, we will explore how to implement a stack data structure using ReactJS. We will go through the steps required to create a stack class and then create a reusable stack component in ReactJS. This article assumes a basic understanding of ReactJS and JavaScript programming. By the end of this article, you will have a better understanding of how to create a reusable stack component in ReactJS, which you can integrate into your own projects.
Setting up the environment
Before we dive into the implementation of the stack data structure in ReactJS, we need to set up our development environment. Here are the steps required to set up your environment:
Installing Node.js and NPM
Node.js is a JavaScript runtime that allows developers to run JavaScript on the server-side. It also comes with NPM (Node Package Manager), which is a package manager that allows you to install and manage dependencies for your project. You can download and install Node.js and NPM from the official website: https://nodejs.org/en/download/.
Creating a new ReactJS project
Once you have installed Node.js and NPM, you can create a new ReactJS project using the create-react-app command-line tool. Open your terminal or command prompt and type the following command:
npx create-react-app my-stack-appThis command will create a new ReactJS project called “my-stack-app” in your current directory.
Setting up project structure
After creating the new ReactJS project, navigate to the project directory using the following command:
cd my-stack-appThe create-react-app command-line tool generates a basic project structure for you, which includes the following files and folders:
public: This folder contains the public assets such as index.html, favicon, etc.src: This folder contains the source code of your ReactJS application.node_modules: This folder contains all the dependencies required by your project.package.json: This file contains the metadata about your project and the list of dependencies.
Now that we have set up our environment, we can move on to the implementation of the stack data structure in ReactJS.
Implementing Stack Data Structure
Before we can create a stack component in ReactJS, we need to create a stack class and implement the required stack methods. Here are the steps required to implement a stack data structure in JavaScript:
Explanation of Stack Data Structure in JavaScript
In JavaScript, we can implement a stack data structure using an array. The last element of the array represents the top of the stack. We can use the push() method to add an element to the top of the stack and the pop() method to remove an element from the top of the stack. Additionally, we can use the peek() method to get the value of the element at the top of the stack without removing it.
Creating a Stack class
To create a stack class,
- Create a new file called
Stack.jsin thesrc/utilsfolder of your ReactJS project. - In the
Stack.jsfile, create a new class calledStackwhich has a constructor method that initializes an empty array:
class Stack {
  constructor() {
    this.items = [];
  }
}
This class has a constructor method that initializes an empty items array, which we will use to store the elements of the stack.
Adding Stack methods
Next, we need to add the stack methods that allow us to push, pop, peek, check if the stack is empty, and get the size of the stack:
class Stack {
  constructor() {
    this.items = [];
  }

  push(element) {
    this.items.push(element);
  }

  pop() {
    return this.items.pop();
  }

  peek() {
    return this.items[this.items.length - 1];
  }

  isEmpty() {
    return this.items.length === 0;
  }

  size() {
    return this.items.length;
  }
}
export default Stack;
With these methods, we can now use the stack class to create a stack component in ReactJS.
Rendering the Stack Component
Now that we have implemented the stack data structure, we can create a reusable stack component in ReactJS. Here are the steps required to create the stack component:
Creating the Stack component
In your ReactJS project,
- Create a new file called
StackComponent.jsin thesrc/componentsfolder of your ReactJS project. - In the
StackComponent.jsfile, import theReactlibrary and theStackclass component from theStack.jsfile:
import React, { Component } from 'react';
import Stack from '../utils/Stack';
Next, create a new class called StackComponent, which extends the Component class:
class StackComponent extends Component {
  render() {
    return (
      <div>
        // Stack UI will be added here
      </div>
    );
  }
}
Adding state and event handlers
In the constructor method of the StackComponent class, initialize the stack state with a new instance of the Stack class:
class StackComponent extends Component {
  constructor(props) {
    super(props);
    this.state = {
      stack: new Stack(),
      input: ''
    };
  }

  render() {
    return (
      <div>
        <h2>Stack Component</h2>
        <input type="text" onChange={this.handleInputChange} value={this.state.input} />
        <button onClick={this.handlePush}>Push</button>
        <button onClick={this.handlePop}>Pop</button>
        <ul>
          {this.state.stack.items.map(item => (
            <li key={item}>{item}</li>
          ))}
        </ul>
      </div>
    );
  }
}
In this class, we have defined the state object with two properties: stack, which is initialized as a new instance of the Stack class, and input, which will be used to store the value entered by the user in the input field.
We have also defined a render method that returns the HTML elements for the StackComponent. This method includes an input field for the user to enter values to push onto the stack, as well as two buttons: one to push the value onto the stack and another to pop the top item from the stack.
The stack items are displayed in an unordered list using the map function to iterate over the items array in the stack state object.
- Add event handler methods to the
StackComponentclass to handle pushing and popping items from the stack:
import React, { Component } from "react";
import Stack from "../utils/Stack";
import "./StackComponent.css";
class StackComponent extends Component {
  constructor(props) {
    super(props);
    this.state = {
      stack: new Stack(),
    };
  }

  handlePush = (event) => {
    event.preventDefault();
    const { stack } = this.state;
    const value = this.refs.input.value;
    stack.push(value);
    this.setState({ stack });
    this.refs.input.value = "";
  };

  handlePop = (event) => {
    event.preventDefault();
    const { stack } = this.state;
    stack.pop();
    this.setState({ stack });
  };

  render() {
    return (
      <div className="stack-container">
        <h1 className="stack-title">Stack Data Structure</h1>
        <form>
          <input
            type="text"
            ref="input"
            className="stack-input"
            placeholder="Enter a value to push to the stack"
          />
          <div className="stack-buttons">
            <button
              className="stack-button push-button"
              onClick={this.handlePush}
            >
              Push
            </button>
            <button
              className="stack-button pop-button"
              onClick={this.handlePop}
            >
              Pop
            </button>
          </div>
        </form>

        <h3>Stack Stats:</h3>
        <div className="stack-stats">
          <p className="stack-stat">Top Element: {this.state.stack.peek()}</p>
          <p className="stack-stat">
            Stack Size: {this.state.stack.items.length}
          </p>
        </div>
        <div className="stack">
          <h3>Stack Items:</h3>
          <ul className="stack-items">
            {this.state.stack.items.map((item, index) => (
              <li className="stack-item" key={index}>
                {item}
              </li>
            ))}
          </ul>
        </div>
      </div>
    );
  }
}

export default StackComponent;
In these methods, we access the stack and input properties from the state object and call the push or pop method on the stack object. We then update the state object with the new stack or input value using the setState method.
Adding CSS:
To improve the visual appeal of our Stack component, we can add some CSS styles to it. In the StackComponent.js file, add the following CSS styles inside the style tag:
.stack-container {
  display: flex;
  flex-direction: column;
  align-items: center;
  margin: 50px;
}

.stack-title {
  color: rgb(97, 97, 247);
  margin: 20px;
}

.stack-items {
  display: flex;
  flex-direction: column-reverse;
  justify-content: center;
  align-items: center;
  margin: 20px;
}

.stack-item {
  width: 30px;
  height: 30px;
  background: #a3fc9d;
  border-radius: 5px;
  margin: 10px;
  text-align: center;
  display: flex;
  justify-content: center;
  align-items: center;
}

.stack-buttons {
  display: flex;
  flex-direction: row;
  justify-content: center;
  align-items: center;
  margin: 20px;
}

.stack-button {
  margin: 0 10px;
  background: #f8e1ee;
  width: 200px;
  border-radius: 5px;
  padding: 10px;
  font-size: 18px;
  color: rgb(0, 0, 0);
  cursor: pointer;
}

.push-button {
  background: #f8e1ee;
}

.pop-button {
  background: #bbfdd8;
}

.stack-stats {
  display: flex;
  flex-direction: column;
  justify-content: space-between;
  width: 20%;
  border: #000 solid 1px;
  border-radius: 5px;
  box-shadow: 5px 5px 0px #000;
}

.stack-input{
  width: 100%;
  height: 30px;
  border-radius: 5px;
  border: 1px solid #000;
  padding: 5px;
  padding-left: 5%;
  margin: 10px 0;
}
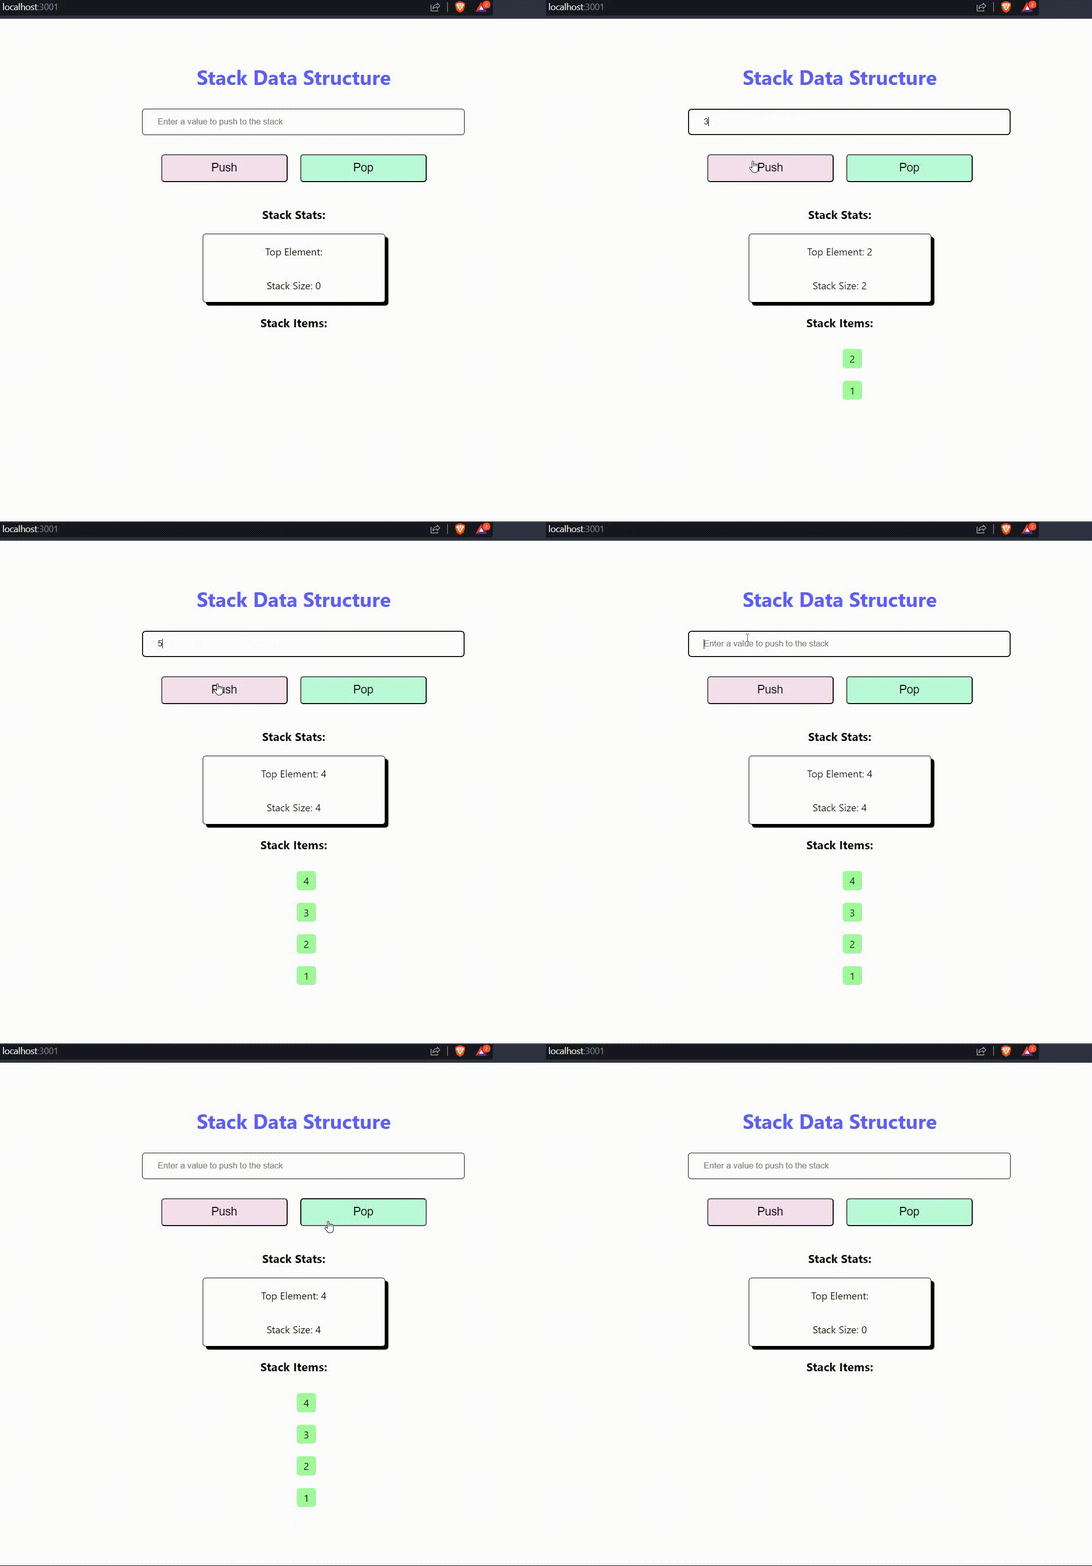
With these steps, we have created a reusable stack component in ReactJS that allows users to push and pop items onto the stack and displays the current state of the stack.
Output:

Conclusion
In this article, we have learned how to implement a stack data structure in JavaScript and how to create a reusable stack component in ReactJS. We started by setting up the environment for our project and then implemented the stack data structure using a class and its methods.
Next, we created a new ReactJS component called StackComponent, which allows users to push and pop items onto the stack and displays the current state of the stack. We achieved this by adding state and event handlers to the StackComponent class and rendering the stack data in a ul element.
By following the steps outlined in this article, you can create a reusable stack component in ReactJS that can be used in your projects. Understanding data structures and algorithms is an important skill for any developer, and implementing them in a popular framework like ReactJS can help you improve your coding skills and build more efficient and scalable applications.


