Queue data structure is a commonly used abstract data type that stores elements in a sequential order based on First-In-First-Out (FIFO) principle. It is widely used in computer science and engineering applications such as operating systems, networking, and data processing. Implementing a Queue data structure in ReactJS can be useful in various situations, especially when dealing with real-time data processing, user interfaces, and web applications.
ReactJS, a popular JavaScript library for building user interfaces, provides an efficient way to build web applications with reusable and modular components. ReactJS’s component-based architecture can be leveraged to build a robust and scalable Queue data structure. This technical blog will cover how to implement a Queue data structure in ReactJS, including creating a Queue class, building a Queue component, and implementing various advanced features such as priority queues, circular queues, and queue animations.
By the end of this blog, readers will have a better understanding of the Queue data structure, its importance, and how to implement it using ReactJS. Furthermore, readers will be able to apply the concepts learned to build their own queue-based applications in ReactJS.
Understanding the Queue Data Structure
A queue is a collection of elements that is based on the principle of First-In-First-Out (FIFO). The elements are inserted at the end of the queue and are removed from the beginning of the queue. The element that is inserted first is the first element to be removed. The queue data structure can be compared to the queue of customers waiting in line for a movie ticket, where the customer who arrived first will be the first to be served.
Features of Queue Data Structure:
The key features of a queue data structure are:
- FIFO (First-In-First-Out) order
- Enqueue: Adding an element to the end of the queue
- Dequeue: Removing an element from the front of the queue
- Peek: Viewing the first element of the queue without removing it
- Size: The total number of elements in the queue
- isEmpty: A check to see if the queue is empty
Types of Queue Data Structure
There are several types of queue data structures, including:
- Simple Queue: A queue that only allows the insertion of new elements at the end and removal of elements from the front.
- Circular Queue: A queue that allows the elements to wrap around and form a circle.
- Priority Queue: A queue that assigns priority to each element, and the element with the highest priority is removed first.
- Deque: A Double-Ended Queue that allows elements to be added or removed from both ends.
In the next section, we will discuss how to implement a simple queue data structure using ReactJS.
Implementing Queue Data Structure in ReactJS
Before starting to implement the Queue data structure, we need to set up the development environment. We will use the create-react-app tool to set up a new React project. Open the terminal and run the following command to create a new project.
npx create-react-app queue-app
Once the project is created, navigate to the project directory and start the development server by running the following command.
cd queue-app
npm start
This will start the development server and open the application in the browser at http://localhost:3000.
Creating a Queue class
To implement the Queue data structure, we need to create a Queue class. The Queue class will have the following methods:
- enqueue(item): Adds an item to the end of the queue.
- dequeue(): Removes the item from the front of the queue.
- peek(): Returns the item at the front of the queue without removing it.
- size(): Returns the number of items in the queue.
- isEmpty(): Returns true if the queue is empty, false otherwise.
Here is the implementation of the Queue class.
class Queue {
  constructor() {
    this.items = [];
  }

  enqueue(item) {
    this.items.push(item);
  }

  dequeue() {
    if (this.isEmpty()) {
      return "Underflow";
    }
    return this.items.shift();
  }

  peek() {
    if (this.isEmpty()) {
      return "Queue is empty";
    }
    return this.items[0];
  }

  size() {
    return this.items.length;
  }

  isEmpty() {
    return this.items.length === 0;
  }
}
export default Queue;
Creating a Queue component:
Now we will create a Queue component that will use the Queue class to implement the Queue data structure. The Queue component will have an input field, a push button to push the input element into the queue, a pop button to pop out the element from the queue in FIFO order, and a div to display the top element and the size of the queue.
In this components we’ll add the basic functionalities like:
- handlePush: This function is called when the user clicks the push button. It adds the input element to the end of the queue, sets the top element, updates the size of the queue, and clears the input field.
- handlePop: This function is called when the user clicks the pop button. It removes the element from the front of the queue, sets the top element, and updates the size of the queue.
- handleChange: This function is called when the user types in the input field. It updates the input state with the current value of the input field.
import React, { useState } from "react";
import Queue from "./Queue";

function QueueComponent() {
  const [queue, setQueue] = useState(new Queue());
  const [input, setInput] = useState("");
  const [top, setTop] = useState("");
  const [size, setSize] = useState(0);

  const handlePush = () => {
    setQueue(queue);
    queue.enqueue(input);
    setTop(queue.peek());
    setSize(queue.size());
    setInput("");
  };

  const handlePop = () => {
    queue.dequeue();
    setTop(queue.peek());
    setSize(queue.size());
  };

  const handleChange = (e) => {
    setInput(e.target.value);
  };

  return (
    <div className="md:flex flex-col  items-center">
      <h1 className="text-3xl text-indigo-500 m-10 font-bold text-center">
        Queue Data Structure
      </h1>
      <input
        type="text"
        value={input}
        onChange={handleChange}
        className="border-2 border-black rounded-lg px-4 py-2"
        placeholder="Enter a value"
      />
      <div className="flex flex-row space-x-4 space-y-4 items-center justify-center mb-10">
        <button
          onClick={handlePush}
          className="mt-4 border-2 border-black z-10 rounded-lg shadow-[5px_5px_0px_0px_rgba(0,0,0)] px-4 py-2 hover:shadow transition duration-200 bg-[#bbfdd8] flex-shrink-0"
        >
          Push
        </button>
        <button
          onClick={handlePop}
          className="mt-4 border-2 border-black z-10 rounded-lg shadow-[5px_5px_0px_0px_rgba(0,0,0)] px-4 py-2 hover:shadow transition duration-200 bg-[#f8e1ee] flex-shrink-0"
        >
          Pop
        </button>
      </div>
      <h3 className="text-2xl text-black font-bold text-center mb-5">
        Queue Properties
      </h3>
      <div className="mt-4 flex flex-col border-2 font-thin border-black rounded-lg shadow-[5px_5px_0px_0px_rgba(0,0,0)] px-10 py-2 ">
        <span>Top Element: {top}</span>
        <span>Last Element: {queue.items[0]}</span>
        <span>Queue Size: {size}</span>
      </div>

      <div className="flex flex-col m-10 items-center justify-center">
        <h3 className="text-2xl text-red-400 font-bold text-center mb-5">
          Queue Elements
        </h3>
        <div className="flex flex-row space-x-4">
          <div className="text-center flex flex-row-reverse">
            {queue.items.map((item) => (
              <span className="border-2 border-black bg-[#a3fc9d] rounded-md px-4 py-2">
                {item}
              </span>
            ))}
          </div>
        </div>
      </div>
    </div>
  );
}

export default QueueComponent;
So, our Queue component is now ready to embed with the App.js.
App.js:
To use the Queue component, we need to import it into the App.js file and render it inside the App component.
import React from "react";
import QueueComponent from "./QueueComponent";

function App() {
  return (
    <div className="App">
      <QueueComponent />
    </div>
  );
}

export default App;
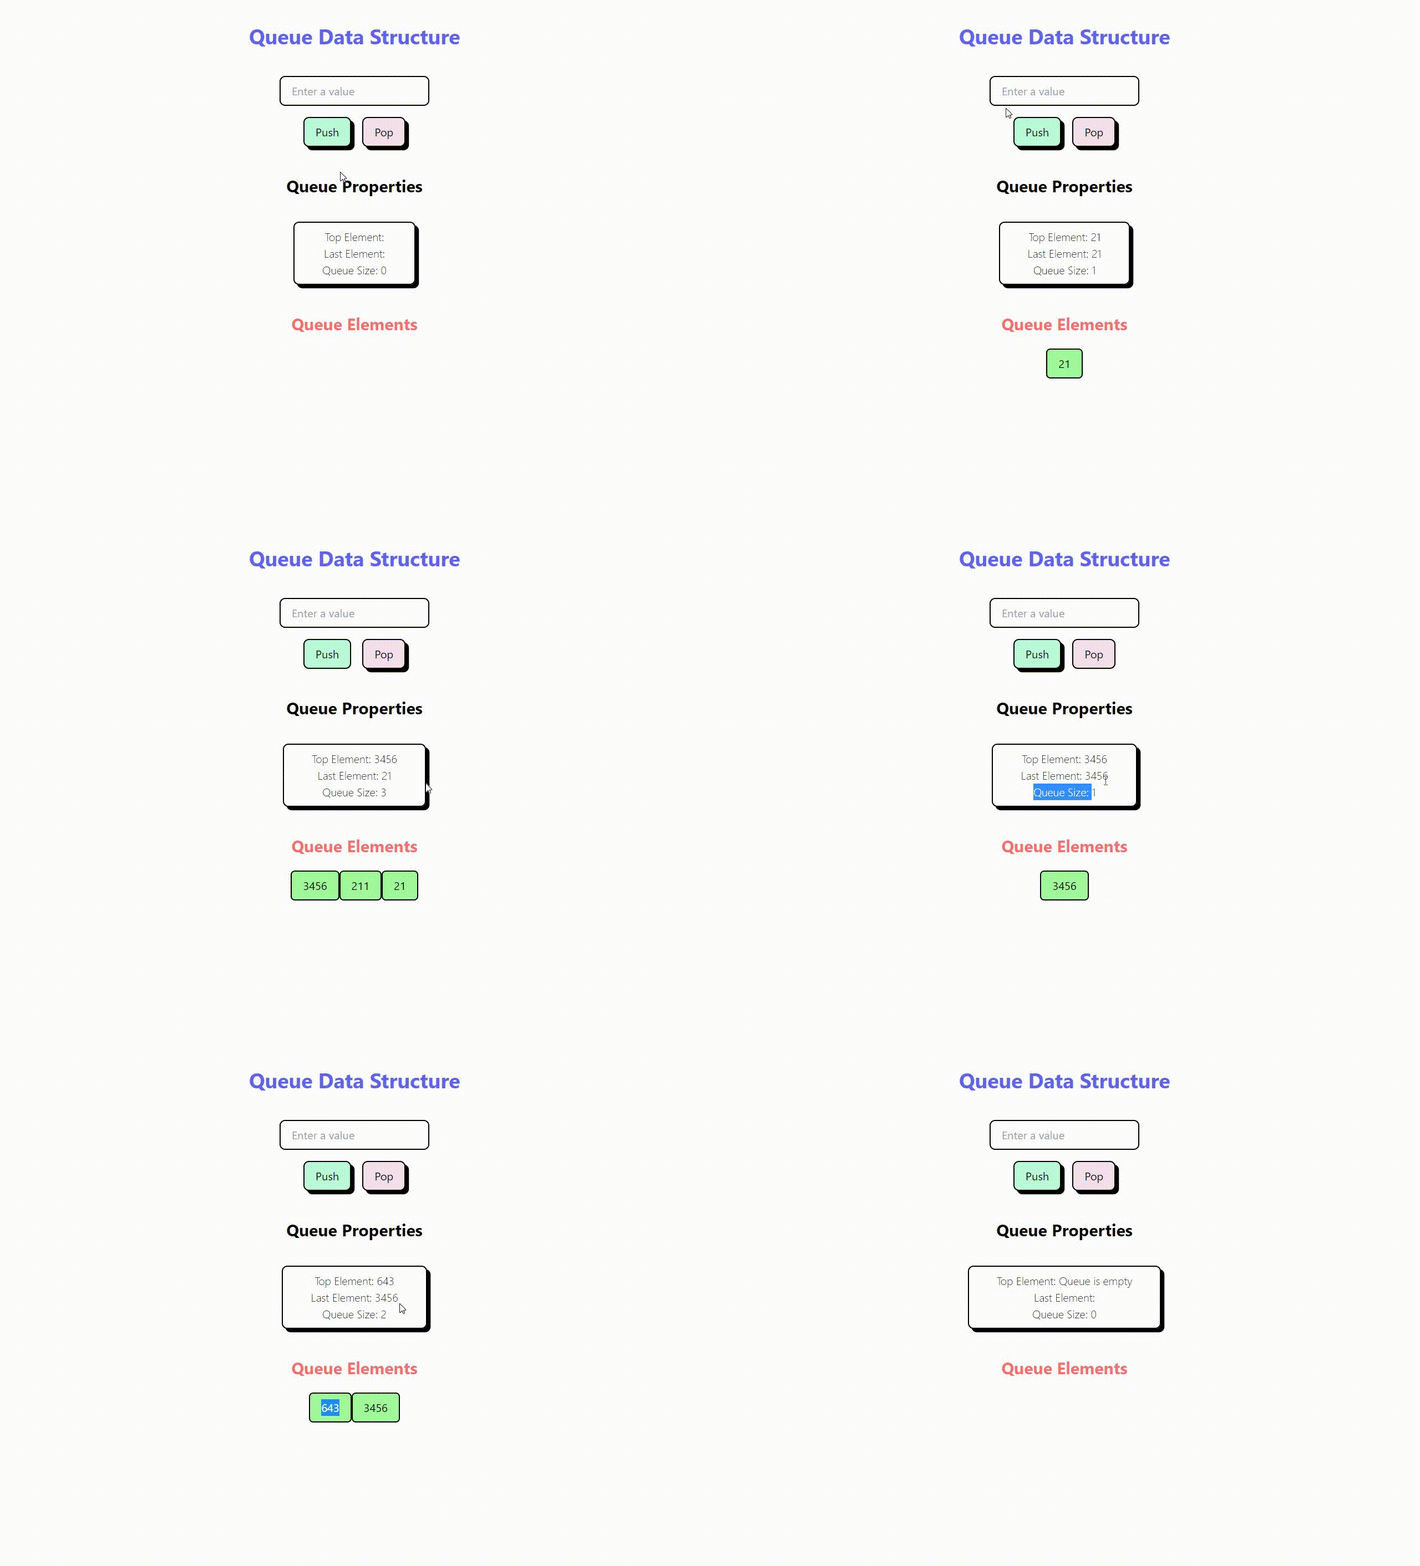
After using the Queue component in the App.js file, we can now run the application and test it. When we open the application in the browser, we will see the input field to add elements to the queue, push button to add elements to the queue, pop button to remove elements from the queue, and a div to show the top element and size of the queue.
To run the application, we need to use the following command in the terminal: npm start
This will start the development server and open the application in the default browser. We can now test the Queue component by adding and removing elements from the queue.
Output:
To see the Queue component in action, check out this video:
Here is the Live demo of this project
In this video, you can see how the Queue component is used to add and remove elements from the queue. When the user adds an element to the queue, it appears at the end of the queue. When the user removes an element from the queue, the first element of the queue is removed and the top element and size of the queue are updated accordingly.
This video demonstrates how the Queue component can be used in a real-world application to manage a queue of tasks or messages. With the help of ReactJS, we can create dynamic and interactive user interfaces that make our applications more user-friendly and efficient.
Advanced Features of Queue Data Structure
In the previous sections, we have learned how to implement a basic Queue data structure using ReactJS. In this section, we will explore some advanced features of the Queue data structure that can help us build more efficient and scalable applications.
Memoizing the Queue state using useMemo hook
The useMemo hook can be used to memoize the state of the Queue component and avoid unnecessary re-renders. Memoization is a technique used to store the results of expensive function calls and reuse them when the same inputs occur again.
To use the useMemo hook, we need to import it from the ‘react’ library and wrap our Queue state object in it. Here’s how we can use the useMemo hook in the Queue component:
import React, { useState, useMemo } from "react";

function QueueComponent() {
  const [queue, setQueue] = useState([]);
  const [input, setInput] = useState("");

  const addElement = () => {
    setQueue([...queue, input]);
    setInput("");
  };

  const removeElement = () => {
    setQueue(queue.slice(1));
  };

  const topElement = useMemo(() => {
    return queue.length > 0 ? queue[0] : "Empty queue";
  }, [queue]);

  const queueSize = useMemo(() => {
    return queue.length;
  }, [queue]);

  return (
    <div>
      <input type="text" value={input} onChange={handleChange} />
      <button onClick={addElement}>Push</button>
      <button onClick={removeElement}>Pop</button>
      <div>
        Top Element: {topElement}
      </div>
      <div>
        Queue Size: {queueSize}
      </div>
      <h3>Queue Elements:</h3>
          <div>
            {queue.items.map((item) => (
              <span>
                {item}
              </span>
            ))}
          </div>
    </div>
  );
}
export default QueueComponent;
In this code, we have used the useMemo hook to memoize the topElement and queueSize state variables. These variables are calculated based on the queue state variable and will only be re-calculated when the queue state changes.
Using the useRef hook to store top element and queue size:
The useRef hook can be used to store the top element and queue size of the Queue component and avoid re-calculating them on every render. The useRef hook returns a mutable ref object that can be used to store any mutable value.
To use the useRef hook, we need to import it from the ‘react’ library and create two ref objects for the top element and queue size. Here’s how we can use the useRef hook in the Queue component:
import React, { useState, useMemo, useRef } from "react";

function QueueComponent() {
  const [queue, setQueue] = useState([]);
  const [input, setInput] = useState("");
  const topElementRef = useRef("Empty queue");
  const queueSizeRef = useRef(0);

  const addElement = () => {
    setQueue([...queue, input]);
    setInput("");
  };

  const removeElement = () => {
    setQueue(queue.slice(1));
  };

  const topElement = useMemo(() => {
    topElementRef.current = queue.length > 0 ? queue[0] : "Empty queue";
    return topElementRef.current;
  }, [queue]);

  const queueSize = useMemo(() => {
    queueSizeRef.current = queue.length;
    return queueSizeRef.current;
  }, [queue]);

  const handleChange = (e) => {
    setInput(e.target.value);
  };

  return (
    <div>
      <input type="text" value={input} onChange={handleChange} />
      <button onClick={addElement}>Push</button>
      <button onClick={removeElement}>Pop</button>
      <div>
        Top Element: {topElement}
      </div>
      <div>
        Queue Size: {queueSize}
      </div>
      <h3>Queue Elements:</h3>
          <div>
            {queue.items.map((item) => (
              <span>
                {item}
              </span>
            ))}
          </div>
    </div>
  );
}
In this code, we have created two ref objects using the useRef hook, one for the top element and another for the queue size. We have also updated the useMemo hooks for topElement and queueSize to update these ref objects instead of calculating them on every render.
So, these are the two ways we can implement the same thing in just one file QueueComponent.js.
Conclusion:
In this blog, we have learned how to implement the Queue data structure in ReactJS. We have also explored some advanced features of the Queue data structure that can help us build more efficient and scalable applications.
By using the useState hook, we were able to create a Queue state object and modify it using the setQueue function. We also created an input field to allow users to input new elements into the queue, and push and pop buttons to add and remove elements from the queue.
We then explored two advanced features of the Queue data structure – memoization using the useMemo hook, and using the useRef hook to store the top element and queue size. Memoization helped us avoid unnecessary re-renders, and the useRef hook helped us avoid re-calculating the top element and queue size on every render.
Overall, implementing a Queue data structure in ReactJS can help us build more efficient and scalable applications. By using the concepts learned in this blog, we can further optimize our applications and improve their performance.
