
React js is probably the most popular JavaScript library for building user interfaces and is used by some of the biggest companies in the world, including Facebook, Instagram, Netflix, and Airbnb. In this blog post, we’ll take a look at what React is, how it works, why it’s so popular and its core concepts. So that if you’re a beginner or wanna start in React, you got a clear-cut knowledge on “why you should learn React js“.
React is used to create single-page applications and mobile applications. For the best example, “Youtube” the most used video platform is created using React JS.
React is easy to learn and use. It has a small API and it is fast. React is declarative, meaning you can write code that is easy to read and understand. React is component-based, meaning you can create reusable components. React is also functional, meaning you can write code that is easy to test and debug.
Okay, now here many people think that react is a javascript framework, but no it isn’t. Although I’ve already mentioned that it is a javascript library, still I’m writing a brief about it.
React isn’t a framework:
React is a JavaScript library for building user interfaces. It lets you create reusable components so that your code is easy to read and maintain. When you build a React app, you create a tree of components. Each component has a render() method that takes input and returns a React element. This element can be either a DOM element or another React component.
React is not a framework. That means there’s no one-size-fits-all solution for every problem. You have to choose the right tools for your project. You can use React with a variety of other libraries and frameworks.
It also means that React is flexible. You can use it with a variety of other libraries and frameworks. And because it’s just a library, you don’t have to use all of React to use any of React.
React is a declarative, efficient, and flexible JavaScript library for building user interfaces. It lets you create reusable components so that your code is easy to read and maintain.
When you build a React app, you create a tree of components. Each component has a render() method that takes input and returns a React element. This element can be either a DOM element or another React component.
Why React js?
React is a declarative, component-based, and functional programming library that lets you create reusable components so that your code is easy to read and maintain. When a user interacts with a React component, React updates the component automatically. This makes your app more responsive and fast.
There are many benefits of using React for front-end development. React is easy to learn and use. It has a small API, which makes it easy to use. React is fast and can be used for larger projects. React is modular and can be used with other frameworks. React is stable and has a large community.
1. Reusable Components:
React has a lot of benefits, including the ability to create reusable components. This means that you can create a component once and use it multiple times in your app. This can be a big time saver, and it can also help make your code more organized and maintainable.
Creating reusable components is pretty simple. Let’s say you have a component that renders a list of items. You can create this component once and then use it anywhere in your app that you need to display a list of items. To do this, you would create a file called List.js and put the following code in it:
import React from 'react';

const List = (props) => {
  return (
    <ul>
      {props.items.map((item, index) => (
        <li key={index}>{item}</li>
        ))}
      </ul>
    );

};

export default List;
Now that you have created your List component, you can use it in any other component in your app. For example, let’s say you have a component that renders a list of articles. You can use your List component to render the articles:
import React from 'react';

import List from './List';

const Articles = (props) => {
  return (
    <List items={props.articles} />
    );
};

export default Articles;
As you can see, creating reusable components can be a big time saver. It can also help make your code more organized and maintainable.
You can see that the codes are written in something called JSX. I’ve talked about it below in the “React component” section.
2. Fast render with Virtual DOM
When a user interacts with a React component, React updates the component automatically. This is called virtual DOM.
The virtual DOM is a JavaScript representation of the actual DOM. It is a way of making changes to the DOM without having to redraw the entire page. This makes React components very fast.
React uses a virtual DOM because it is more efficient than the traditional DOM. The virtual DOM is a JavaScript representation of the actual DOM. This means that when a user interacts with a React component, React updates the component automatically.
The traditional DOM requires that the entire page be redrawn when a change is made to a component. This is because the traditional DOM does not keep track of changes to the DOM. The virtual DOM, on the other hand, does keep track of changes. This means that only the changed parts of the DOM need to be redrawn.
React also uses a virtual DOM because it is easier to use than the traditional DOM. The traditional DOM can be very difficult to use. The virtual DOM is much easier to use.
3. SEO friendly:
React is a JavaScript library for building user interfaces. It is maintained by Facebook and a community of individual developers and companies. React can be used as a base in the development of single-page or mobile applications.
Nowadays, SEO is one of the most important factors for the success of a website. A website that is not optimized for SEO will have a hard time ranking in the search engine results pages (SERP).
The good news is that React is an SEO-friendly JavaScript library. When used properly, React can help you build a website that is fast, responsive, and easy to crawl by search engine bots.
Tips to optimise your React website:
The process of optimising a website is the same for every case irrespective of what framework you’ve used. It is the same for a simple website that is made of HTML, CSS and a React.js website.
So you can also read one of my previous articles, i.e. “Make Your Website’s HTML page Optimized for SEO“.
Here are some tips on how to optimize your React website for SEO:
1) Use a static site generator: A static site generator is a tool that generates a static HTML file for each page of your website. This HTML file can then be served by a web server.
Some popular static site generators that work with React include Gatsby and Next.js.
2) Use server-side rendering: Server-side rendering is a technique for rendering a React component on the server. The generated HTML is then sent to the client.
This technique is important because it allows search engine bots to index your website properly.
3) Optimize your images: Images are an important part of any website. They can help make your content more engaging and visually appealing.
However, large images can slow down your website. That’s why it’s important to optimize your images for the web.
There are many ways to optimize images for the web. One popular way is to use an image optimization tool like ImageOptim.
4) Use a CDN: A content delivery network (CDN) is a network of servers that deliver content to users.
Using a CDN can help improve the performance of your website. It can also help reduce the load on your server.
Some popular CDNs that work with React include Cloudflare and Amazon CloudFront.
5) Minify your JavaScript: Minifying your JavaScript code can help reduce the size of your JavaScript files. This can help improve the performance of your website.
There are many tools that can help you minify your JavaScript code. One popular tool is UglifyJS.
6) Use a caching plugin: Caching is a technique for storing data in memory so that it can be accessed quickly.
Using a caching plugin can help improve the performance of your website. It can also help reduce the load on your server.
Some popular caching plugins that work with React include WP Rocket and W3 Total Cache.
7) Use a performance monitoring tool: A performance monitoring tool can help you identify and fix performance issues on your website.
One popular performance monitoring tool is New Relic.
8) Use a React-specific SEO plugin: There are many SEO plugins that work with React. Some popular plugins include React-Static and React-Helmet.
Using a React-specific SEO plugin can help you optimize your website for search engines.
9) Don’t forget about the basics: In addition to the tips above, don’t forget about the basics of SEO. This includes things like creating high-quality content, optimizing your title tags and meta descriptions, and building backlinks.
By following the tips above, you can optimize your React website for search engines. This will help you improve your website’s ranking in the SERP and drive more traffic to your website.
Virtual Dom:
In computing, a virtual DOM (VDOM) is a software abstraction that models the structure of documents like HTML and XML. By keeping a virtual copy of the DOM(Document Object Model) in memory, a VDOM can help manage changes to a document in a more efficient way than the traditional DOM.
The virtual DOM was originally created by the developers of the React JavaScript library as a way to improve the performance of user interface (UI) updates. Today, many other libraries and frameworks make use of the virtual DOM concept.
In a nutshell, virtual DOM is a way to make UI updates more efficient by abstracting away the actual DOM. By keeping a virtual copy of the DOM in memory, the virtual DOM can help manage changes to a document in a more efficient way.
Why was virtual DOM introduced?
The virtual DOM was introduced as a way to improve the performance of web applications by making it easier to update the UI. By using a virtual DOM, web developers can create a fast and responsive UI without having to worry about managing the real DOM.
Why is the virtual DOM faster than the real DOM?
The Virtual DOM is faster than the real DOM because it is only changing the parts of the DOM that need to be changed, instead of changing the whole DOM tree.
How does the Virtual Dom work?
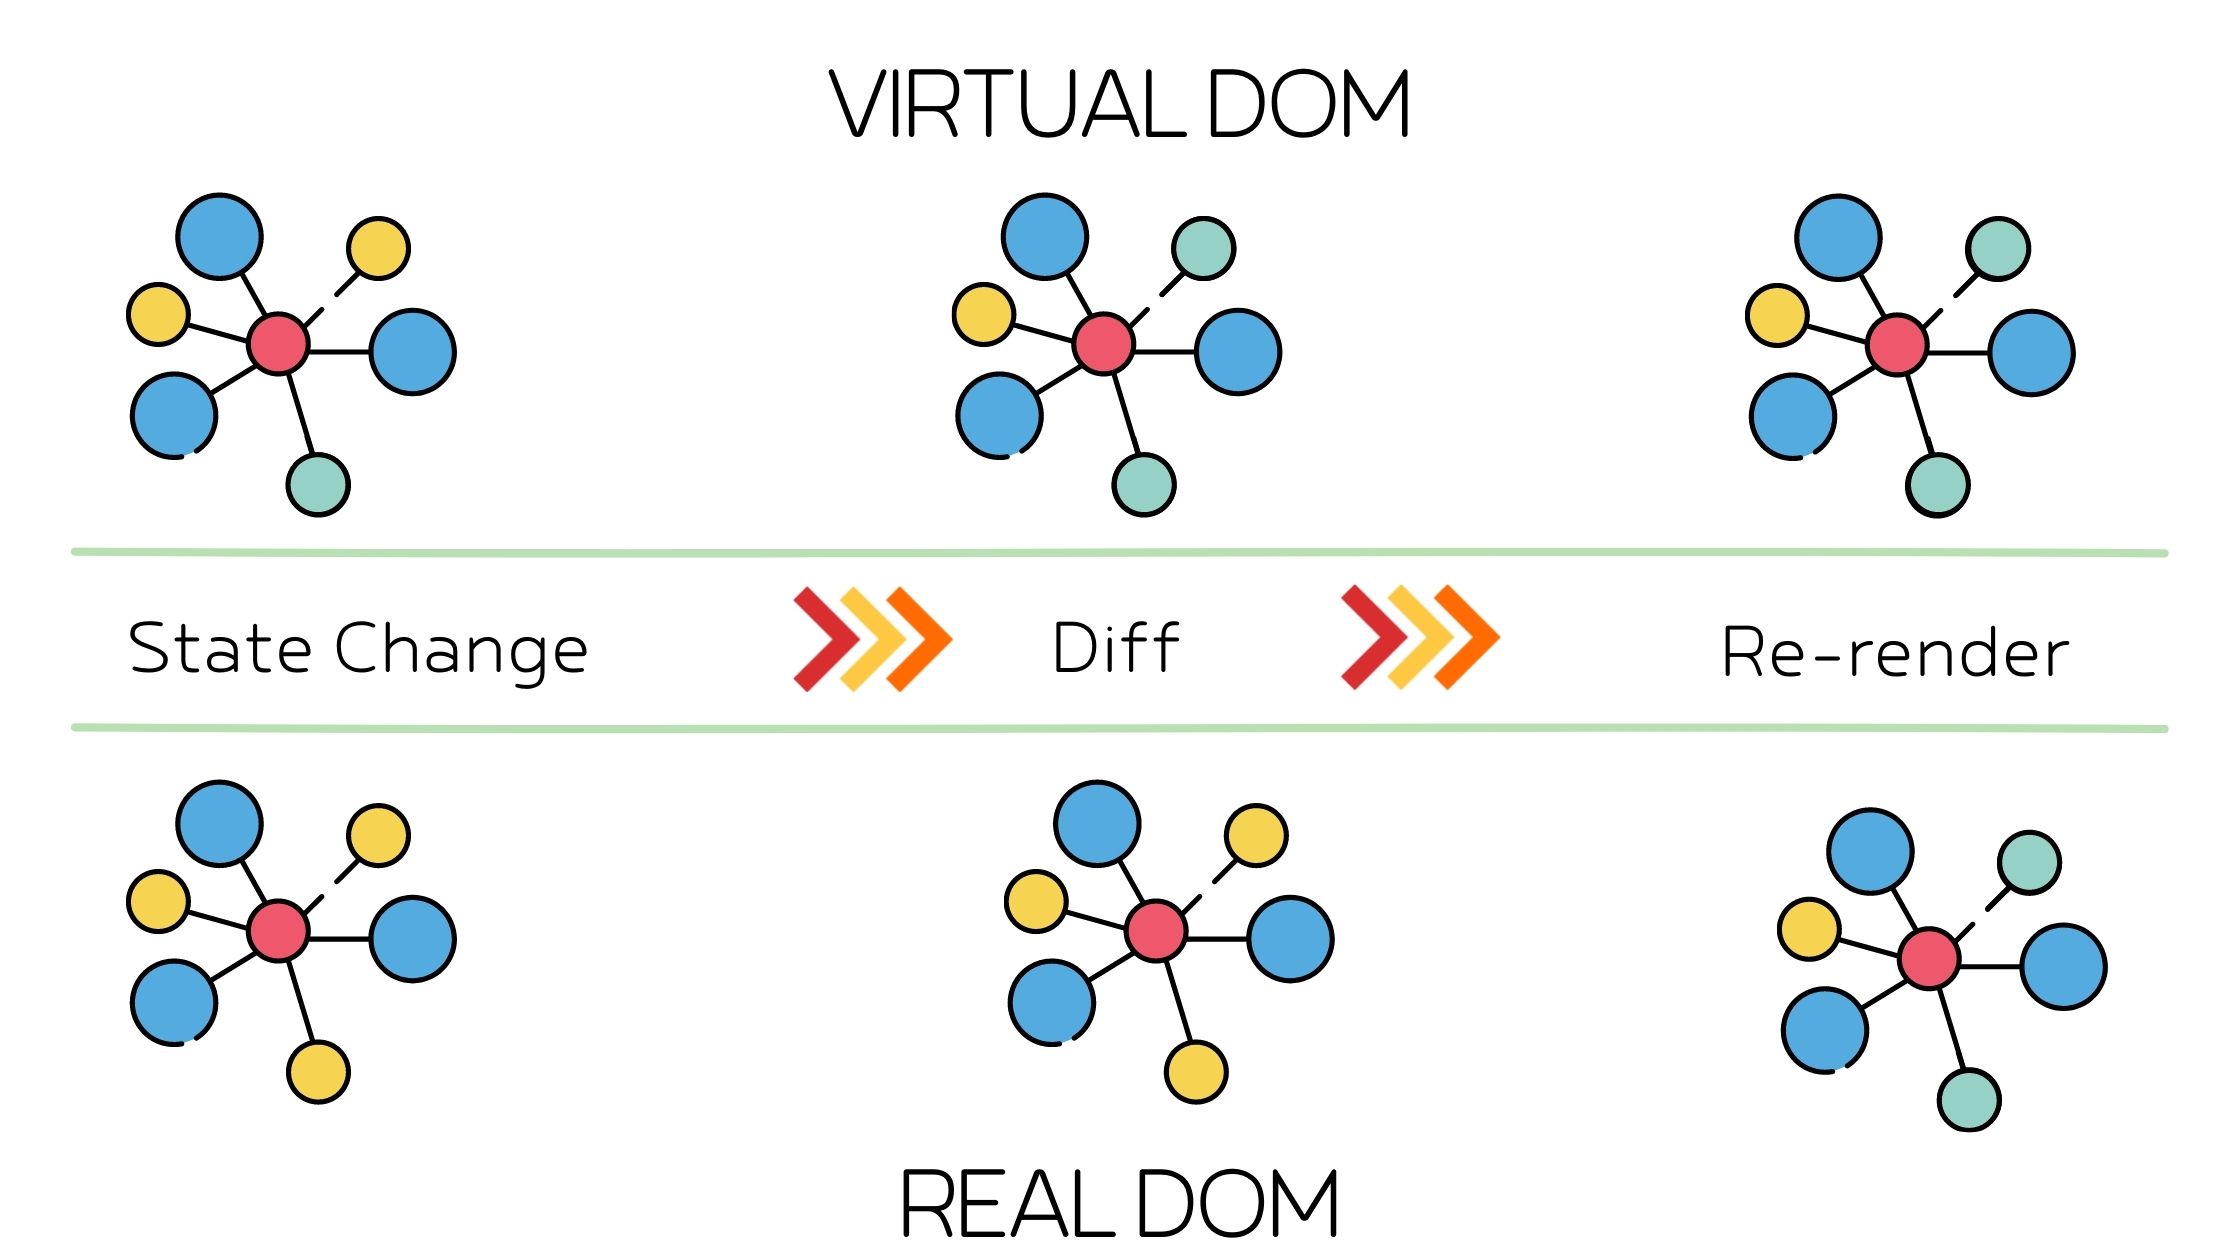
The virtual DOM works by keeping a copy of the real DOM in memory and updating it whenever the UI changes. When the UI needs to be updated, the virtual DOM will compare the current DOM with the copy in memory and make the necessary changes. This process is much faster than updating the real DOM directly, and it allows web developers to create a UI that is both fast and responsive.
The main difference between the real DOM object and the virtual DOM object is that any changes in the virtual DOM object will not reflect on the screen directly. You can consider a VDOM object as a blueprint of the real DOM object. Whenever a JSX element gets rendered, every virtual DOM object gets updated.
Another thing, although it is not so important to know. The comparison between the previous VDOM tree and the updated VDOM tree is called “the diffing algorithm“.
Diffing Algorithm:
The diffing algorithm is a way to compare two virtual DOM trees and find the differences between them. This can be used to find the changes that need to be made to a given DOM tree and to make those changes efficiently.
The diffing algorithm works by first creating a data structure that represents the changes that need to be made to the DOM tree. This data structure is then used to generate a series of patches that can be applied to the DOM tree to make the necessary changes.
The diffing algorithm is an efficient way to find the changes that need to be made to a DOM tree. It can be used to make those changes quickly and efficiently.
Advantages and Disadvantages of Virtual DOM:
The advantage of the Virtual DOM is that it is a lot faster to update than the actual DOM. The reason for this is that the Virtual DOM is a JavaScript object, and the browser can access it directly. When the browser needs to update the actual DOM, it has to go through the entire HTML code and find the specific element that needs to be updated. With the Virtual DOM, the browser can simply access the object and make the necessary changes.
Another advantage of the Virtual DOM is that it can be used to create a snapshot of the webpage. This snapshot can be used to restore the webpage to its previous state. This is useful if a user makes a mistake and wants to undo their changes.
Virtual DOM is not without its disadvantages. One disadvantage is that it can be difficult to debug. When an error occurs, it can be difficult to track down the cause. Another disadvantage is that the Virtual DOM can be slow to load. If the webpage has a lot of content, it can take a while for the browser to create the object.
Overall, the Virtual DOM is a useful tool that can be used to improve the performance of a webpage. It is fast and efficient, and it can be used to create a snapshot of the webpage. However, it can be difficult to debug and slow to load.
React Components:
Components are the building blocks of React Js apps. They are self-contained and reusable pieces of code that can be used to create complex user interfaces.
React components are typically written in JavaScript, but they can also be written in other languages like TypeScript, JSX etc.
What is JSX?
JSX is an XML-like syntax extension to ECMAScript without any defined semantics. It’s NOT intended to be implemented by engines or browsers. It’s NOT a specification. It’s intended to be used by various preprocessors (transpilers) to transform these tokens into standard ECMAScript.
JSX was originally proposed by Facebook for use in their own products, such as their JavaScript-based web framework React. However, JSX is not limited to React and can be used in any JavaScript-based framework or application.
At a high level, JSX just provides a convenient way to write HTML-like structures in your JavaScript code. When used with a transpiler, JSX code gets transformed into regular JavaScript code that can be executed by your JavaScript engine.
There are a few key things to remember about JSX:
- JSX is not required for React development.
- You can write React components without using JSX.
- JSX is similar to HTML, but not exactly the same.
- JSX is not executed by the browser. JSX is first transformed into regular JavaScript code by a JSX transpiler.
Coming back to React Components.
React components can be either stateless or stateful. Stateless components are simpler to write and are more efficient because they do not have to manage the local state.
Stateful components are more complex but are necessary when you need to interact with data that changes over time.
React components can be either function-based or class-based. Function-based components are simpler to write and are more lightweight. They are typically used for presentational purposes, such as displaying data or user input forms.
- Functional components–
Functional components are simpler to write and are more lightweight. They are typically used for presentational purposes, such as displaying data or user input forms. - Class-based components-
Class-based components are more powerful and allow you to use additional features like local state and lifecycle methods.
Class-based components are more powerful and allow you to use additional features like local state and lifecycle methods.
React provides a number of built-in features that make working with components easier. These include:
- React.createElement() – a function that creates React elements
- React.Component – a base class for creating React components
- React.Children – a utility for working with React children
- React.PropTypes – a utility for validating props
- React.cloneElement() – a function for cloning React elements
- React.createFactory() – a function for creating React element factories
- React.unmountComponentAtNode() – a function for unmounting React components
In conclusion, React components are a powerful way to create modular and reusable code. They are easy to write, maintain, and test. And they can improve the performance of your app.
Example:
Here is a simple example of React Components. The file name should be the same as the class name, i.e. App.jsx.
import React from 'react';
class App extends React.Component {
   render() {
      return (
         <div>
            <Header/>
            <Content/>
         </div>
      );
   }
}
class Header extends React.Component {
   render() {
      return (
         <div>
            <h1>Header</h1>
         </div>
      );
   }
}
class Content extends React.Component {
   render() {
      return (
         <div>
            <h2>Content</h2>
            <p>The content text!!!</p>
         </div>
      );
   }
}
export default App;
React State:
In general, state refers to the data that represents the current state of a component. For example, if a component is displaying a list of items, the state of the component would be the data that represents the items in the list.
In React JS, the state is used to store data that can be used to render a component. A state can be any data type, including numbers, strings, objects, arrays, and booleans.
How does the state work?
When a component is created, the initial state of the component is set. This initial state can be set using the constructor of the component.
Once the initial state is set, the component can render itself using the state data. When the state of the component changes, the component will re-render itself using the new state data.
How can the state be used to build user interfaces?
A state can be used to build dynamic user interfaces. For example, if a component is displaying a list of items, the state of the component would be the data that represents the items in the list. When the state of the component changes, the component will re-render itself using the new state data.
This allows the component to update its own UI in response to state changes. This is a powerful technique that can be used to build complex user interfaces.
Let’s understand “State” with an example:
import React from 'react';
class App extends React.Component {
 constructor(props) {
   super(props);
   this.state = {
     text: "What is (5+5)?",
   };
 }

 answer() {
   this.setState(prevState => {
     return { text: "5+5 is 10" };
   });
 }

 render() {
   return (
     <div>
       <p>{this.state.text}</p>
       <button onClick={() => this.answer()}>Answer</button>
     </div>
   );
 }
}
export default App;Note:State object does not work for functional components but, we can use React Hooks to add state to a functional component.
React Props:
In React, props are pieces of data that are passed to a component from the parent component. They’re used to configure the component and to pass data into the component from the parent.
How do props work?
When a component is created, the props that are passed in are available to the component as “this.props“. For example, if we have a component that takes a name prop, we can access the name prop from within the component like this:
this.props.name
We can also use destructuring to make this even easier:
const { name } = this.props;This will give us a named variable that we can use within the component, and it will be set to the value of the name prop that was passed in.
Props are useful because they allow us to pass data into a component from the parent component. This is important because it allows us to make our components reusable. For example, imagine we have a component that displays a list of items. We can use this component multiple times, but each time we use it, we can pass in different props to configure it. This would allow us to reuse the same component but with different data each time.
React Hooks:
React Hooks are a relatively new concept in the React world. Although they’ve been around since React 16.8, Hooks didn’t become popular until a few years later. Today, Hooks are being used more and more, and they’re a great way to add extra functionality to your React apps.
What are React Hooks?
React Hooks are functions that let you “hook into” React state and lifecycle features from function components. Hooks don’t work inside classes — they let you use React without classes.
React Hooks were introduced in React 16.8. They let you use state and other React features without writing a class.
There are two types of Hooks:
State Hooks: let you use the React state in a functional component.
Effect Hooks: let you use the React side effects in a functional component.
State Hooks
State Hooks allow you to use the React state in a functional component.
To use a State Hook, you need to call the useState function inside your functional component. The useState function takes a single argument, which is the initial state.
The “useState” function returns an array with two values: the current state and a function that lets you update the state.
Here’s an example of how to use the useState Hook:
import React, { useState } from 'react';

function Example() {
  // Declare a new state variable, which we'll call "count"
  const [count, setCount] = useState(0);

  return (
    <div>
      <p>You clicked {count} times</p>
      <button onClick={() => setCount(count + 1)}>
        Click me
      </button>
    </div>
  );
}
In the example above, we use the useState Hook to create a new state variable called count. The initial value of count is 0.
The useState function returns an array with two values: the current state (count) and a function that lets us update the state (setCount).
We use the setCount function to increment the count by 1 every time the button is clicked.
Effect Hooks
Effect Hooks let you perform side effects in a functional component.
Side effects are operations that don’t necessarily have a visual impact on the component, but still need to be performed. Examples of side effects include making a network request, setting up a subscription, and manually changing the DOM.
To use an Effect Hook, you need to call the useEffect function inside your functional component. The useEffect function takes a function as an argument. This function is called the “effect.”
The effect function is called when the component is mounted (i.e. when the component is first rendered on the screen) and whenever the component’s state or props are updated.
Here’s an example of how to use the useEffect Hook:
import React, { useState, useEffect } from 'react';

function Example() {
  const [count, setCount] = useState(0);

  // Similar to componentDidMount and componentDidUpdate:
  useEffect(() => {
    // Update the document title using the browser API
    document.title = `You clicked ${count} times`;
  });

  return (
    <div>
      <p>You clicked {count} times</p>
      <button onClick={() => setCount(count + 1)}>
        Click me
      </button>
    </div>
  );
}
In the example above, we use the useEffect Hook to set the document title every time the count is updated.
The effect function is called when the component is mounted and whenever the count is updated.
Why use React Hooks?
There are several reasons why you might want to use React Hooks:
- Hooks let you use state and other React features without writing a class.
- Hooks are a more concise way to write React components.
- Hooks are easier to understand and reason about than classes.
- Hooks are more reusable than classes.
- Hooks are more testable than classes.
How to get started with React Hooks
If you’re interested in using React Hooks, there are a few things you need to know before getting started.
- First, you need to make sure that you’re using React 16.8 or higher. React Hooks were introduced in React 16.8, so you’ll need to use that version or higher.
- Next, you need to decide which Hooks you want to use. React comes with a few built-in Hooks, and there are also many third-party Hooks that you can use.
- Finally, you need to make sure that you’re using the React Developer Tools. The React Developer Tools let you inspect the React component tree, which is helpful for understanding how Hooks are used in a React application.
Once you’ve decided which Hooks you want to use, you can start using them in your React components.
To use a Hook, you need to call the Hook function inside your functional component. The Hook function will take care of the rest.
If you’re interested in learning more about React Hooks, I recommend checking out the React Hooks documentation.
React Lifecycle Methods:
Lifecycle methods are used in React to give users control over what happens when a component renders/mounts, updates, or unmounts.
A React component can have several “lifecycle methods”, which are called at different stages in the process of the component being rendered and updated. The most important lifecycle methods are:
- mounting [componentWillMount()]: when the component is first created and inserted into the DOM
- updating [componentDidMount()]: when the component is updated (i.e. when props or state change)
- unmounting [componentWillUnmount()]: when the component is removed from the DOM
These are the three main lifecycle methods{ described briefly below }, but there are also a few others that are worth mentioning.
- componentWillReceiveProps() is called when a component is receiving new props from its parent component. This is the place to update any state or props that are based on the new props.
- shouldComponentUpdate() is called before a component is updated. This is the place to check if the component really needs to be updated and to return false if it doesn’t. This can be used to improve performance by avoiding unnecessary updates.
- componentWillUpdate() is called before a component is updated. This is the place to prepare for an update, such as calculating a new state based on the new props.
- componentDidUpdate() is called after a component is updated. This is the place to do any post-update work, such as setting up event handlers or making Ajax requests.
These are the main lifecycle methods that are used in React components. They are called at different points in a component’s lifecycle, and each has a different purpose. By understanding these methods, you can have greater control over what happens when a component renders, updates, or unmounts.
The order in which the lifecycle methods are called is important and should be understood before using them. For example, the componentDidMount() method is called after the component is first rendered, so it can be used to set up a subscription or timer. If a subscription or timer is set up in the componentDidMount() method, it should be cleaned up in the componentWillUnmount() method.
The mounting, updating and unmounting lifecycle methods are all passed a few arguments, which are:
- props: the props that were passed to the component
- state: the component’s current state
- context: the context object
The shouldComponentUpdate() method is passed the next props and state and should return a boolean value. If the method returns false, the component will not be updated.
The componentDidCatch() method is used for error handling and is passed the error and the info object.
The following code shows a simple React component with a few lifecycle methods:
class MyComponent extends React.Component {
  constructor(props) {
    super(props);
    this.state = {
      count: 0
      };
    }
  componentDidMount() {
    // set up a subscription or timer here
  }

  componentDidUpdate(prevProps, prevState, snapshot) {
    // do something here if the component is updated
  }

  componentWillUnmount() {
    // clean up any subscriptions or timers here
  }

  shouldComponentUpdate(nextProps, nextState) {
    // return false if you don't want the component to be updated
  }

  componentDidCatch(error, info) {
    // do something here if there is an error
  }

  render() {
    return (
        <div>
            <h1>MyComponent</h1>
            <p>{this.state.count}</p>
        </div>
    );
    }
}
Explaining 3 main lifecycle methods :
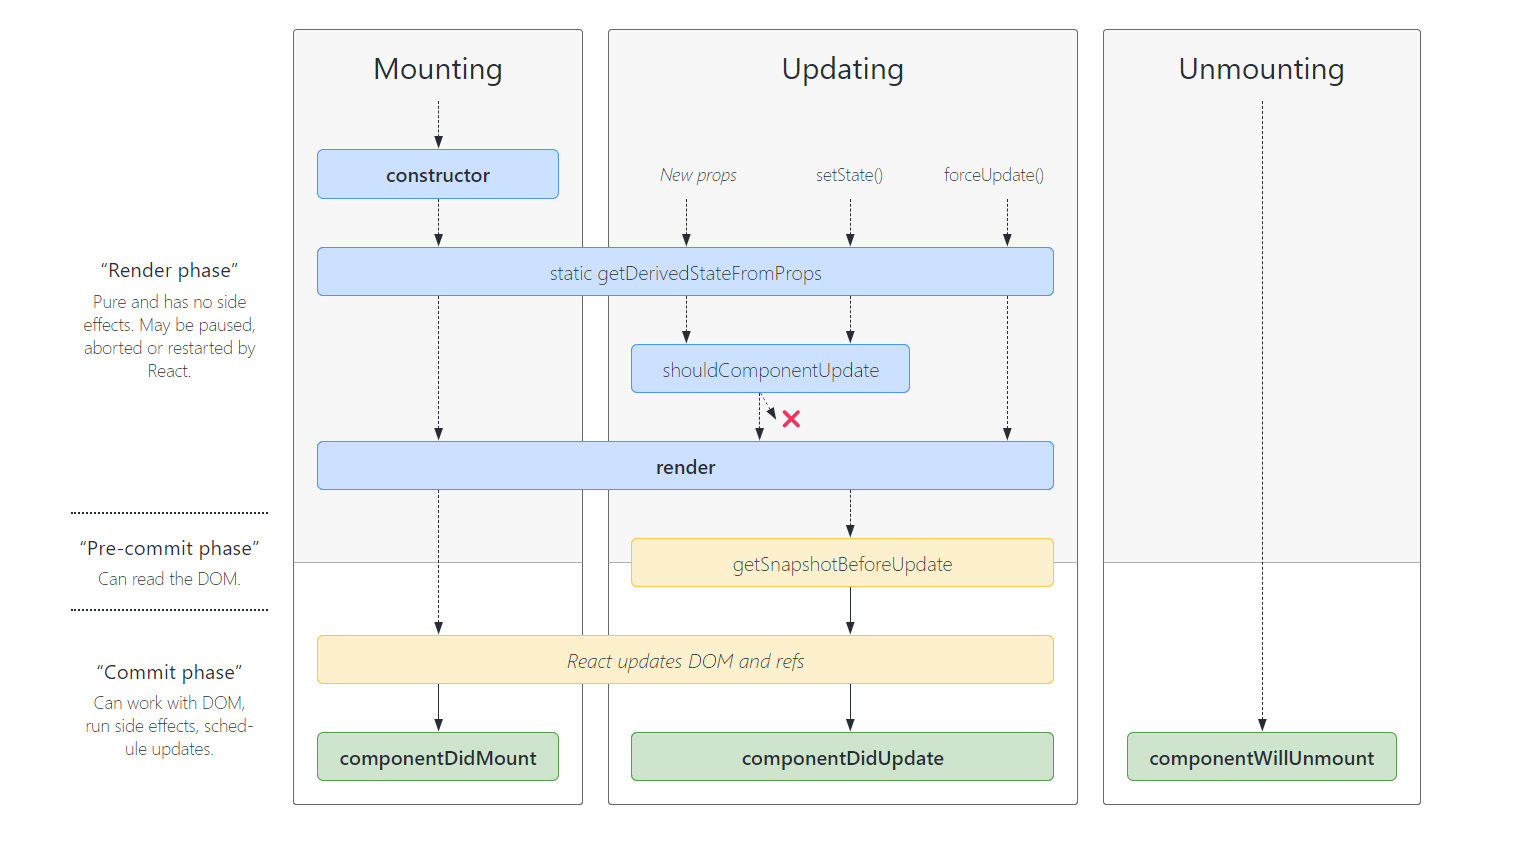
Now, let’s break down this image.
Mounting:
When you create a React JS component, you have the ability to specify what element type to render as. You can create a React component by subclassing React.Component and providing a render method. A render method returns a React element, which is a lightweight description of what to render.
React elements can be either created from scratch or derived from existing DOM elements. When created from scratch, they are simply JavaScript objects with a type property and props. When derived from existing DOM elements, they are React wrappers around the existing DOM elements.
In either case, you can use React.createElement(type, props, children) function to create React elements.
The type argument can be either a tag name string (such as ‘div’ or ‘span’) or a React component. The props argument is an object that specifies the props to be passed to the element. The “children” argument is an array of child elements or a string of text.
If you pass a React component to React.createElement, it will instantiate the component and call its render method to obtain a React element. This is how you can render a custom React component.
The following code creates a React element representing a DOM button:
React.createElement(‘button’, { type: ‘button’ }, ‘Click me!’)
This element can be rendered as a DOM button with the following code:
ReactDOM.render(
React.createElement('button', { type: 'button' }, 'Click me!'),
document.getElementById('button')
);
If you have a custom React component, you can render it as follows:
ReactDOM.render(
React.createElement(MyComponent, { someProperty: 'someValue' }),
document.getElementById('component')
);
Updating:
Updating is one phase of the component lifecycle and is caused by changes in props or state. React has a built-in method, componentDidUpdate(), which is called after a component is updated. This is where you can perform actions such as making an AJAX call or setting a focus.
There are two ways to update a component:
- forceUpdate:
forceUpdate will update the component immediately, without waiting for React to perform a re-render. This should be used sparingly, as it does not give React a chance to optimise rendering. - setState:
setState is the preferred method of updating a component. It schedules an update to the component, and React will perform a re-render when the component is updated.
When setState is called, React will compare the current state with the new state, and decide whether or not to re-render the component. If the component has changed, React will call the render method, and the component will be updated. If the component has not changed, React will do nothing. This is why it is important to make sure that the state object is immutable so that React can easily tell when it needs to re-render.
There are a few things to keep in mind when updating a component:
- Do not mutate the state object. React uses reference equality to check if the state has changed, so if you mutate the state object, React js will not be able to tell that the state has changed, and the component will not be updated.
- Do not make AJAX calls in the componentDidUpdate lifecycle method. AJAX calls should be made in the componentDidMount lifecycle method. This is because componentDidUpdate will be called every time the component is updated, which includes when the component is first mounted. Making an AJAX call in componentDidUpdate will result in an infinite loop.
- Be careful when using the setState method. If you are not careful, you can end up with an infinite loop. Make sure that the state object you are passing to setState is different from the current state.
- Do not call setState from the render method. This will cause an infinite loop.
- Use the shouldComponentUpdate lifecycle method to improve performance. This method is called before the render method and can be used to prevent the component from being re-rendered if the state has not changed.
By understanding the component lifecycle, and using the setState method carefully, you can avoid potential issues when updating a component.
Unmounting:
When we talk about unmounting in React, we are referring to the process of undoing the effects that were created when a component was mounted. This can be important for a number of reasons, including:
- We may need to clean up any event listeners that were created when the component was mounted.
- We may need to reset any data that was set when the component was mounted.
- We may need to stop any timers that were started when the component was mounted.
There are a few ways that we can go about unmounting a component in React, but the most common way is to use the componentWillUnmount lifecycle method. This method is called just before a component is unmounted and destroyed, and it gives us a chance to clean up any last-minute things that need to be done.
In most cases, the componentWillUnmount lifecycle method is used for cleanup tasks, such as:
- Removing event listeners
- Cancelling network requests
- Clearing timers
However, there are a few other things that we can do in the componentWillUnmount lifecycle method, such as:
Updating state
Yes, We can actually update the state of a component in the componentWillUnmount lifecycle method. However, there are a few things that we need to keep in mind if we do choose to do this.
- First of all, the
componentWillUnmountlifecycle method is called just before the component is unmounted, which means that we will not have access to the component instance after this method is called. This means that we will not be able to call setState on the component instance. - Secondly, the
componentWillUnmountlifecycle method is called on the client side only. This means that if we are using server-side rendering, thecomponentWillUnmountlifecycle method will not be called on the server.
With that being said, there are still a few cases where it might make sense to update the state in the componentWillUnmount lifecycle method. One example might be if we are using a higher-order component (HOC) to wrap our component, and we need to update the state of the HOC when the wrapped component is unmounted.
Another thing to keep in mind is that the componentWillUnmount lifecycle method is not called when the component is unmounted due to an error. This means that if you need to do any cleanup in the componentWillUnmount lifecycle method, you will need to do it in the componentDidCatch lifecycle method as well.
Reference:
To write this section, I took help from an article by Freecodecamp. So if you want to know more about it, you can either google it or I’m giving you the link below-
React component lifecycle- by freecodecamp
Here comes some of the common questions-
Is React JS frontend or backend?
React is a front-end javascript library, developed and maintained by Facebook. It’s one of the most popular front-end frameworks alongside Angular and Vue.js. React is used for building user interfaces and is often used in combination with other frameworks like React Router for routing, Redux for state management, and GraphQL for data fetching.
Is React better or Angular?
There is no one-size-fits-all answer to this question, as the best JavaScript framework for your project will depend on a variety of factors. But the main thing is React js is not even a framework (as I’ve already told you), it is a library, whereas Angular js is a javascript framework. So, comparing each of them should not be fair according to me.
Although, in general, React is considered to be more lightweight and flexible than Angular. Additionally, React’s component-based architecture makes it easy to scale and update applications, which can be a big advantage over Angular’s more complex approach.
That’s all for this blog, I hope you’ll get the core concept of React js from this article. If you’ve any further questions, feel free to ask that in the comment section. I’ll be thrilled to answer that, or if that needs to be explained, I’ll make another blog on that.


