Follow Us:
How to optimize the React DOM size?

As developers, we understand the critical role performance plays in the success of our React JS applications. One key factor affecting performance is the size of the Document Object Model (DOM). In this blog, I will guide you through the process of optimizing the DOM size in your React applications. This is crucial for ensuring smooth, efficient interactions for our users.
React’s virtual DOM offers a powerful way to build dynamic user interfaces efficiently. However, managing the actual DOM size is essential to avoid performance bottlenecks. This blog is designed to help developers at all levels—whether you are a beginner, an intermediate, or a professional. I will share strategies and insights on minimizing the DOM size, enhancing your application’s performance, and ensuring a better user experience.
We’ll explore tools for profiling your react-DOM size, techniques to reduce unnecessary re-renders, and methods to structure your components for optimal efficiency. The focus will be on practical, actionable advice that you can apply to your development process right away.
The goal of this guide is to equip you with the knowledge and skills to tackle DOM size optimization head-on, improving both the performance and the scalability of your React applications. Let’s embark on this journey to refine our development practices and build more responsive, high-performing web applications.
Understanding the Problem:
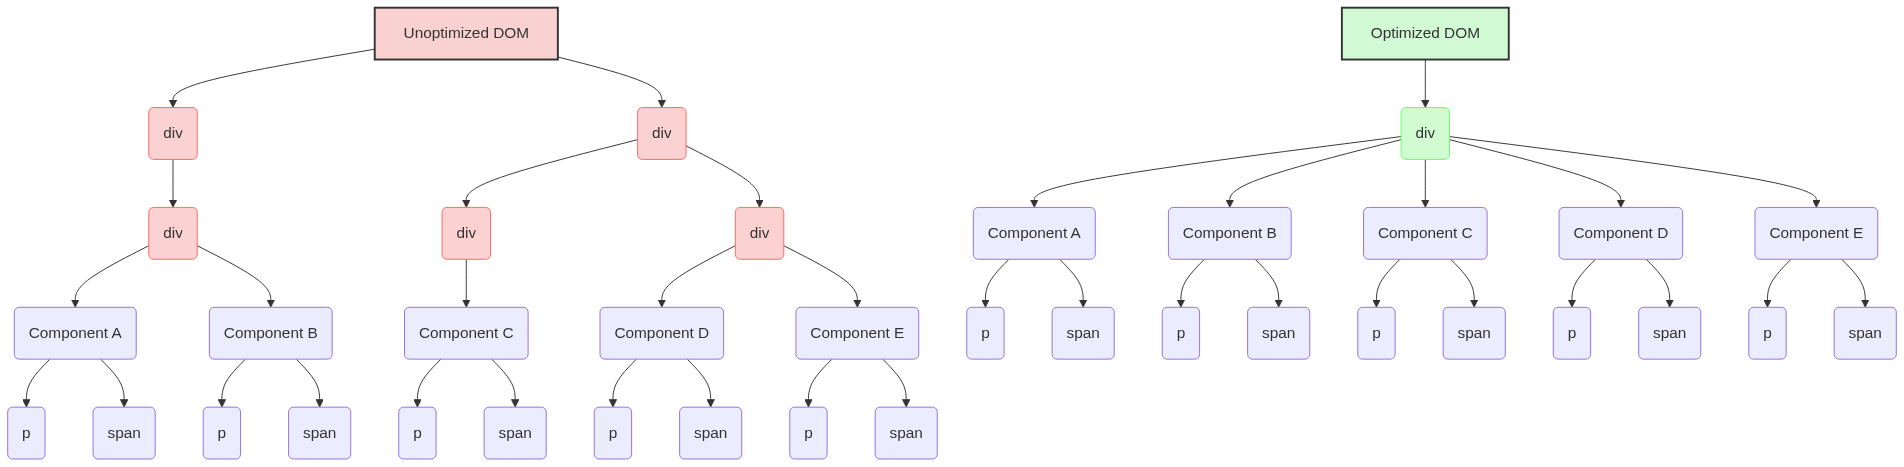
In any website, effectively managing the DOM size is pivotal for ensuring optimal performance. A bloated DOM can lead to slower page loads, sluggish interactions, and an overall decline in user experience. But before we can optimize, we must understand the root of the issue. See, below we’ve an illustration that shows the difference between an organised and an un-organised DOM structure.
The Impact of a Large DOM
The DOM is a tree-like structure that represents the UI of your application. Each node in the DOM tree corresponds to a UI element. React uses a virtual DOM to efficiently update the UI by only changing elements in the real DOM when necessary. However, if the real DOM grows too large, even the virtual DOM’s diffing algorithm can’t prevent performance issues.
For example, consider a React application that renders a large list of items. Each item might contain several nested elements:
function ItemList({ items }) {
  return (
    <ul>
      {items.map((item) => (
        <li key={item.id}>
          <div className="item-container">
            <h2>{item.title}</h2>
            <p>{item.description}</p>
            {/* Additional nested elements */}
          </div>
        </li>
      ))}
    </ul>
  );
}If items contains thousands of entries, the resulting DOM will be massive, leading to slow render times and laggy updates.
Why Does This Matter?
A large DOM affects performance in several ways:
- Rendering Performance: The browser takes longer to render UI updates, leading to a noticeable lag in user interactions.
- JavaScript Performance: React’s reconciliation process, which updates the DOM, becomes slower as the number of elements increases.
- Memory Usage: A larger DOM consumes more memory, which can be particularly problematic on mobile devices with limited resources.
Understanding the relationship between React’s rendering process and the actual DOM size is crucial. React might be efficient in managing updates, but if we’re not mindful of how our components contribute to the overall DOM structure, we’ll inevitably face performance bottlenecks.
Identifying the Culprits
To pinpoint what contributes to DOM bloat, we use profiling tools like the React Developer Tools. These tools allow us to inspect the component tree and identify components that render excessive DOM nodes. For instance, a common issue is rendering hidden elements that contribute to the DOM size but are not immediately visible to the user.
By comprehending the implications of a large DOM and learning to identify the contributing factors, developers can take targeted actions to mitigate this issue. In the following sections, we’ll explore specific strategies and techniques to optimize the DOM size in React applications, enhancing both performance and user experience.
Profiling and Measuring DOM Size:
To optimize the DOM size in React applications, we first need to measure and identify potential bottlenecks. Profiling your application provides insight into the components and elements that contribute most to the DOM size, allowing for targeted optimizations. Here’s how you can start:
Using Browser Developer Tools
Modern browsers like Chrome, Firefox, and Edge come equipped with developer tools that offer a wealth of information about your application’s performance and structure.
- Chrome DevTools: Chrome’s DevTools include a Performance tab for recording and analyzing runtime performance. To measure the DOM size, you can use the Elements tab. Here’s a step-by-step guide:
- Open Chrome DevTools by right-clicking on your page and selecting “Inspect” or pressing
Ctrl+Shift+I(Cmd+Opt+Ion Mac). - Navigate to the Elements tab to see the current DOM tree.
- Use the Performance tab to record a session while interacting with your application to identify slow rendering components.
Chrome also offers theCoveragetool, found under theMore toolssection, which helps identify unused code, potentially reducing bundle size and indirectly affecting DOM performance.
- Open Chrome DevTools by right-clicking on your page and selecting “Inspect” or pressing
- Firefox Developer Edition: Similar to Chrome, Firefox offers developer tools with a Performance tab for analyzing rendering performance and a Debugger tab where you can inspect the DOM tree.
React Developer Tools
The React Developer Tools extension for Chrome and Firefox provides deeper insight into React component trees. It allows you to inspect the current props and state of each component and understand how components are nested. To identify components contributing to a large DOM size:
- Install React Developer Tools from the Chrome Web Store or Firefox Browser Add-Ons.
- Open the developer tools in your browser, and you’ll see a new “React” tab.
- Navigate to the “Components” tab within the React tools to inspect the component hierarchy.
- Look for components with large trees of child components or components that update frequently.
React DevTools also offers a Profiler tab, where you can record rendering times to identify performance bottlenecks.
Performance Monitoring Tools
- Lighthouse: An open-source, automated tool for improving the quality of web pages. You can run it against any web page, public or requiring authentication. It has audits for performance, accessibility, progressive web apps, and more. For DOM size, focus on the performance audit.
- WebPageTest: Allows for a more detailed performance report and can show you how your site’s speed stacks up against others. It provides insights into load times, rendering, and interactions.
Analyzing the Data
After collecting data, the next step is to analyze it. Look for patterns or specific components that contribute to a large DOM size. Common culprits include:
- Lists or tables rendering many rows.
- Nested components with deep component trees.
- Off-screen or hidden elements still rendered in the DOM.
Practical Example
Suppose you have a component that renders a list of items. By profiling, you notice that rendering this list significantly increases the DOM size and slows down your application. You can use React Developer Tools to inspect this component and evaluate its impact:
const LargeList = ({ items }) => {
  return (
    <div>
      {items.map(item => (
        <div key={item.id}>
          <h2>{item.title}</h2>
          <p>{item.description}</p>
        </div>
      ))}
    </div>
  );
};By analyzing the component with React Developer Tools, you could identify that this list renders hundreds of items, making it a prime target for optimization, such as virtualization or pagination.
Strategies for Optimizing DOM Size
Optimizing the DOM size is crucial for improving the performance of React applications. Here, we outline several strategies, each accompanied by code examples to illustrate the implementation.
1. Minimize Component Depth
A deeply nested component structure increases the DOM size and complexity. Flattening your component tree where possible can significantly enhance performance.
Before Optimization:
const DeepNesting = () => (
  <div>
    <div>
      <div>
        {/* Deeply nested structure */}
        <Content />
      </div>
    </div>
  </div>
);

const Content = () => (
  <div>Content here</div>
);After Optimization:
const Flattened = () => (
  <div>
    <Content />
  </div>
);

const Content = () => (
  <div>Content here</div>
);Optimization: Reduce the layers of unnecessary wrapping elements.
2. Efficient Rendering
React offers several mechanisms to prevent unnecessary re-renders, which can lead to a reduced DOM size over time as fewer elements need to be created or updated.
Using React.memo for Functional Components:
const MemoizedComponent = React.memo(({ text }) => {
  return <div>{text}</div>;
});Optimization: React.memo prevents re-rendering if props remain the same.
Using useMemo and useCallback:
import React, { useMemo, useCallback } from 'react';

const ExpensiveComponent = ({ computation, onClick }) => {
  const memoizedValue = useMemo(() => computeExpensiveValue(computation), [computation]);
  const memoizedCallback = useCallback(() => {
    onClick(memoizedValue);
  }, [onClick, memoizedValue]);

  return <div onClick={memoizedCallback}>Value: {memoizedValue}</div>;
};Optimization: useMemo and useCallback prevent expensive recalculations and functions from being recreated on each render.
3. Code Splitting and Lazy Loading
Splitting your code and lazy-loading parts of your application can significantly reduce the initial DOM size, as components are only loaded when needed.
Lazy Loading a Component:

import React, { Suspense, lazy } from 'react';

const LazyComponent = lazy(() => import('./LazyComponent'));

const App = () => (
  <Suspense fallback={<div>Loading...</div>}>
    <LazyComponent />
  </Suspense>
);Optimization: This approach loads the component only when it’s required, reducing the initial load time and DOM size.
4. Optimizing Conditional Rendering
Conditional rendering can lead to unnecessary DOM elements if not used wisely. Optimizing these conditions can reduce the DOM size.
Before Optimization:
return (
  <div>
    {isLoggedIn && <UserProfile />}
    {!isLoggedIn && <Login />}
  </div>
);After Optimization:
return (
  <div>
    {isLoggedIn ? <UserProfile /> : <Login />}
  </div>
);Optimization: This approach ensures that only one component is rendered at any time, reducing the overall number of DOM elements.
5. Using Virtualization for Large Lists
For components rendering large lists or tables, consider using virtualization. Libraries like react-window or react-virtualized render only the items in view, drastically reducing the number of DOM elements.
Implementing Virtualization with react-window:
import { FixedSizeList as List } from 'react-window';

const MyList = ({ items }) => (
  <List
    height={150}
    itemCount={items.length}
    itemSize={35}
    width={300}
  >
    {({ index, style }) => (
      <div style={style}>Item {items[index]}</div>
    )}
  </List>
);Optimization: This code only renders items that fit in the currently viewable area, significantly reducing the DOM size and improving performance.
By implementing these strategies, developers can significantly reduce the DOM size of their React applications, leading to faster rendering times and a smoother user experience. Each of these strategies targets a different aspect of DOM optimization, offering a comprehensive approach to improving your application’s performance.
Advanced Techniques for DOM Optimization
Advanced optimization techniques can provide significant performance improvements. Here, we explore server-side rendering (SSR), static site generation (SSG), and progressive web apps (PWAs), providing detailed code examples for each.
1. Server-Side Rendering (SSR)
SSR improves the initial load time by rendering components on the server and sending the resulting HTML to the client. It reduces the amount of JavaScript that needs to be downloaded and executed on the client side, leading to a faster Time to Interactive (TTI).
Example with Next.js:
Next.js is a React framework that supports SSR out of the box. To implement SSR in Next.js, you create pages in the pages directory. Next.js will automatically render these pages on the server.
// pages/index.js
import fetch from 'isomorphic-unfetch';

const HomePage = ({ posts }) => (
  <ul>
    {posts.map(post => (
      <li key={post.id}>{post.title}</li>
    ))}
  </ul>
);

export async function getServerSideProps() {
  const res = await fetch('https://api.example.com/posts');
  const posts = await res.json();

  return { props: { posts } };
}

export default HomePage;Optimization: This example demonstrates fetching data on the server and rendering the initial HTML, reducing the initial load on the client-side.
2. Static Site Generation (SSG)
SSG is similar to SSR but generates static HTML files at build time. It’s ideal for pages that do not require dynamic content on each request. Static pages load faster since they can be served from a CDN without any server processing.
Example with Next.js:
Next.js also supports SSG via the getStaticProps and getStaticPaths functions for pre-rendering pages at build time.
// pages/posts/[id].js
export async function getStaticProps({ params }) {
  const res = await fetch(`https://api.example.com/posts/${params.id}`);
  const post = await res.json();

  return { props: { post } };
}

export async function getStaticPaths() {
  const res = await fetch('https://api.example.com/posts');
  const posts = await res.json();

  const paths = posts.map(post => ({
    params: { id: post.id.toString() },
  }));

  return { paths, fallback: false };
}

const Post = ({ post }) => (
  <div>
    <h1>{post.title}</h1>
    <p>{post.content}</p>
  </div>
);

export default Post;Optimization: This code generates static pages for each post at build time, ensuring fast loading times without needing real-time data fetching or server-side processing.
3. Progressive Web Apps (PWAs)
PWAs use modern web capabilities to deliver an app-like experience. Service workers, a core technology behind PWAs, enable capabilities such as offline support and resource caching, which can significantly reduce the load time after the initial visit.
Implementing a Service Worker:
To create a service worker for caching and offline capabilities, you first need to register it in your application.
// public/service-worker.js
self.addEventListener('install', event => {
  event.waitUntil(
    caches.open('v1').then(cache => {
      return cache.addAll([
        '/index.html',
        '/main.js',
        '/style.css',
        // Add other resources to cache
      ]);
    })
  );
});

self.addEventListener('fetch', event => {
  event.respondWith(
    caches.match(event.request).then(response => {
      return response || fetch(event.request);
    })
  );
});// Register the service worker from your main JavaScript file
if ('serviceWorker' in navigator) {
window.addEventListener('load', () => {
navigator.serviceWorker.register('/service-worker.js').then(registration => {
console.log('SW registered: ', registration);
}).catch(registrationError => {
console.log('SW registration failed: ', registrationError);
});
});
}Optimization: The service worker caches essential assets and serves them from the cache, reducing the need for network requests and speeding up subsequent page loads.
These advanced techniques—SSR, SSG, and PWAs—represent the cutting edge of web performance optimization. By pre-rendering content, leveraging build-time generation, and utilizing service workers for caching, you can drastically reduce the DOM size your users need to download and render, leading to faster, more responsive applications. Implementing these strategies requires a deeper understanding of web technologies and React, but the performance gains can be substantial.
Best Practices and Common Pitfalls
In this section, we focus on “Best Practices and Common Pitfalls” in optimizing the DOM size within React applications. Understanding these can help avoid common mistakes and adopt strategies that contribute to more efficient applications.
Best Practices
- Keep Components Small and Focused: Break down large components into smaller, reusable ones. This not only makes your code more manageable but also reduces the chance of unnecessary DOM bloat.
- Use Fragment and <> Syntax Where Appropriate: React Fragments allow you to group a list of children without adding extra nodes to the DOM, keeping it lean.
- Profile Regularly: Use profiling tools like the React DevTools Profiler to identify performance bottlenecks regularly. Optimization is an ongoing process, not a one-time task.
- Implement Lazy Loading: Use React’s lazy loading for components and images. This reduces the initial load time by loading only what’s necessary when it’s necessary.
- Opt for Virtualization for Large Lists: When displaying large collections of data, such as lists or tables, use virtualization techniques to render only the items in view.
- Memorize Expensive Computations: Utilize
useMemoandReact.memoto avoid unnecessary recalculations and re-renders of components. - Manage State Efficiently: Keep your state as local as possible. Global state management can lead to unnecessary re-renders across multiple components.
Common Pitfalls and Mitigation
Let’s outline some common pitfalls in optimizing DOM size in React applications and how to mitigate them. For clarity, we’ll present this information in a table format:
| Pitfall | Description | Mitigation |
|---|---|---|
| Over-nesting Components | Deeply nested components can lead to an unnecessarily large DOM. | Flatten the component structure where possible. Use React Fragments to group elements without adding extra nodes. |
| Unnecessary Re-renders | Components re-rendering unnecessarily can slow down the app and increase the DOM size. | Implement React.memo, useMemo, and useCallback to prevent unnecessary re-renders. |
| Ignoring Code Splitting | Loading the entire app upfront increases the initial load time and size. | Use dynamic import() statements and React.lazy for splitting code and loading components on demand. |
| Improper Use of Conditional Rendering | Misuse of conditional rendering can lead to unnecessary DOM elements being rendered. | Use conditional rendering wisely to render only necessary components. Opt for ternary operators or logical operators for cleaner, more efficient conditional rendering. |
| Not Utilizing Virtualization for Large Lists | Rendering large lists or tables without virtualization can significantly increase the DOM size. | Implement virtualization with libraries like react-window or react-virtualized to render only visible items. |
| Inefficient State Management | Global state or improperly managed local state can cause unnecessary re-renders across the app. | Keep state local where possible. Use context or state management libraries efficiently to minimize re-renders. |
Optimizing the DOM size in React applications involves a combination of strategic coding practices, regular profiling, and avoiding common pitfalls. By adhering to the best practices outlined and being mindful of the pitfalls, developers can significantly improve their application’s performance and user experience. Remember, optimization is a continuous process that benefits greatly from regular review and adjustment based on performance metrics and user feedback.
Conclusion:
In conclusion, optimizing the DOM size in React applications is essential for ensuring high performance and a smooth user experience. Throughout this guide, we’ve explored a variety of strategies and techniques, from basic adjustments like minimizing component depth and efficient rendering to more advanced methods such as server-side rendering, static site generation, and leveraging progressive web apps. We’ve also highlighted best practices to follow and common pitfalls to avoid, offering solutions to common challenges developers face when trying to optimize the DOM.
The key takeaway is that DOM optimization is an ongoing process that requires regular profiling, thoughtful coding practices, and a willingness to adopt new strategies as your application evolves. By applying the insights and techniques discussed, developers can build faster, more responsive applications that delight users and stand out in the digital landscape.
Remember, the goal isn’t just to reduce the DOM size but to create efficient, maintainable, and scalable React applications. As you continue to develop and optimize your projects, keep these strategies in mind, and don’t hesitate to experiment with new tools and techniques that could further enhance your application’s performance.
Happy coding, and here’s to building blazing-fast React applications that push the boundaries of web performance!