Follow Us:
How to Build RESTful API with Java and Spring Boot?
RESTful APIs are the backbone of modern web applications, facilitating smooth communication between client and server. These APIs follow REST (Representational State Transfer) principles, which emphasize scalable interaction using standard HTTP methods. This architectural style allows for efficient data exchange and updates in web services, making it a preferred choice for developers aiming to build robust, scalable applications.
Java, known for its reliability and scalability, remains a popular language among professional developers. Spring Boot, a project within the larger Spring framework, simplifies the setup and development of new Spring applications. It is particularly favoured for its ability to let developers quickly start and create stand-alone, production-grade applications that are just right with minimal configuration. This makes Java and Spring Boot an ideal combination for developing high-performing RESTful APIs.
In this blog, I’ll try to set a guide on setting up, building, and testing a RESTful API using Java and Spring Boot. I will cover every step from initial setup, through coding various components of the API, to finally testing its functionality. Whether you are looking to enhance your existing skills or are new to API development with Java and Spring Boot, this guide will equip you with the knowledge needed to build a well-structured API.
By following this guide, you can gain some practical insights and actionable knowledge, that you can apply directly to your projects, and can build efficient and scalable RESTful APIs.
Setting Up the Development Environment
To start building a RESTful API with Java and Spring Boot, you first need to set up your development environment. This involves installing the necessary software and tools that will enable you to create and test your API efficiently.
Required Tools and Software
- Java JDK: Install the latest Java JDK (Java Development Kit), which includes everything you need to develop Java applications, such as the runtime environment (JRE) and compilers.
- IDE (Integrated Development Environment): Use an IDE like IntelliJ IDEA or Eclipse that supports Java and Spring Boot. These IDEs offer built-in features such as auto-completion, debugging, and syntax highlighting, which facilitate smoother development.
- Postman: This tool is essential for testing your API. Postman allows you to send requests to the API and view the responses without needing to develop a separate client.
Installing and Configuring Spring Boot
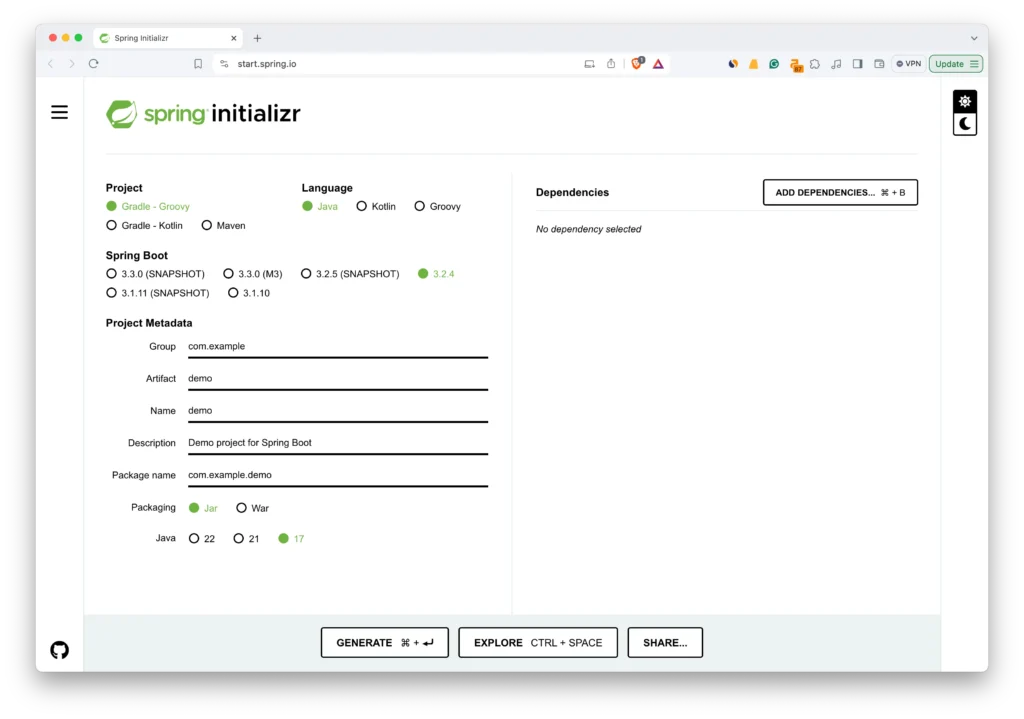
- Spring Initializr: Visit start.spring.io to easily generate a Spring Boot project. This web service allows you to customize your project setup:
- Choose
GradleorMavenas your build tool. - Select dependencies you initially require, such as ‘Spring Web’, ‘JPA’, ‘MySQL’, and ‘Spring Security’.
- Download and extract the project: Once configured, download the generated ZIP file and extract it into your working directory.
- Import the project into your IDE: Open your chosen IDE and import the project. Both IntelliJ IDEA and Eclipse have options to import existing projects, ensuring they recognize the project’s structure.
Creating a New Spring Boot Project Using Spring Initializr
Here’s a quick guide to creating your project:
- Navigate to start.spring.io.
- Set the project metadata (Group, Artifact, Name, Description).
- Choose Java as the language.
- Select your build tool (Maven or Gradle).
- Add dependencies like ‘Spring Web Starter’ for building web applications.
- Click on “Generate” to download your project setup.
This step-by-step setup ensures you have a fully configured development environment tailored for building RESTful APIs with Java and Spring Boot. Once you have completed these steps, you are ready to start developing your API components in the next sections of this blog.
Understanding the Project Structure
Once you’ve set up and imported your Spring Boot project into your IDE, it’s crucial to understand its directory layout and the purpose of key files. This knowledge will help you navigate and manage your project efficiently as you develop your RESTful API.
Overview of the Default Spring Boot Project Structure
Here’s a breakdown of the primary components of a typical Spring Boot project structure:
src/main/java: This directory contains all your Java source files. Your main application class, controllers, services, and other classes will reside here.src/main/resources: This folder holds all non-Java resources, such as static content, property files, and templates. It’s where you’ll place yourapplication.propertiesorapplication.ymlfiles for configuration settings.src/test/java: Dedicated to your test classes, this directory allows you to keep your unit and integration tests separate from your main application code.
Explanation of Key Directories and Files
pom.xmlorbuild.gradle: Depending on whether you choose Maven or Gradle, this file manages your project’s dependencies, plugins, and additional configurations. It is essential to define what libraries are included in your project and how they should be built.Application.java: This is your main application class where the Spring Boot application starts. It typically contains themainmethod that Spring Boot uses to bootstrap your application. This class is annotated with@SpringBootApplication, indicating it as a configuration class that declares one or more@Beanmethods.application.propertiesorapplication.yml: These files are used for configuring your application. Common configurations include database details, server port, and Spring profiles. You can specify properties for various environments (development, test, production) within these files./staticand/templates: Located undersrc/main/resources, these directories are where you store web resources like CSS, JavaScript, and HTML templates if your application serves web content.
Understanding the Role of These Files and Directories
Each component in the project structure serves a specific purpose:
pom.xml/build.gradle: Manages all dependencies required by your project, ensuring that all necessary libraries are available during development and deployment.Application.java: Serves as the launching point for your application. This class initializes your Spring context and settings.application.properties/application.yml: Centralizes configuration management, making it easy to change settings without altering your code.- Resource directories (
/static,/templates): These enhance the functionality of your application by providing resources necessary for a complete web application, if applicable.
By understanding this structure, you can effectively navigate and manage your project, making the development process smoother and more organized. This foundational knowledge is critical as you proceed to develop the different layers of your RESTful API.
Building a Simple RESTful API
Once you have a solid understanding of your project structure, you can begin building the components of your RESTful API. This section covers creating the data model, setting up the data access layer, implementing business logic through services, and constructing the controller to handle HTTP requests.
1. Define the Data Model
1.1 Creating the Domain Model (e.g., a User Class)
Start by defining a User class that represents the data model. This class will include attributes typical of a user, such as id, name, and email.
package com.example.demo.model;

import javax.persistence.*;

@Entity
public class User {

    @Id
    @GeneratedValue(strategy = GenerationType.IDENTITY)
    private Long id;
    private String name;
    private String email;

    // Getters and Setters
}1.2 Annotations for Data Modelling
@Entity: Marks the class as a persistent Java class.@Id: Designates the primary key of an entity.@GeneratedValue: Specifies the strategy for generating the primary key values using an auto-incremented database column.
2. Create Data Access Layer
2.1 Setting Up Repositories Using Spring Data JPA
Create a repository interface for the User class by extending Spring Data JPA’s JpaRepository or CrudRepository. This interface provides CRUD functions for the entity class without requiring implementation.
package com.example.demo.repository;

import com.example.demo.model.User;
import org.springframework.data.jpa.repository.JpaRepository;

public interface UserRepository extends JpaRepository<User, Long> {
}3. Business Services Layer
3.1 Writing Service Classes to Handle Business Logic
Develop a service class to encapsulate the business logic. This class will use the UserRepository to interact with the database.
package com.example.demo.service;

import com.example.demo.model.User;
import com.example.demo.repository.UserRepository;
import org.springframework.beans.factory.annotation.Autowired;
import org.springframework.stereotype.Service;

import java.util.List;

@Service
public class UserService {

    @Autowired
    private UserRepository userRepository;

    public List<User> findAllUsers() {
        return userRepository.findAll();
    }

    public User findUserById(Long id) {
        return userRepository.findById(id).orElse(null);
    }

    public User saveUser(User user) {
        return userRepository.save(user);
    }

    public void deleteUser(Long id) {
        userRepository.deleteById(id);
    }
}3.2 Using Service Annotations
@Service: Indicates that the class is a service provider, used for writing business logic, calling methods in the repository layer, and querying the database.
4. Building the Controller
4.1 Creating a REST Controller
Define a REST controller to handle HTTP requests. Use the @RestController annotation, which combines @Controller and @ResponseBody and ensures responses are automatically serialized into JSON or XML.
package com.example.demo.controller;

import com.example.demo.model.User;
import com.example.demo.service.UserService;
import org.springframework.beans.factory.annotation.Autowired;
import org.springframework.web.bind.annotation.*;

import java.util.List;

@RestController
@RequestMapping("/users")
public class UserController {

    @Autowired
    private UserService userService;

    @GetMapping
    public List<User> getAllUsers() {
        return userService.findAllUsers();
    }

    @GetMapping("/{id}")
    public User getUserById(@PathVariable Long id) {
        return userService.findUserById(id);
    }

    @PostMapping
    public User createUser(@RequestBody User user) {
        return userService.saveUser(user);
    }

    @PutMapping("/{id}")
    public User updateUser(@PathVariable Long id, @RequestBody User user) {
        user.setId(id);
        return userService.saveUser(user);
    }

    @DeleteMapping("/{id}")
    public void deleteUser(@PathVariable Long id) {
        userService.deleteUser(id);
    }
}4.2 Mapping HTTP Operations
The controller maps HTTP methods to service operations:
@GetMappingfor retrieving data.@PostMappingfor creating a new entry.@PutMappingfor updating an existing entry.@DeleteMappingfor deleting an entry.
4.3 Exception Handling with @ExceptionHandler
Implement an exception-handling mechanism to manage exceptions and return appropriate error responses.
@ExceptionHandler
public ResponseEntity<String> handleException(Exception e) {
    return new ResponseEntity<>(e.getMessage(), HttpStatus.INTERNAL_SERVER_ERROR);
}By following these structured steps, you can efficiently develop a scalable and maintainable API, adhering to best practices in software architecture.
Implementing Data Validation
To ensure the reliability and integrity of the data your RESTful API receives, it’s essential to implement data validation. Data validation helps prevent malformed data from being processed by the application and ensures that only valid data is acted upon. Here’s how you can implement data validation in your Java and Spring Boot applications.
Using Spring’s Validation Annotations
Spring provides a robust validation framework that integrates seamlessly with Spring MVC. Here are the key steps to adding validation to your models:
1. Annotate Model Attributes for Validation: Use Spring’s built-in annotations in your domain model to enforce rules. For example, to validate user input in the User class:
package com.example.demo.model;

import javax.persistence.*;
import javax.validation.constraints.Email;
import javax.validation.constraints.NotBlank;
import javax.validation.constraints.Size;

@Entity
public class User {

    @Id
    @GeneratedValue(strategy = GenerationType.IDENTITY)
    private Long id;

    @NotBlank(message = "Name is mandatory")
    @Size(min = 2, max = 100, message = "Name must be between 2 and 100 characters")
    private String name;

    @NotBlank(message = "Email is mandatory")
    @Email(message = "Email should be valid")
    private String email;

    // Getters and Setters
}@NotBlankensures the field is not empty.@Sizechecks if the field’s length falls within the set limits.@Emailensures the field is a valid email address.
2. Enable Validation in the Service Layer: Modify your service methods to support validation. This typically involves annotating method parameters with @Valid to trigger validation:
package com.example.demo.service;

import com.example.demo.model.User;
import com.example.demo.repository.UserRepository;
import org.springframework.beans.factory.annotation.Autowired;
import org.springframework.stereotype.Service;
import org.springframework.validation.annotation.Validated;

import javax.validation.Valid;

@Service
@Validated
public class UserService {

    @Autowired
    private UserRepository userRepository;

    public User saveUser(@Valid User user) {
        return userRepository.save(user);
    }
}Handling Validation Errors
When validation fails, Spring generates a MethodArgumentNotValidException, which you can handle to return meaningful error messages to the client. Implementing an exception handler in your controller helps manage these errors:
package com.example.demo.controller;

import org.springframework.http.HttpStatus;
import org.springframework.http.ResponseEntity;
import org.springframework.web.bind.MethodArgumentNotValidException;
import org.springframework.web.bind.annotation.ExceptionHandler;
import org.springframework.web.bind.annotation.RestControllerAdvice;

@RestControllerAdvice
public class UserExceptionHandler {

    @ExceptionHandler(MethodArgumentNotValidException.class)
    public ResponseEntity<Object> handleValidationExceptions(MethodArgumentNotValidException ex) {
        Map<String, String> errors = new HashMap<>();
        ex.getBindingResult().getAllErrors().forEach((error) -> {
            String fieldName = ((FieldError) error).getField();
            String errorMessage = error.getDefaultMessage();
            errors.put(fieldName, errorMessage);
        });
        return new ResponseEntity<>(errors, HttpStatus.BAD_REQUEST);
    }
}This handler extracts validation error messages and returns them in a structured format, making it easier for clients to understand what went wrong.
By implementing these validation steps, you ensure that your API does not process invalid data, thus maintaining the integrity and reliability of your application. This also improves the user experience, as clients receive immediate feedback on their input.
Securing the API
Security is a critical component of any API. In this section, we will cover the basics of securing your RESTful API with Spring Boot using Spring Security, which provides robust authentication and authorization capabilities.
Basics of Securing a REST API with Spring Security
Spring Security can handle both authentication and authorization to ensure that only legitimate users can access your API and perform actions they are permitted to. Here’s how to integrate Spring Security into your project:

Add Spring Security Dependencies: First, add Spring Security to your project. If you are using Maven, include the following in your pom.xml:
<dependency>
    <groupId>org.springframework.boot</groupId>
    <artifactId>spring-boot-starter-security</artifactId>
</dependency>For Gradle, add this line to your build.gradle:
implementation 'org.springframework.boot:spring-boot-starter-security'Configure HTTP Security: Customize your security settings by extending the WebSecurityConfigurerAdapter class. Here, you can configure which endpoints are public and which are secured.
package com.example.demo.security;

import org.springframework.security.config.annotation.web.builders.HttpSecurity;
import org.springframework.security.config.annotation.web.configuration.EnableWebSecurity;
import org.springframework.security.config.annotation.web.configuration.WebSecurityConfigurerAdapter;

@EnableWebSecurity
public class SecurityConfig extends WebSecurityConfigurerAdapter {

    @Override
    protected void configure(HttpSecurity http) throws Exception {
        http
            .authorizeRequests()
                .antMatchers("/", "/home", "/public/**").permitAll()
                .anyRequest().authenticated()
            .and()
            .httpBasic();
    }
}In this configuration:
- Public endpoints (
/,/home,/public/**) do not require authentication. - All other endpoints require the user to be authenticated.
- HTTP Basic authentication is enabled for simplicity.
Configure User Details: In a production environment, you would typically fetch user details from a database or an external service. However, for demonstration purposes, you can configure an in-memory user store with a default username and password.
@Override
protected void configure(AuthenticationManagerBuilder auth) throws Exception {
    auth.inMemoryAuthentication()
        .withUser("user")
        .password(passwordEncoder().encode("password"))
        .roles("USER");
}

@Bean
public PasswordEncoder passwordEncoder() {
    return new BCryptPasswordEncoder();
}This configuration sets up a simple in-memory authentication with a username and a password that is encoded using BCrypt.
HTTP Basic authentication is a straightforward method where the user name and password are encoded with Base64 and sent in the HTTP header. It’s suitable for internal or low-security applications. For higher security applications, consider implementing OAuth2 or JWT-based authentication.
By following these steps, you secure your API by ensuring that only authenticated users can access sensitive endpoints. This setup is essential for protecting your application from unauthorized access and data breaches.
Database Integration
Integrating a database is a crucial step in developing a RESTful API, as it allows for persistent storage and retrieval of data. In this section, we will discuss how to configure a database connection using Spring Boot, which simplifies database operations with its auto-configuration capabilities.
Configuring a Database
Spring Boot supports a variety of databases, including relational databases like MySQL and H2, and non-relational databases. For demonstration purposes, we will use an H2 in-memory database for its simplicity and ease of setup, but the steps are similar for other databases.
- Add Database Dependencies: Include the H2 database dependency in your project. For Maven, add the following to your
pom.xml:
<dependency>
    <groupId>com.h2database</groupId>
    <artifactId>h2</artifactId>
    <scope>runtime</scope>
</dependency>For Gradle, include this in your build.gradle:
runtimeOnly 'com.h2database:h2'- Configure Database Properties: Spring Boot uses
application.propertiesorapplication.ymlfor configuration settings. Add the following properties to connect to an H2 database:
# H2 Database
spring.datasource.url=jdbc:h2:mem:testdb;DB_CLOSE_DELAY=-1;DB_CLOSE_ON_EXIT=FALSE
spring.datasource.driverClassName=org.h2.Driver
spring.datasource.username=sa
spring.datasource.password=
spring.jpa.database-platform=org.hibernate.dialect.H2DialectThis configuration sets up an H2 database that is available throughout the application’s lifecycle.
- Enable H2 Console (Optional): For development purposes, you may want to enable the H2 console to visually manage the database:
# H2 Console
spring.h2.console.enabled=true
spring.h2.console.path=/h2-consoleAccess the H2 console via http://localhost:8080/h2-console using the JDBC URL jdbc:h2:mem:testdb.
Using Spring Data JPA for Database Operations
Spring Data JPA abstracts much of the boilerplate required in database operations, allowing you to focus more on your business logic rather than database connectivity and query details.
- Create Entity Classes: Define your data model using entity annotations, as discussed in the “Building a Simple RESTful API” section.
- Create Repository Interfaces: Extend
JpaRepositoryorCrudRepositoryto create interfaces for database operations. Spring Data JPA automatically implements these repositories, providing you with ready-to-use methods for CRUD operations.
package com.example.demo.repository;

import com.example.demo.model.User;
import org.springframework.data.jpa.repository.JpaRepository;

public interface UserRepository extends JpaRepository<User, Long> {
}- Use Repositories in Service Classes: Autowire these repositories in your service classes to perform database operations.
package com.example.demo.service;

import com.example.demo.model.User;
import com.example.demo.repository.UserRepository;
import org.springframework.beans.factory.annotation.Autowired;
import org.springframework.stereotype.Service;

@Service
public class UserService {

    @Autowired
    private UserRepository userRepository;

    public User saveUser(User user) {
        return userRepository.save(user);
    }
}By integrating a database and using Spring Data JPA, you streamline your data handling, making it more efficient and scalable. This setup not only enhances the performance of your API but also simplifies the maintenance of your codebase.
Testing the API
Testing is a critical phase in the development of a RESTful API, ensuring that your application behaves as expected. In this section, we discuss how to implement both unit and integration tests using Spring Boot’s testing support.
Unit Testing
Unit tests focus on individual components of the application without relying on external dependencies like databases or other services. Here’s how to set up unit tests for your service layer in a Spring Boot application.
- Add Testing Dependencies: First, make sure your project includes the necessary dependencies for testing. If you’re using Maven, include these in your
pom.xml:
<dependency>
    <groupId>org.springframework.boot</groupId>
    <artifactId>spring-boot-starter-test</artifactId>
    <scope>test</scope>
</dependency>For Gradle, add this to your build.gradle:
testImplementation 'org.springframework.boot:spring-boot-starter-test'- Write Unit Tests for the Service Layer: Using JUnit and Mockito, you can write tests that mock your repositories and focus solely on the business logic.
package com.example.demo.service;

import com.example.demo.model.User;
import com.example.demo.repository.UserRepository;
import org.junit.jupiter.api.Test;
import org.junit.jupiter.api.extension.ExtendWith;
import org.mockito.InjectMocks;
import org.mockito.Mock;
import org.mockito.junit.jupiter.MockitoExtension;
import org.springframework.boot.test.context.SpringBootTest;

import static org.mockito.Mockito.*;
import static org.mockito.BDDMockito.*;
import static org.assertj.core.api.Assertions.*;

@ExtendWith(MockitoExtension.class)
public class UserServiceTest {

    @Mock
    private UserRepository userRepository;

    @InjectMocks
    private UserService userService;

    @Test
    public void testSaveUser() {
        User user = new User();
        user.setName("John Doe");
        user.setEmail("[email protected]");

        given(userRepository.save(user)).willReturn(user);

        User savedUser = userService.saveUser(user);

        assertThat(savedUser).isNotNull();
        verify(userRepository).save(any(User.class));
    }
}Integration Testing
Integration tests check how different parts of the application work together, from the controller to the database.
- Setting Up Integration Tests: Use
@SpringBootTestto load the application context and@AutoConfigureMockMvcfor calling API endpoints.
package com.example.demo.controller;

import org.junit.jupiter.api.Test;
import org.springframework.beans.factory.annotation.Autowired;
import org.springframework.boot.test.autoconfigure.web.servlet.WebMvcTest;
import org.springframework.boot.test.mock.mockito.MockBean;
import org.springframework.test.web.servlet.MockMvc;
import org.springframework.test.web.servlet.request.MockMvcRequestBuilders;
import org.springframework.test.web.servlet.result.MockMvcResultMatchers;

@WebMvcTest(UserController.class)
public class UserControllerTest {

    @Autowired
    private MockMvc mockMvc;

    @MockBean
    private UserService userService;

    @Test
    public void testGetAllUsers() throws Exception {
        mockMvc.perform(MockMvcRequestBuilders.get("/users"))
                .andExpect(MockMvcResultMatchers.status().isOk());
    }
}- Test Database Interactions: For tests that interact with the database, use
@DataJpaTestto configure an in-memory database automatically.
package com.example.demo.repository;

import com.example.demo.model.User;
import org.junit.jupiter.api.Test;
import org.springframework.beans.factory.annotation.Autowired;
import org.springframework.boot.test.autoconfigure.orm.jpa.DataJpaTest;

import static org.assertj.core.api.Assertions.*;

@DataJpaTest
public class UserRepositoryTest {

    @Autowired
    private UserRepository userRepository;

    @Test
    public void testSaveUser() {
        User user = new User();
        user.setName("Alice");
        user.setEmail("[email protected]");

        User savedUser = userRepository.save(user);

        assertThat(savedUser).isNotNull();
        assertThat(savedUser.getId()).isNotNull();
    }
}By implementing these testing strategies, you ensure that each component of your API functions correctly and interacts properly with other components. This robust testing setup enhances the reliability and maintainability of your API.
API Documentation
Effective API documentation is crucial for enabling developers to understand and use your API effectively. Swagger (now known as OpenAPI) is a powerful tool for generating interactive documentation that can help users understand all the operations your API supports.
- Add Swagger Dependencies: Integrate Swagger by adding these dependencies to your Maven or Gradle build file. For Maven:
<dependency>
    <groupId>io.springfox</groupId>
    <artifactId>springfox-swagger2</artifactId>
    <version>2.9.2</version>
</dependency>
<dependency>
    <groupId>io.springfox</groupId>
    <artifactId>springfox-swagger-ui</artifactId>
    <version>2.9.2</version>
</dependency>For Gradle:
implementation 'io.springfox:springfox-swagger2:2.9.2'
implementation 'io.springfox:springfox-swagger-ui:2.9.2'- Configure Swagger: Add a configuration class to enable Swagger UI and customize its settings.
package com.example.demo.config;

import org.springframework.context.annotation.Bean;
import org.springframework.context.annotation.Configuration;
import springfox.documentation.builders.PathSelectors;
import springfox.documentation.builders.RequestHandlerSelectors;
import springfox.documentation.spi.DocumentationType;
import springfox.documentation.spring.web.plugins.Docket;
import springfox.documentation.swagger2.annotations.EnableSwagger2;

@Configuration
@EnableSwagger2
public class SwaggerConfig {
    @Bean
    public Docket api() {
        return new Docket(DocumentationType.SWAGGER_2)
                .select()
                .apis(RequestHandlerSelectors.any())
                .paths(PathSelectors.any())
                .build();
    }
}This setup allows developers to visually interact with your API through Swagger UI, providing a clear, navigable interface for all available API operations.
Deployment
Deploying your API ensures it is accessible to users and applications. You can deploy your Spring Boot application to a variety of platforms, including standalone servers or cloud platforms like AWS, Heroku, or Azure.
Although there is the process of deploying your API on AWS, as it offers several services for deploying Java applications. One common approach is to use AWS Elastic Beanstalk, which automates the deployment, from capacity provisioning, load balancing, and auto-scaling to application health monitoring.
Steps for Deploying on AWS Elastic Beanstalk
- Prepare Your Application:
- Ensure your application is production-ready.
- Check all configurations in
application.propertiesorapplication.ymlare set for production environments. - Package your application into an executable JAR file. Spring Boot makes this easy with its built-in support for creating JARs.
- The command
mvn clean packagegenerates atarget/your-application.jarfile.
- Create an AWS Account and Set Up the AWS CLI:
- If you don’t already have an AWS account, create one at AWS Management Console.
- Install and configure the AWS CLI on your local machine. Authenticate it with your AWS account to enable interaction with AWS services directly from the CLI.
aws configure
- Deploy Using Elastic Beanstalk:
- Install the Elastic Beanstalk CLI (EB CLI) to simplify creating, updating, and monitoring your application environments.
pip install awsebcli - Initialize your Elastic Beanstalk application:
eb init -p java-11 --region your-region-id your-app-name - Choose a platform branch that matches your Java version.
- Create an environment and deploy your application:
eb create your-env-nameandeb deploy eb createsets up the environment, whileeb deployuploads your JAR file and starts the deployment process.
- Install the Elastic Beanstalk CLI (EB CLI) to simplify creating, updating, and monitoring your application environments.
- Verify the Deployment:
- Once deployment is complete, Elastic Beanstalk provides a URL to access your deployed application.
- Visit this URL in a web browser to ensure your API is operational.
- Monitor the application’s health and logs via the AWS Management Console under the Elastic Beanstalk service.
- Manage Your Environment:
- Use the Elastic Beanstalk Dashboard to manage application versions, and environment configurations, and monitor application health.
- Scale your environment up or down based on demand directly from the console.
By following these steps, you can deploy your Spring Boot application to AWS Elastic Beanstalk, taking advantage of AWS’s robust, scalable infrastructure. This approach simplifies many of the challenges associated with managing server infrastructure, allowing you to focus more on developing and improving your application.
Conclusion
In this blog, we’ve systematically explored how to build a RESTful API using Java and Spring Boot, covering essential aspects from setting up the development environment to deploying the application on AWS. We began by outlining the project structure and progressed through building the API, including data modeling, repository setup, service layer creation, and controller implementation. We emphasized the importance of implementing data validation and security to ensure robustness and reliability. Documentation and deployment were addressed to ensure the API is both usable and accessible to other developers and systems.
The steps provided in each section aim to equip you with practical knowledge and skills to create scalable and maintainable RESTful APIs. By following this guide, you should feel confident in your ability to develop and deploy APIs using Java and Spring Boot, ready to handle real-world challenges and enhance your development projects. Remember, continuous learning and adaptation are key in the ever-evolving landscape of software development.