Typography plays a significant role in web design, impacting a website’s appearance and user experience. As WordPress developers or aspiring developers, you understand the importance of creating visually appealing and engaging websites. This article aims to guide you through the process of adding custom fonts to WordPress without using plugins. We will also explore the benefits of loading Google Fonts locally, ensuring efficiency and compliance with GDPR regulations.
Throughout this guide, we’ll provide you with a clear step-by-step process on how to add custom fonts in WordPress without using any plugin. We’ll cover everything from selecting custom fonts, preparing them for WordPress, to enabling them using CSS. Additionally, we’ll discuss the advantages of hosting Google Fonts locally and offer troubleshooting tips for common issues.
By the end of this article, you’ll be equipped with the knowledge to enhance your WordPress website’s typography and provide visitors with a better browsing experience. Let’s begin our journey of integrating custom fonts into WordPress in a straightforward and informative manner.
Understanding Custom Fonts:
Custom fonts are an essential element of modern web design, allowing website owners to depart from the constraints of standard web-safe fonts and infuse their sites with a unique and distinctive character. Unlike familiar fonts like Arial or Times New Roman, custom fonts offer a wide array of styles and aesthetics that can help create a memorable and visually appealing user experience.
Why It’s Important to Add Custom Fonts?

- Branding and Identity: Custom fonts enable website owners to reinforce their brand’s identity and personality through typography. By choosing fonts that resonate with their brand values, businesses can create a consistent and recognizable visual identity.
- Enhanced User Experience: Typography significantly impacts the readability and overall user experience of a website. Custom fonts, when thoughtfully selected, can improve content legibility, making it easier for users to engage with the site’s information.
- Distinctive Visual Appeal: Unique typography adds visual appeal to a website, making it stand out from competitors. A well-chosen custom font can leave a lasting impression on visitors and contribute to a more memorable browsing experience.
- Differentiation and Memorability: In a crowded digital landscape, the use of custom fonts can help websites differentiate themselves and be more memorable to their target audience. The right font choice can evoke emotions, evoke a sense of professionalism, or match the website’s specific niche.
- Consistency in Design: Utilizing custom fonts across different sections of a website ensures a consistent design language. This consistency helps maintain a professional appearance and reinforces the overall theme and branding.
- Complementing Website Theme: Custom fonts offer flexibility in aligning typography with the website’s theme. Designers can choose fonts that harmonize with the content and design, creating a cohesive and aesthetically pleasing experience.
Google’s GDPR Policy:
Google Fonts, a popular resource for web fonts, has gained traction due to its extensive collection and ease of use. However, it is crucial to be mindful of the General Data Protection Regulation (GDPR) when integrating Google Fonts into your WordPress site. The GDPR is a data protection and privacy regulation enacted by the European Union (EU) to safeguard the personal data and privacy of EU citizens. When using Google Fonts, the user’s browser may make a request to Google’s servers, potentially transmitting user data such as IP addresses to Google.
To comply with the GDPR, it is recommended to host Google Fonts locally on your server. By hosting the fonts locally, you can ensure that user data is not sent to external servers, promoting better privacy and compliance with data protection regulations. With a clear understanding of the significance of custom fonts and the importance of GDPR compliance when using external resources like Google Fonts, let’s explore the step-by-step process of adding custom fonts to your WordPress website without relying on third-party plugins.
Locating and Choosing Custom Fonts (Google Fonts):
When it comes to accessing a diverse collection of high-quality custom fonts, Google Fonts emerges as a favored choice among web designers and developers. Google Fonts offers an extensive library of web fonts that are not only visually appealing but also optimized for web performance. Let’s explore the process of locating and choosing custom fonts from Google Fonts to elevate your WordPress website’s typography.
2.1 Accessing Google Fonts:
- Visit Google Fonts: Begin by navigating to the Google Fonts website (fonts.google.com). You’ll be welcomed by an extensive library of fonts waiting to be explored.
- Browsing and Filtering: Google Fonts allows you to browse fonts by categories such as Serif, Sans Serif, Display, Handwriting, and more. You can also filter fonts based on thickness, slant, and width to find the perfect fit for your website.
- Preview and Compare: Click on a font card to view more details and preview the font in various text sizes and styles. Compare multiple fonts side by side to make an informed decision.
- Selecting Fonts: Once you’ve found fonts that complement your website’s design and content, add them to your collection by clicking the “plus” icon next to each font. This action saves the selected fonts to your custom collection for easy reference later.
2.2 Implementing Google Fonts:
- Embedding Google Fonts: After finalizing your font selection, click the “Embed” button at the bottom of the page. Google Fonts will generate an embed code with a link to the selected fonts.
- Integrating the Embed Code: Copy the provided embed code and paste it into the
<head>section of your WordPress theme’s HTML file. This ensures that the chosen Google Fonts are loaded into your website’s CSS. - Font Styles and Weights: Customize the font styles and weights you wish to use on your website. Google Fonts provides specific CSS code snippets that you can insert into your theme’s stylesheet (style.css) to apply the desired font styles.
2.3 Ensuring GDPR Compliance (Optional):
If GDPR compliance is a concern for your website, consider hosting the Google Fonts locally instead of relying on Google’s servers. By downloading the font files from Google Fonts and hosting them on your server, you can mitigate the transmission of user data to external servers, adhering to data protection regulations.
With Google Fonts offering a diverse range of web fonts, finding the perfect typography to match your website’s theme and content becomes an enjoyable experience. By incorporating Google Fonts thoughtfully, you can elevate your WordPress website’s visual appeal and readability, offering visitors an engaging and memorable browsing journey.
Preparing the Fonts for WordPress:
To integrate custom fonts from Google Fonts into your WordPress website, a few preparatory steps are necessary. From downloading the font files to converting them to the appropriate format and finally adding them to your hosting panel (hPanel), follow this step-by-step guide to ensure a seamless and efficient process.
3.1 Downloading the Font Files from Google Fonts:
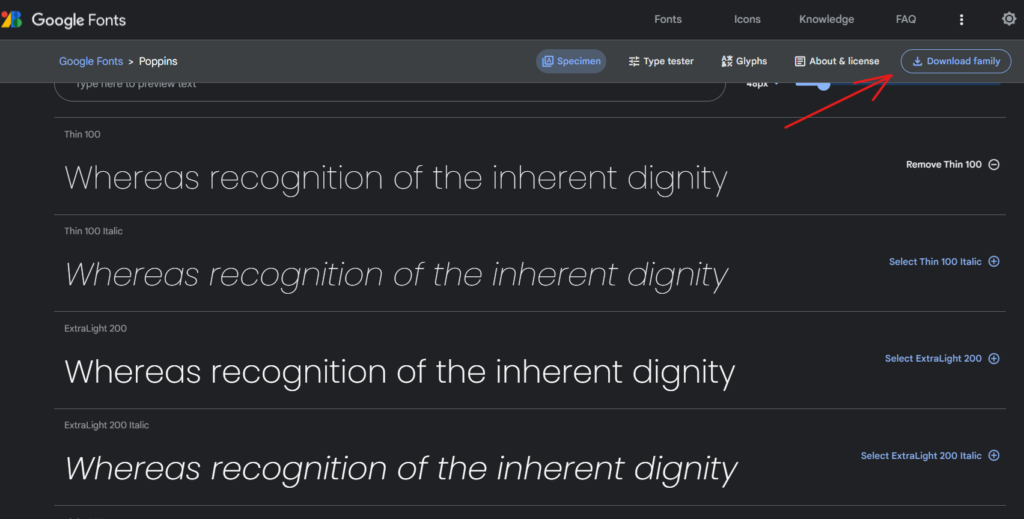
- Access Your Google Fonts Collection: Head to the Google Fonts website and log in using your Google account. Navigate to “My Collection” to view the fonts you’ve previously selected or create a new collection by adding fonts to it.
- Select Fonts to Download: Choose the custom fonts you want to use on your website by clicking the “plus” icon next to each font card. This will add the selected fonts to your collection.
- Access Your Collection: Once you have your desired fonts in your collection, click on the collection name to open it.
- Download Font Files: Click on the download icon (a down-facing arrow) at the top-right corner of the collection page. A ZIP file containing the font files you selected will be downloaded to your computer.
3.2 Converting TTF Files to WOFF (or WOFF2) Format:
- Extract the ZIP File: Unzip the downloaded file to reveal the font files in TTF format.
- Convert TTF to WOFF (or WOFF2): To improve web performance, it’s recommended to convert TTF files to Web Open Font Format (WOFF) or Web Open Font Format 2 (WOFF2). You can use various online font converter tools or desktop applications to perform this conversion. Save the converted files in a separate folder for ease of access.
3.3 Adding the Google Font in hPanel:
- Log in to hPanel: Access your hosting control panel (hPanel/cPanel) provided by your hosting provider.
- File Manager: Locate the “File Manager” section in your hPanel and open it. Navigate to the root directory of your WordPress installation i.e. “public_html”.
- Create a New Fonts Folder: From the root directory, go to “wp-content” folder and there create a new folder named “custom-fonts” (or any name you prefer) to store your custom font files.
- Upload Font Files: Inside the “fonts” folder, upload the TTF and converted WOFF (or WOFF2) font files that you previously downloaded from Google Fonts.
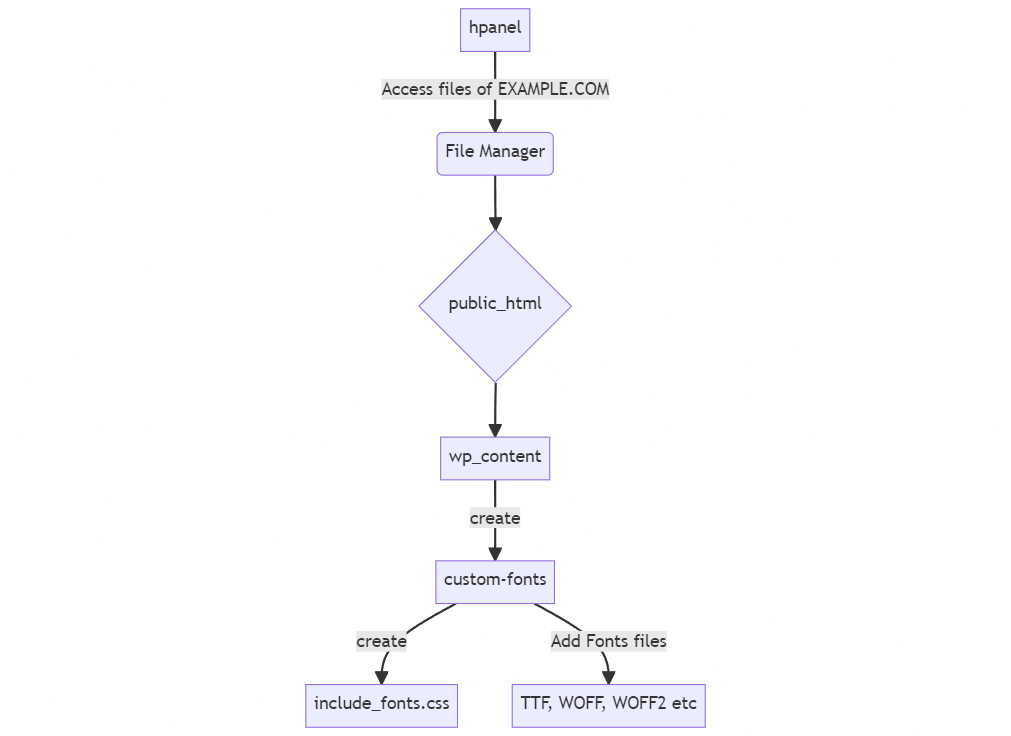
- Create
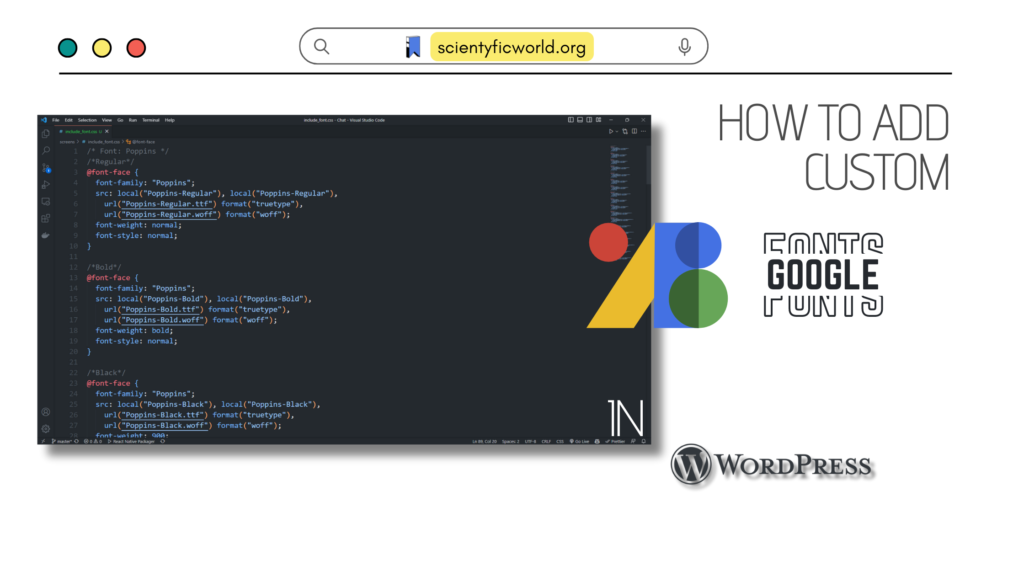
include_font.css: Inside the same folder i.e. “custom-fonts”, create a CSS file called include_font.css
/* Font: Poppins */
/*Regular*/
@font-face {
  font-family: "Poppins";
  src: local("Poppins-Regular"), local("Poppins-Regular"),
    url("Poppins-Regular.ttf") format("truetype"),
    url("Poppins-Regular.woff") format("woff");
  font-weight: normal;
  font-style: normal;
}

/*Bold*/
@font-face {
  font-family: "Poppins";
  src: local("Poppins-Bold"), local("Poppins-Bold"),
    url("Poppins-Bold.ttf") format("truetype"),
    url("Poppins-Bold.woff") format("woff");
  font-weight: bold;
  font-style: normal;
}

/*Black*/
@font-face {
  font-family: "Poppins";
  src: local("Poppins-Black"), local("Poppins-Black"),
    url("Poppins-Black.ttf") format("truetype"),
    url("Poppins-Black.woff") format("woff");
  font-weight: 900;
  font-style: normal;
}

/*Semi-Bold*/
@font-face {
  font-family: "Poppins";
  src: local("Poppins-SemiBold"), local("Poppins-SemiBold"),
    url("Poppins-SemiBold.ttf") format("truetype"),
    url("Poppins-SemiBold.woff") format("woff");
  font-weight: 600;
  font-style: normal;
}

/*Extra-Bold*/

@font-face {
  font-family: "Poppins";
  src: local("Poppins-ExtraBold"), local("Poppins-ExtraBold"),
    url("Poppins-ExtraBold.ttf") format("truetype"),
    url("Poppins-ExtraBold.woff") format("woff");
  font-weight: 800;
  font-style: normal;
}

/*Light*/
@font-face {
  font-family: "Poppins";
  src: local("Poppins-Light"), local("Poppins-Light"),
    url("Poppins-Light.ttf") format("truetype"),
    url("Poppins-Light.woff") format("woff");
  font-weight: 300;
  font-style: normal;
}

/*Medium*/
@font-face {
  font-family: "Poppins";
  src: local("Poppins-Medium"), local("Poppins-Medium"),
    url("Poppins-Medium.ttf") format("truetype"),
    url("Poppins-Medium.woff") format("woff");
  font-weight: 500;
  font-style: normal;
}

/*Extra-Light*/
@font-face {
  font-family: "Poppins";
  src: local("Poppins-ExtraLight"), local("Poppins-ExtraLight"),
    url("Poppins-ExtraLight.ttf") format("truetype"),
    url("Poppins-ExtraLight.woff") format("woff");
  font-weight: 200;
  font-style: normal;
}

/*Thin*/
@font-face {
  font-family: "Poppins";
  src: local("Poppins-Thin"), local("Poppins-Thin"),
    url("Poppins-Thin.ttf") format("truetype"),
    url("Poppins-Thin.woff") format("woff");
  font-weight: 100;
  font-style: normal;
}

/*Italic*/
@font-face {
  font-family: "Poppins";
  src: local("Poppins-Italic"), local("Poppins-Italic"),
    url("Poppins-Italic.ttf") format("truetype"),
    url("Poppins-Italic.woff") format("woff");
  font-weight: normal;
  font-style: italic;
}

/*Medium-Italic*/
@font-face {
  font-family: "Poppins";
  src: local("Poppins-MediumItalic"), local("Poppins-MediumItalic"),
    url("Poppins-MediumItalic.ttf") format("truetype"),
    url("Poppins-MediumItalic.woff") format("woff");
  font-weight: 500;
  font-style: italic;
}

/*Semi-Bold-Italic*/
@font-face {
  font-family: "Poppins";
  src: local("Poppins-SemiBoldItalic"), local("Poppins-SemiBoldItalic"),
    url("Poppins-SemiBoldItalic.ttf") format("truetype"),
    url("Poppins-SemiBoldItalic.woff") format("woff");
  font-weight: 600;
  font-style: italic;
}

/*Bold-Italic*/
@font-face {
  font-family: "Poppins";
  src: local("Poppins-BoldItalic"), local("Poppins-BoldItalic"),
    url("Poppins-BoldItalic.ttf") format("truetype"),
    url("Poppins-BoldItalic.woff") format("woff");
  font-weight: bold;
  font-style: italic;
}

/*Extra-Bold-Italic*/
@font-face {
  font-family: "Poppins";
  src: local("Poppins-ExtraBoldItalic"), local("Poppins-ExtraBoldItalic"),
    url("Poppins-ExtraBoldItalic.ttf") format("truetype"),
    url("Poppins-ExtraBoldItalic.woff") format("woff");
  font-weight: 800;
  font-style: italic;
}

/*Light-Italic*/
@font-face {
  font-family: "Poppins";
  src: local("Poppins-LightItalic"), local("Poppins-LightItalic"),
    url("Poppins-LightItalic.ttf") format("truetype"),
    url("Poppins-LightItalic.woff") format("woff");
  font-weight: 300;
  font-style: italic;
}

/*Extra-Light-Italic*/
@font-face {
  font-family: "Poppins";
  src: local("Poppins-ExtraLightItalic"), local("Poppins-ExtraLightItalic"),
    url("Poppins-ExtraLightItalic.ttf") format("truetype"),
    url("Poppins-ExtraLightItalic.woff") format("woff");
  font-weight: 200;
  font-style: italic;
}

/*Thin-Italic*/
@font-face {
  font-family: "Poppins";
  src: local("Poppins-ThinItalic"), local("Poppins-ThinItalic"),
    url("Poppins-ThinItalic.ttf") format("truetype"),
    url("Poppins-ThinItalic.woff") format("woff");
  font-weight: 100;
  font-style: italic;
}

/*Black-Italic*/
@font-face {
  font-family: "Poppins";
  src: local("Poppins-BlackItalic"), local("Poppins-BlackItalic"),
    url("Poppins-BlackItalic.ttf") format("truetype"),
    url("Poppins-BlackItalic.woff") format("woff");
  font-weight: 900;
  font-style: italic;
}The given CSS code represents the @font-face rule, which allows web developers to define and use custom fonts on their websites. In this specific example, the custom font being defined is “Poppins.” Let’s break down the code:
@font-face: This is the CSS at-rule used to define a custom font to be used on the web page.font-family: "Poppins";: Specifies the name of the custom font family, which is “Poppins” in this case. This name will be used to reference the font throughout the website.src: Specifies the source of the font files. Thelocal()function is used to check if the font is already installed on the user’s device. If it is, the locally installed version will be used. The subsequenturl()functions provide the paths to the font files in different formats.format: Specifies the format of the font file. In this example, two formats are used: TrueType (TTF) and Web Open Font Format (WOFF).font-weight: normal;: Defines the font weight for the “Poppins” font family when used with normal text. In this case, it is set to the default font weight, which is “normal.”font-style: normal;: Defines the font style for the “Poppins” font family when used with normal text. Here, it is set to the default font style, which is “normal” (i.e., not italic).
Overall, this @font-face rule ensures that the custom font “Poppins” is correctly defined and available for use in the CSS styles for different HTML elements. With this setup, web developers can easily apply the “Poppins” font to various parts of the website, giving it a unique and visually appealing typography style.
- Edit Functions.php (Optional): If you want to enqueue the custom fonts using functions.php, access your WordPress theme’s functions.php file and add the appropriate code to register and enqueue the custom fonts.
function add_custom_fonts() {
    wp_enqueue_style( 'my-styles', WP_CONTENT_URL . '/custom-fonts/include_font.css', array(), '1.0.0' );
}
add_action( 'wp_enqueue_scripts', 'add_custom_fonts' );By following these steps, you have successfully prepared your custom fonts for integration into your WordPress website. The font files are now stored on your server, ready to be accessed and loaded onto your website. The next section will guide you through the process of enabling these custom fonts with CSS, ensuring your website displays the desired typography for a captivating user experience.
Enabling Fonts with CSS:
Now that you have prepared your custom fonts by downloading and converting them, it’s time to integrate them into your WordPress website using CSS. With the provided “include_font.css” file and the appropriate code in the “function.php” file, you’re all set to apply your custom typography to different elements of your site.
4.1 Applying Custom Fonts to Specific Elements:
To customize the font style for specific elements on your website, follow these steps:
- Locate the Element: Identify the HTML element you want to style with a custom font. This could be headings (h1, h2, h3, etc.), paragraphs (p), navigation menus, or any other element.
- Add CSS Code: Go to your WordPress Dashboard and navigate to “Appearance” > “Customize.” Inside the “Additional CSS” section, add the desired CSS code snippet for the element you wish to modify.
- Use Font Family Name: In the CSS code, specify the font-family property and use the exact same font family name as mentioned in the “include_font.css” file. For example, if you want to use the “Poppins” font for headings, the code would look like this:
h1, h2, h3 {
  font-family: "Poppins", sans-serif;
}- Save Changes: After adding the CSS code, click the “Publish” button to save your changes. The custom font will now be applied to the specified elements across your website.
4.2 Global Custom Font Styles:
Alternatively, you can apply the custom font globally to all relevant elements using the “*”(asterisk) selector. This ensures consistency throughout your site. To do this, add the following CSS code in the “Additional CSS” section:
*{
  --theme-font-family: "Poppins", sans-serif;
}This code sets the “Poppins” font as the default font for the entire website’s body text.
4.3 Fallback Font: It’s essential to provide a fallback font in case the custom font fails to load. The fallback font should be a commonly available font to ensure a consistent user experience. For example:
body {
  font-family: "Poppins", sans-serif;
}In this example, if the “Poppins” font is not available, the browser will use the default sans-serif font.
With these CSS guidelines, you have the flexibility to apply custom fonts selectively or globally across your WordPress website. Enjoy the creative freedom to craft a unique and captivating user experience by choosing the perfect custom fonts for your site’s design and content.
What are the benefits of Loading Google Fonts Locally?
Integrating Google Fonts locally on your WordPress website offers several advantages over relying on external servers to load the fonts. By hosting the font files on your server instead of fetching them from Google’s servers, you can enjoy the following benefits:
- Improved Page Load Speed:
Loading fonts from external servers can introduce delays, especially if the server experiences high traffic or network issues. Hosting the fonts locally ensures faster loading times as the font files are directly retrieved from your own server, reducing dependency on external resources. - Enhanced Website Performance:
Optimizing website performance is crucial for providing a smooth user experience. By using local fonts, you reduce the number of external HTTP requests required to load your site, thus minimizing potential bottlenecks and improving overall performance. - Increased Privacy and Security:
When using Google Fonts externally, visitors’ browsers may need to communicate with Google’s servers, potentially sharing user data such as IP addresses. Hosting fonts locally eliminates this data transfer, contributing to better user privacy and enhanced security. - GDPR Compliance:
As mentioned earlier, the General Data Protection Regulation (GDPR) in the European Union aims to protect user data and privacy. By loading Google Fonts locally, you can adhere to GDPR requirements as user data is not transmitted to external servers. - Offline Access:
Hosting Google Fonts locally allows visitors to access your website even when they are offline or experiencing network connectivity issues. This offline access can be valuable for users who may need to view your site without an internet connection. - Better Control and Customization:
With local hosting, you have full control over the font files and can easily make modifications if needed. Additionally, you can combine various font weights and styles into a single font file, reducing the number of requests and optimizing performance further. - Minimized Dependency on External Servers:
By avoiding reliance on external servers, you reduce the risk of potential font service disruptions or changes to Google’s infrastructure that may impact font availability or loading times. - Mitigation of CORS Issues:
Cross-Origin Resource Sharing (CORS) issues can arise when loading resources from external domains, potentially causing complications in certain browsers. Hosting Google Fonts locally helps avoid CORS-related problems. - Future-Proofing:
Loading Google Fonts locally future-proofs your website against potential changes or discontinuation of Google Fonts service. You retain control over the font files, ensuring consistent typography even if Google makes alterations to its font library.
Below is a comparison table between locally loading Google Fonts and not locally loading Google Fonts:
| Parameters | Locally Load Google Fonts | Not Locally Load Google Fonts |
|---|---|---|
| Page Load Speed | Faster | Slower |
| Website Performance | Enhanced | May be compromised |
| Privacy and Security | Increased privacy | Potential data transmission to external servers, may raise privacy concerns |
| GDPR Compliance | Compliant | May pose challenges in complying with data protection regulations |
| Offline Access | Available | Not available |
| Control and Customization | Full control over font files and customization options | Limited customization and control, dependent on external servers |
| Dependency on External Servers | Reduced risk | Higher risk of disruptions or changes affecting font availability |
| CORS Issues | Avoided | Possible CORS-related issues when loading resources from external domains |
| Future-Proofing | Ensured | Vulnerable to potential changes or discontinuation of external font service |
In summary, locally loading Google Fonts offers faster page load speeds, enhanced website performance, increased privacy and security, GDPR compliance, offline access, better control and customization options, minimized dependency on external servers, avoidance of CORS issues, and improved future-proofing. On the other hand, not locally loading Google Fonts may lead to slower loading times, potential privacy concerns, challenges in complying with data protection regulations, limited customization options, dependency on external servers, possible CORS-related issues, and vulnerability to changes in external font services.
Troubleshooting Common Issues:
While adding custom fonts to your WordPress website can significantly enhance its visual appeal and user experience, encountering certain issues during the process is not uncommon. Here, we address some common problems and provide troubleshooting tips to help you overcome them.
Font Not Displaying:
Issue: Your custom font doesn’t display as expected on the website.
Troubleshooting Tips:
- Check File Paths: Verify that the font files’ paths in the “include_font.css” and the font files’ location in the “fonts” folder are correct.
- File Permissions: Ensure that the font files have proper read permissions (often 644) to be accessible by the web server.
- Font Name Matching: Make sure the font family name in the
@font-facerule and CSS code matches the name specified in the “include_font.css” file. - Font Format Compatibility: Confirm that the majority of web browsers supports the chosen font formats (TTF and WOFF).
Slow Page Load Times:
Issue: Integrating custom fonts affects the website’s loading speed.
Troubleshooting Tips:
- Font Subset: Use only the characters you need to reduce font file size by creating a font subset. This is especially useful if you only require specific characters or language glyphs.
- Font File Compression: Compress font files using tools like Gzip to minimize their size.
- Optimize Font Usage: Limit the number of font styles and weights you load to reduce HTTP requests.
Cross-Browser Compatibility:
Issue: The custom font displays differently or not at all across different web browsers.
Troubleshooting Tips:
- Browser Support: Confirm that the chosen font formats (TTF and WOFF) are supported by all target browsers.
- Fallback Fonts: Always provide fallback font options in your CSS code to ensure proper rendering in case the custom font fails to load.
CORS Issues:
Issue: You encounter Cross-Origin Resource Sharing (CORS) issues when loading font resources from external domains.
Troubleshooting Tips:
- Local Hosting: Host Google Fonts locally to avoid CORS-related problems and reduce dependency on external servers.
Mixed Content Errors (for HTTPS sites):
Issue: If your website is on HTTPS but the font files are loaded over HTTP, mixed content errors may occur.
Troubleshooting Tips:
- Use HTTPS URLs: Ensure that you use HTTPS URLs for all resources, including font files, to maintain a secure connection.
Font Licensing and Copyright:
Issue: Legal concerns regarding font licensing and copyright.
Troubleshooting Tips:
- Check Licensing: Make sure to use custom fonts that are licensed for web use and comply with copyright regulations.
- Read Licensing Terms: Review the licensing terms and conditions of the custom fonts to avoid any legal complications.
By addressing these common issues and applying the provided troubleshooting tips, you can ensure a smooth integration of custom fonts into your WordPress website, providing visitors with a visually appealing and seamless user experience.
Conclusion:
Custom fonts play a vital role in elevating the visual appeal and user experience of your WordPress website. By adding them locally, you can improve page load speeds, enhance performance, and ensure GDPR compliance while maintaining user privacy. Local hosting offers more control and customization options, mitigates CORS issues, and future-proofs your site against potential font service changes. If you encounter issues, follow our troubleshooting tips to overcome common obstacles and enjoy the benefits of creating a unique and captivating typography for your website. Embrace custom fonts, and make your website stand out with a distinct and memorable character.
