
API development with Apidog streamlines the process of building, testing, and deploying application programming interfaces. This platform provides developers with the essential tools needed for each development phase, maintaining a focus on efficiency and simplicity. With Apidog, you design, debug, document, and deploy APIs using an interface that supports industry-standard protocols and methods.
As you begin using Apidog, you will find features that facilitate the management of API lifecycles, collaboration with team members, and integration with other tools and systems. This guide introduces Apidog’s environment setup, illustrates how to design APIs with a design-first approach, and explains the use of mock servers for testing. It further details the processes for API debugging, automated testing, and integration with continuous integration and deployment pipelines. Follow this guide to understand and utilize Apidog’s full range of features, enhancing your API development workflow.
Setting Up Your Apidog Environment
Apidog is an all-in-one platform designed for efficient API development. It supports API design, development, debugging, testing, documentation, and mocking, all within a single toolkit. With Apidog, teams can work collaboratively, boosting efficiency and ensuring synchronization across different stages of API development. Whether you’re a back-end developer, a front-end developer, or a QA engineer, Apidog caters to your specific needs, streamlining the API lifecycle management.
- Creating an Apidog Account
- Visit the Apidog website and sign up for a new account.
- Provide necessary details like your email address and create a password.
- Verify your account through the email confirmation sent to your inbox.
- Initiating a New Project
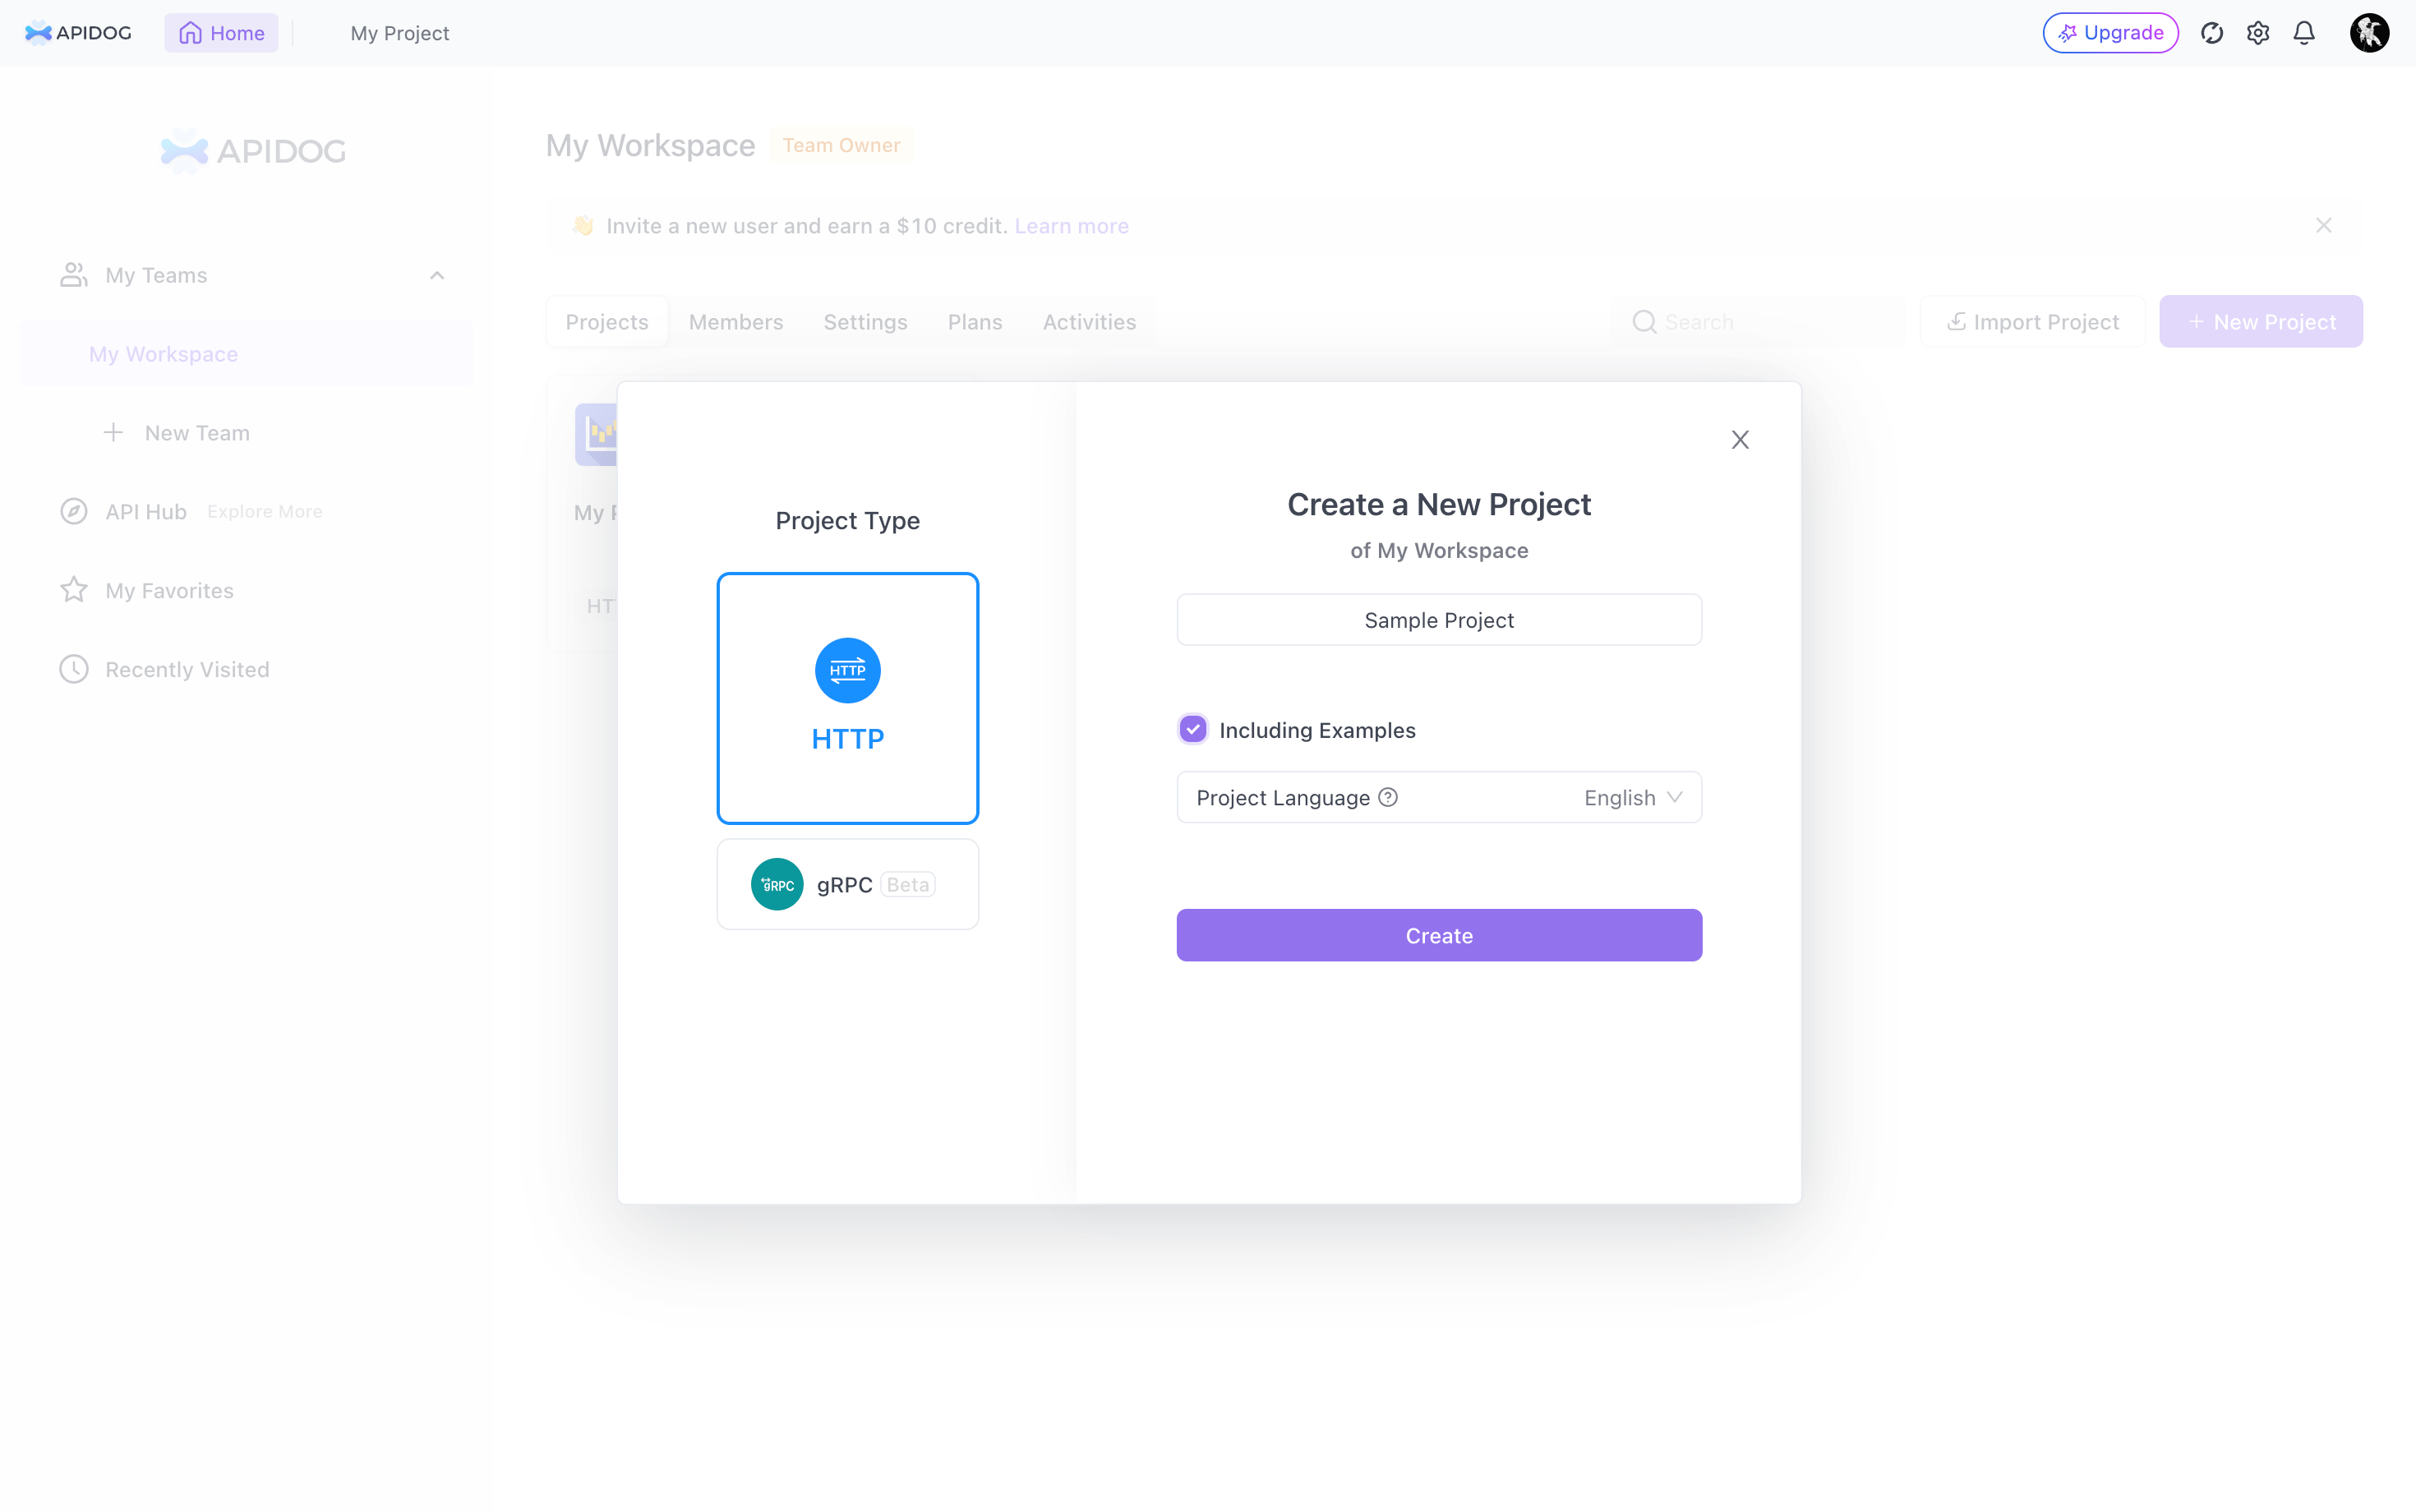
- Log into your Apidog account.
- On the dashboard, select ‘New Project.’
- Enter a name for your project and provide a brief description.
- Choose the type of API you plan to work on, such as RESTful, gRPC, or WebSocket.
- Familiarizing with the Apidog Interface
- Explore the dashboard to understand various sections like ‘API Design,’ ‘Testing,’ ‘Mocking,’ and ‘Documentation.’
- Check out the ‘Settings’ to customize your working environment.
- Visit the ‘Team’ section to add or manage team members for collaborative projects.
- Importing or Designing APIs
- To import an existing API, click on ‘Import’ and choose from options like URL Import or file import (JSON, YAML).
- To design a new API, click on ‘New API.’ Specify your API’s endpoint, method, and other details.
- Define parameters, and request/response structures, and add descriptions for better clarity.
- Setting Up Environments and Variables
- Go to the ‘Environment’ section to create different environments like testing, staging, or production.
- Define environment-specific variables for dynamic data usage across requests.
- Utilizing Mock Servers for Development
- In the ‘Mock’ section, set up a mock server to simulate API responses.
- Customize responses for different scenarios to facilitate front-end development and testing.
- Collaborating with Your Team
- Invite team members to your project and assign roles like designer, developer, or tester.
- Use the real-time collaboration feature to work simultaneously with team members on API designs and tests.
- Beginning with API Development
- Start designing or importing APIs as per your project requirements.
- Use the debugging tools to test APIs and ensure they behave as expected.
By following these steps, you set a solid foundation for your API development journey using Apidog. This environment setup is the first step toward a streamlined and efficient API development process.
Designing APIs with Apidog
API design is a critical phase in the development process, where you outline the structure and behaviour of your APIs. Apidog provides a comprehensive suite of tools for designing APIs, allowing for a streamlined, efficient workflow. Whether you’re importing existing API specifications or creating new ones, Apidog’s intuitive interface simplifies the process.
- Importing API Specifications
- Apidog supports the import of existing APIs. You can import APIs using OpenAPI specifications, either from a URL or by uploading a JSON or YAML file.
- After importing, Apidog allows you to run, test, and mock these APIs immediately, enhancing their debuggability and testability.
- Designing a New API
- To create a new API, start by clicking on ‘New API’ in your project workspace.
- Define your API path (e.g.,
/users/{id}) and name it appropriately (e.g., ‘Get user by id’). - Specify parameters like path, query, or body parameters as needed. Apidog recognizes these elements, allowing you to define them with ease.
- Proceed to define the response structure. You can set response types and associate them with schemas for standardization.
- Structuring API Responses
- In the ‘Responses’ section, choose the response type and status code (e.g., 200 OK).
- Define the response structure by adding nodes to your schema, such as a ‘data’ field.
- Utilize ‘Schemas’ to standardize response structures across your API endpoints.
- You can also auto-generate response examples based on your defined schema, which aids in understanding the expected output.
- Leveraging Code Generation
- Apidog enables the generation of server stubs and client SDKs in various programming languages.
- This feature is particularly useful for backend developers, as it facilitates the implementation of the designed APIs.
- Running and Debugging APIs
- Once you have designed your API, you can run it directly within Apidog.
- Input test values for parameters and send requests to verify the API’s behaviour.
- Apidog provides an environment management feature, allowing you to test APIs under different configurations.
- Debugging with Variable Usage
- Use variables in Apidog to store and reuse values across requests.
- Environment and global variables offer flexibility in managing dynamic data within your API tests.
- Utilizing Pre-Processors
- Apidog allows the use of pre-processors, where you can write custom scripts to manipulate request data before sending it.
- This feature enables complex scenarios like data transformation, header modification, or logging.
By following these steps, you can effectively design and structure your APIs using Apidog. This platform offers a holistic environment for API designers to create, test, and deploy APIs with precision and efficiency. The design-first approach in Apidog ensures that your APIs are well-planned, consistent, and ready for integration into your development workflow.
Debugging and Testing APIs with Apidog
Debugging and testing are critical phases in API development, ensuring the APIs function as intended and meet quality standards. Apidog provides a rich set of tools for debugging and testing APIs, making it a go-to solution for developers and QA engineers alike.
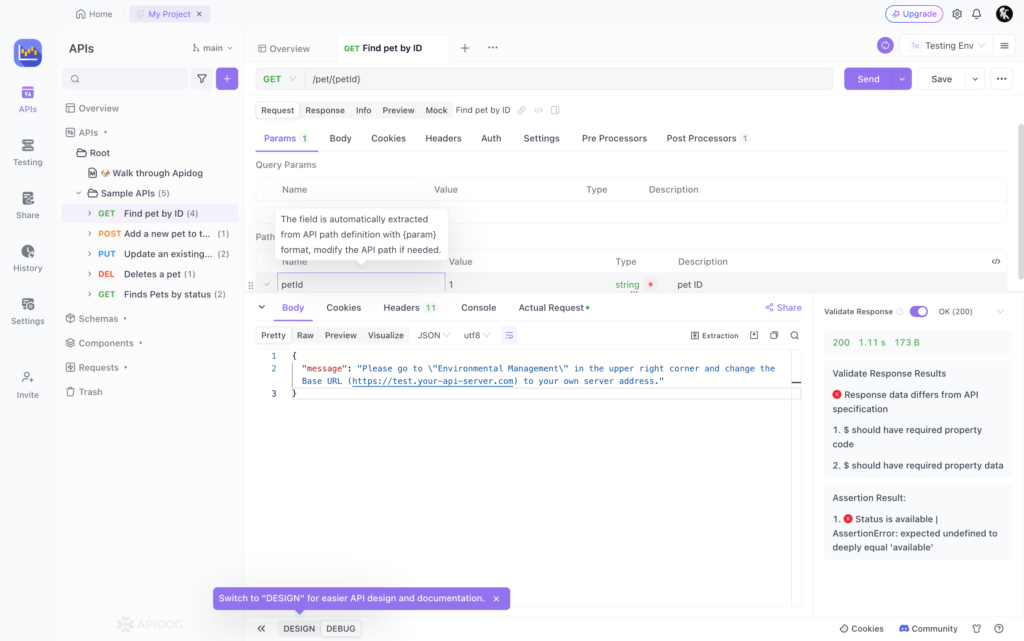
- Debugging APIs in Apidog
- After designing or importing APIs, you can immediately begin debugging them in Apidog.
- To debug an API, select it and use the ‘Run’ feature. Input test values for parameters and send requests to assess the API’s behaviour.
- Apidog allows you to manage environments and switch between them (like testing, staging, or production) to test APIs under different configurations.
- The platform automatically checks if the API’s actual response aligns with its definition, highlighting discrepancies like incorrect data types or missing fields.
- Using Variables for Dynamic Data Management
- Apidog supports the use of variables to store values that can be reused across requests.
- Define environment-specific variables and global variables in the ‘Manage Environments’ section.
- Use these variables in your API requests by referencing them with double curly braces notation, like
{{variableName}}.
- Pre-Processors for Request Manipulation
- Pre-processors in Apidog allow you to execute custom scripts before sending a request.
- These can be used for various operations like setting or modifying variables, performing data validation, adding or modifying headers, and more.
- Pre-processor scripts are written in JavaScript and execute each time a request is sent, providing flexibility in request manipulation.
- Automated API Testing
- Apidog’s automated testing module enables QA engineers to generate test scenarios based on API definitions or API cases.
- The platform supports data-driven testing, allowing you to easily generate dynamic test data.
- Visual assertion features in Apidog simplify the process of writing test cases, and variable extraction makes it easy to manage and use data within these tests.
- Assertions and Test Scenarios
- In Apidog, you can add test assertions visually or use custom scripts for more complex validation.
- Test scenarios can include multiple API cases, which can be executed with a single click to generate comprehensive test reports.
- Apidog’s assertion mechanism compares expected outcomes with actual API responses, ensuring the APIs perform as designed.
- Data-Driven Testing and Dynamic Values
- Data-driven testing in Apidog allows you to set variable values using data tables or the “Dynamic Value” feature for automatic value generation.
- Dynamic values can be used to test APIs with varying parameter values, enhancing the robustness of your tests.
- Integrating with CI/CD Pipelines
- Apidog supports integration with CI/CD pipelines, allowing you to include API tests in your automated deployment processes.
- Using the Apidog CLI, you can run tests via the command line and incorporate these tests into tools like Jenkins.
By utilizing Apidog’s debugging and testing features, developers and QA engineers can significantly improve the quality and reliability of their APIs. This comprehensive approach to API development ensures that APIs are not only well-designed but also thoroughly tested and debug-proof, ready for production deployment.
Collaborating on API Development with Apidog
Collaboration is a cornerstone of modern software development, especially when it comes to APIs. Apidog stands out as a platform that not only accommodates but enhances collaboration across various roles in a development team. It provides an environment where back-end developers, front-end developers, and QA engineers can work in unison, ensuring a smooth workflow.
- Collaborative Environment for All Team Roles
- Apidog serves as a shared workspace where team members can design, develop, test, and document APIs together.
- Each team member, depending on their role (API designer, back-end developer, front-end developer, QA engineer), can use Apidog’s features to address their specific needs while maintaining alignment with the team’s objectives.
- Team Management and Role Assignment
- Project administrators in Apidog can add team members to a project and assign them specific roles and permissions.
- This role-based access control ensures that team members have the necessary permissions to fulfil their tasks without interfering with others’ work.
- Real-Time Collaboration and Version Control
- Apidog supports real-time collaboration, allowing multiple team members to work on the same API simultaneously.
- The platform includes version control mechanisms to track changes and manage different versions of API designs and documentation. This feature is crucial for maintaining consistency and managing updates effectively.
- Integrating Workflows Across Different Roles
- API designers can specify APIs using the intuitive Apidog interface or import them from OpenAPI specifications. Once specified, these APIs are immediately available for other team members to work on.
- Back-end developers can leverage Apidog to develop and debug APIs. They can generate server stubs and client SDKs, run the APIs, and debug them to ensure correct output.
- Front-end developers benefit from Apidog’s API mocking feature, which allows them to develop against simulated API responses.
- QA engineers can directly generate test scenarios from API definitions or API cases within Apidog. They can use data-driven testing, visual assertions, and variable extractions to simplify test case writing.
- Seamless Joint Debugging and API Documentation
- Front-end and back-end teams can jointly debug APIs, adhering to the specifications defined in Apidog, which facilitates a smoother transition from mock data to real data.
- Once the APIs are developed and tested, Apidog can generate comprehensive documentation, making it easy for the team to publish the API internally or externally.
Apidog’s collaborative features not only streamline the API development process but also foster a culture of teamwork and efficiency. By utilizing these features, teams can work in harmony, ensuring that each member contributes effectively to the API lifecycle.
Using Mock Servers in Apidog
Mock servers play a crucial role in API development, particularly in the early stages when the back end is not yet fully implemented. Apidog provides an integrated mock server feature, enabling front-end developers and testers to simulate API responses and work independently of back-end progress.
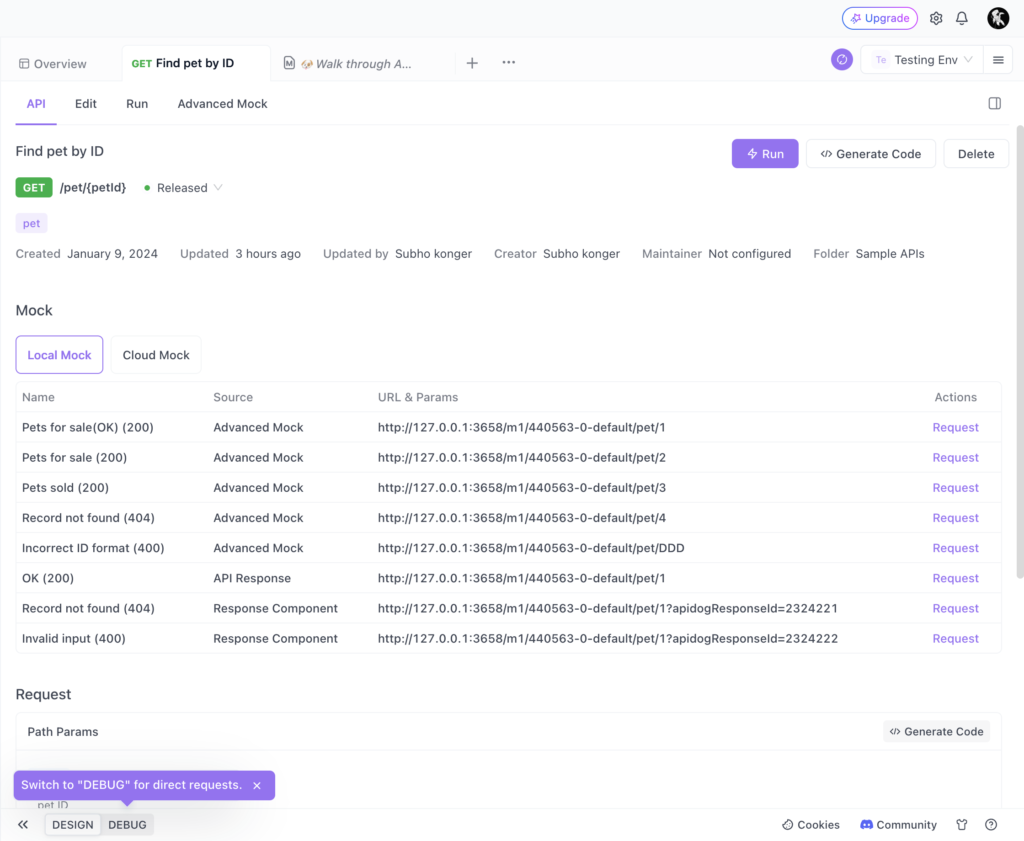
- Setting Up a Mock Server
- In Apidog, setting up a mock server is straightforward. Once you have your API design ready, navigate to the ‘Mock’ section of your project.
- Here, you can define the behaviour of the mock server by specifying the responses for various API requests.
- For each API endpoint, set up expected request parameters and define the corresponding mock responses, including status codes, response headers, and body.
- Customizing Mock Responses
- Apidog allows for detailed customization of mock responses. You can create different scenarios for each API request, depending on various input conditions.
- This feature is particularly useful for testing how the front-end application handles different types of responses, including edge cases and error conditions.
- Integrating Mock Servers with Front-End Development
- Front-end developers can use these mock servers to proceed with their development, assuming the back-end API responses.
- This parallel development approach significantly reduces the time-to-market, as front-end and back-end development can occur simultaneously.
- Dynamic Behavior and Conditional Responses
- Apidog’s mock servers can simulate dynamic behaviour based on request parameters. This capability allows for a more realistic testing environment.
- You can set conditions within the mock server to return different responses based on the input, emulating the logic that would be present in the actual API.
- Sharing Mock Servers with Team Members
- Mock servers in Apidog can be shared across the team, ensuring everyone has access to the latest simulated API environment.
- This shared access facilitates consistent testing and development practices among all team members, irrespective of their role in the API development lifecycle.
By leveraging Apidog’s mock server capabilities, teams can ensure that their front-end development and testing are not hindered by back-end availability. This feature not only enhances efficiency but also ensures that the final product is robust and well-tested against a variety of scenarios.
CI/CD Integration with Apidog
CI/CD, standing for Continuous Integration and Continuous Deployment, is a cornerstone of modern software development practices, aimed at reducing the gap between code development and its deployment in a production environment. Apidog provides seamless integration of these practices specifically tailored for API development and management.

- Understanding the Role of Apidog in CI/CD: Apidog’s integration into existing CI/CD pipelines ensures that API testing and documentation are part of the continuous deployment process. This integration is vital for maintaining the quality and reliability of APIs throughout the development lifecycle.
- Setting Up Apidog CLI for Continuous Integration
- The Apidog CLI (Command Line Interface) is a critical tool for integrating Apidog into CI/CD workflows, especially for those who prefer terminal-based operations.
- To set up the Apidog CLI, ensure you have Node.js installed (version 12 or higher). You can verify or install Node.js from the official website.
- Install the Apidog CLI using npm (Node Package Manager) with the command
npm install -g apidog-cli. - Verify the installation by checking the version of the Apidog CLI using
apidog --version.
- Incorporating Apidog into Your CI/CD Pipeline
- Utilize Apidog CLI to automate API testing, documentation generation, and other API management tasks using scripts and commands, which is essential in CI/CD pipelines.
- Integrate Apidog’s testing capabilities into your CI process, ensuring every change to an API (new endpoints or modifications) is automatically tested and validated.
- Configuring Continuous Integration in Apidog
- Access the “Testing” section in the Apidog dashboard to manage test cases, suites, and configurations for CI.
- Select the test suites and individual test cases you wish to include in the CI process.
- Define the runtime environment, iteration count, and relevant parameters for testing.
- Save your configurations to integrate these tests into your CI workflow.
- Creating a New CI Setup using the “CI/CD” Tab
- Navigate to the “CI/CD” tab within the Apidog interface.
- Start a new CI setup by clicking on the ”+New” button.
- Provide necessary configurations for the environment, test data, and other settings.
- Review and save the new CI setup, ensuring it aligns with your project requirements.
- Running Continuous Integration Tests
- Access the CI configuration from the “CI/CD” tab in Apidog.
- Initiate the CI tests in real time using the “Run” button.
- Monitor the progress and outcomes of the tests through Apidog’s interface.
Best Practices for CI/CD with Apidog
- Regularly update and validate your CI configurations to adapt to changes in the API specifications.
- Leverage Apidog’s collaborative features to align the development, testing, and deployment processes among team members.
- Utilize the versatility of Apidog CLI to enhance and streamline your CI/CD workflow, ensuring a consistent and reliable API development process.
Integrating Apidog into your CI/CD pipeline represents a significant step toward more efficient, reliable, and collaborative API development and management. This integration ensures that APIs are not only developed with high standards but also consistently tested and ready for deployment, reflecting the best practices in modern software development.
Best Practices for Using Apidog:
Apidog offers a versatile and comprehensive platform for API development and management, catering to various roles within a team. Here are the best practices for different roles:
Front-end Developer
- Utilize Mock Servers: Leverage Apidog’s mock servers to develop front-end applications even when the back-end is not ready.
- Collaborate with Back-end Developers: Regularly sync with back-end developers to ensure the front-end aligns with the API’s actual responses.
- Test Front-End Against Mock Responses: Test the front-end application against a variety of mock responses, including edge cases and error conditions.
Backend Developer
- API Design and Development: Use Apidog’s intuitive interface for designing and developing APIs.
- Debugging and Testing: Regularly test and debug APIs within Apidog to ensure they meet specifications.
- Collaboration with Front-End: Work closely with front-end developers to provide necessary API endpoints and assist with integration.
Quality Engineer
- Automated Testing: Create and manage automated test cases in Apidog for comprehensive API testing.
- Data-Driven Testing: Utilize Apidog’s data-driven testing capabilities for thorough and varied test scenarios.
- Regression Testing: Conduct regression tests upon each change in the API to ensure existing functionalities are not affected.
Product/Project Manager
- Project Oversight: Monitor the overall progress of API development and testing in Apidog.
- Team Coordination: Ensure effective communication and coordination among different roles within the team.
- Documentation Review: Regularly review API documentation to ensure it is up-to-date and accurately reflects the API functionalities.
Tech Lead
- Technical Guidance: Provide technical guidance and best practices for API design and development.
- Code Review and Standards: Enforce coding and API design standards across the team.
- Integration with CI/CD: Oversee the integration of Apidog within the CI/CD pipeline for efficient deployment processes.
Incorporating these best practices tailored to specific roles ensures a cohesive and efficient use of Apidog, leading to streamlined API development and management processes.
Conclusion
In conclusion, Apidog emerges as a powerful, integrated platform that significantly enhances the API development lifecycle. This blog has walked you through its comprehensive features and functionalities, demonstrating how Apidog caters to the diverse needs of various roles within a development team. From designing and debugging APIs to facilitating collaboration and integration into CI/CD pipelines, Apidog proves to be an indispensable tool for front-end developers, back-end developers, full-stack developers, quality engineers, product managers, tech leads, and others.
Embracing the best practices outlined for each role enables teams to leverage Apidog’s full potential, ensuring efficient workflow, high-quality API development, and effective collaboration. Whether you are working on API design, testing, or looking to streamline your development process, Apidog provides the necessary tools and features to achieve these goals with precision and ease.
As you continue to explore and utilize Apidog in your projects, remember the key insights and guidelines shared in this blog. They will serve as a roadmap to enhance your API development process, ultimately leading to more robust, reliable, and scalable API solutions.
FAQs:
Is Apidog free?
Apidog offers a free version as part of its Public Beta. For more advanced features and plans, users can refer to the pricing page on the Apidog website.
How to Handle the Auth State in Apidog?
Handling the authentication state in Apidog involves setting up the necessary authentication parameters and incorporating them into API requests. Detailed documentation on managing authentication states is available on the Apidog website.
Can Apidog be integrated into existing CI/CD pipelines?
Yes, Apidog can be integrated into existing Continuous Integration/Continuous Deployment (CI/CD) pipelines. It offers features like automated testing and documentation generation that can be included in CI/CD workflows.
What are the capabilities of Apidog’s mock server feature?
Apidog’s mock server feature allows developers to simulate API responses, facilitating front-end development and testing even when the actual API is not fully implemented. It supports the customization of response scenarios, including status codes and response bodies.
Does Apidog support different API protocols?
Yes, Apidog supports various API protocols including HTTP(s), gRPC, and WebSocket, making it a versatile choice for different types of API projects.


