Welcome to our comprehensive guide on navigating the Wordfence alert for an increased attack rate. If you’re a website owner or administrator, receiving a notification from Wordfence about heightened security threats can be alarming. Wordfence, a leading security plugin for WordPress sites, plays a crucial role in safeguarding websites against various cyber threats. This guide will delve into what these alerts mean, why Wordfence sends them, and, most importantly, the steps you should take upon receiving such a notification.
We aim to provide clear, technical, yet easily understandable insights into effectively handling these alerts. By the end of this guide, you’ll be equipped with the knowledge and strategies necessary to respond proactively to Wordfence’s increased attack rate alerts, ensuring your website’s security remains robust. Let’s get started on understanding and tackling these critical alerts with confidence.
In this blog, I’ve shared my personal experiences and the lessons learned while securing my WordPress website. From responding to security alerts to strengthening overall site security, these insights come from direct, real-world encounters. It’s important to remember: in the event of a cyber attack, consulting a professional is your best strategy. This guide aims to equip you with the knowledge and tools necessary for effectively securing your WordPress site.
Author
Understanding the Wordfence alert for an increased attack rate:
When Wordfence detects a security issue, it sends an alert like the one above. This message serves as a first line of defence, informing you of a potential problem.
But what does this alert mean, and how should you interpret the information provided?
The Components of the Alert
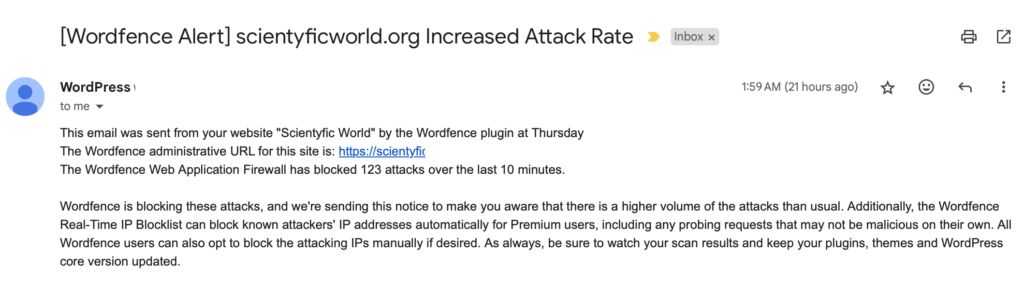
When you receive an alert from Wordfence, it’s essential to understand each part to respond effectively. Here’s a detailed breakdown using a hypothetical example:
Example Alert Breakdown:
- Subject Line: The subject of the email immediately notifies you of the nature of the alert:
[Wordfence Alert] yourwebsite.com Increased Attack Rate. This allows you to identify the alert’s importance and act accordingly quickly. - Source Information: The alert clearly states that it’s sent from your website, “Your Website Name,” via the Wordfence plugin. This confirms that the alert is directly related to your specific website’s security and is not a general update from Wordfence.
- Timestamp: “Thursday 11th of January 2024 at 01:59:36 AM.” The precise timing of the alert is crucial. It allows you to correlate this incident with your website’s access logs to identify any patterns or additional suspicious activities that may not have been caught by Wordfence.
- Attack Details:
- Number of Attacks: “The Wordfence Web Application Firewall has blocked 123 attacks over the last 10 minutes.” This indicates a high volume of attacks in a short period, which is unusual and suggests a coordinated attack.
- Administrative URL: “The Wordfence administrative URL for this site is: https://yourwebsite.com/wp-admin.” This link is your direct access to the Wordfence dashboard where you can investigate the attacks and modify security settings if needed.
By dissecting this example alert, we can understand that Wordfence has detected an unusually high number of attempted attacks on your website in a brief timeframe. The alert provides you with actionable information: it notifies you of the incident, gives you a measure of its scale, and directs you to where you can respond to these incidents.
In this example, the alert’s details would prompt the site administrator to log into their Wordfence dashboard via the provided link, review the nature of the blocked attacks, check for patterns, and assess whether additional security measures are needed. It’s an invitation to take a closer look at what’s happening and ensure your site remains secure.
Why Wordfence Sends Alerts?
Wordfence’s primary function is to safeguard your website against attacks. The alert system is a proactive measure to inform you of unusual activity, such as an increased attack rate, which could indicate a targeted attempt to compromise your website.
Decoding the Alert
- Blocked Attacks: The number of attacks Wordfence has blocked in a specific timeframe is a critical piece of information. It indicates the scale of the attempted breach.
- Notice: The email reports the incident and reminds you of the tools at your disposal, such as the Real-Time IP Blocklist, which is available to premium users.
Receiving this alert means Wordfence is doing its job – detecting and preventing unauthorized access. However, it also serves as a reminder to remain vigilant. The alert prompts you to check your website’s security posture, update security measures, and consider enhancing your defence mechanisms, especially if you are using the free version of the plugin.
By understanding the various components of this alert and the reasons behind its issuance, you can better prepare to take the necessary actions to protect your website.
Analyzing the Alert
After understanding the components of a Wordfence alert, the next step is to analyze the content to determine the severity and nature of the attacks. This involves examining the details provided in the alert and interpreting what they signify for your website’s security.
Reviewing the Attack Log
The alert typically includes a sample of recent attacks, which are critical data points for your analysis:
- IP Address: Each entry in the log shows an IP address, which represents the source of the attack. For instance, you might see multiple attempts from a single IP address, suggesting that a particular attacker is targeting your site.
- Attack Timestamps: The timestamps show when the attacks occurred. A cluster of attempts in a short period can indicate a brute force attack, where an attacker is trying to gain access by overwhelming your site with rapid attempts.
- Reason for Blocking: Wordfence will also provide the reason for each block, such as “Known malicious User-Agents.” This tells you that Wordfence recognized the attacking tool or method as a known threat and acted to block it.
Interpreting the Threat Level:

The chart provided visualizes the pattern of attacks over 12 hours. This graphical representation is a potent tool for interpreting the threat level faced by a website. Here’s an analysis based on the provided chart:
- Peaks of Activity: The chart shows two significant peaks, one around the 3rd hour and another around the 11th hour. Such spikes in activity suggest periods of intense attack attempts. In this hypothetical scenario, it would be prudent to investigate what occurred during these times. Were there any special events or vulnerabilities that could have triggered such interest from attackers?
- Troughs and Quiet Periods: Conversely, the periods where the graph dips to its lowest points, notably around the 7th hour, indicate times when attack attempts were at their minimum. These troughs could correspond to off-peak hours for the website when traffic is typically lower, which may be less attractive for attackers.
- Consistency in Attacks: The regularity of the attacks, as depicted by the continuous line connecting the data points, shows that the website faces a consistent threat level throughout the period. This implies a sustained attempt to breach the site’s defences rather than random, isolated incidents.
Analyzing the Data
With this chart, a website administrator can deduce that:
- The website is under a sustained attack with periods of high intensity. Such a pattern could indicate a targeted campaign rather than random attacks.
- There may be specific hours when the website is more vulnerable or attractive to attackers. These times could correlate with lower traffic, making it easier for attackers to attempt to breach the site without getting lost in regular traffic.
By analyzing the data in this way, website administrators can make informed decisions about bolstering security measures during identified peak attack times or implementing more robust continuous monitoring to prevent future attacks.
Assessing Attack Types
The provided graph not only illustrates the frequency of attacks but also implies the potential types of attacks a website may be experiencing:
- Brute Force Attempts: The peaks in the chart could correspond to brute force attempts, where an attacker or a group of attackers try to guess passwords or find a valid user session. If these peaks match with numerous login attempts from the same IP addresses, it indicates a systematic effort to penetrate the website’s authentication mechanisms.
- Exploit Probes: The consistent line of attacks, despite not always peaking, suggests ongoing exploit probes. Attackers could be using different methods or vectors to find a vulnerability in the website’s software. If the line reveals varied attack vectors coming from the same set of IP addresses, this could be a sign that attackers are methodically testing different exploits to find an entry point.
Planning a Response
The analysis of attack patterns informs the formulation of a response strategy:
- Immediate Action: Identify IP addresses associated with the highest peaks and continuous attack attempts. These IPs may warrant immediate blocking to prevent further unauthorized attempts. Even with the free version of Wordfence, taking such swift actions is crucial.
- Long-term Solutions: Given the sustained nature of the attacks, it may be necessary to consider long-term security solutions. This could involve:
- Upgrading to Wordfence Premium for access to real-time threat defence feeds.
- Implementing a more sophisticated firewall that can adapt to evolving threats.
- Configuring Wordfence to enforce stricter rules during peak attack hours as identified in the chart.
By taking these steps, you can address the immediate threat and lay the groundwork for a more secure website infrastructure, mitigating the risk of future attacks and ensuring the integrity of your online presence.
Immediate Actions to Take After a Wordfence Alert
When you receive a Wordfence alert indicating an increased attack rate, it’s important to act swiftly to ensure your website remains secure. Here’s a detailed action plan based on extensive research:
- Verify the Alert: Ensure the alert is genuine and not a phishing attempt. It should come from the official email you’ve set up with Wordfence.
- Check Wordfence Dashboard: Log in to your WordPress admin and go to the Wordfence dashboard to review the details of the alert. Look for the number of attacks, their types, and any patterns.
- Update Security Settings: If your site is under a brute force attack, ensure that Wordfence’s “Brute Force Protection” features are enabled and properly configured to limit login attempts and enforce strong password policies.
- Optimize the Firewall: If you haven’t done so, optimize Wordfence’s firewall to ensure it runs with “Extended Protection”. This sets up the firewall to run before WordPress starts loading, which helps block malicious traffic more efficiently.
- Use Rate Limiting: Adjust the “Rate Limiting” rules to make it more difficult for attackers to perform unauthorized scanning and scraping of your site. You can customize these settings based on the nature of the traffic your site is receiving.
- Real-Time IP Blocklist: For premium users, ensure that the Real-Time IP Blocklist feature is active. This automatically blocks IPs that are currently involved in malicious activities across WordPress sites.
- Manual IP Blocking: If specific IPs are identified as sources of the attack and you’re using the free version of Wordfence, you can manually block these IPs to prevent further attacks.
- Review Allowlisted IPs and Services: Ensure that you haven’t incorrectly allowlisted suspicious IPs that should be blocked. Also, review any services that you’ve allowlisted to avoid unintentional blocking of legitimate services.
- Set Up Immediate Blocks for Malicious URLs: If you’ve identified specific URLs that are being targeted, you can set up Wordfence to immediately block IPs that access these URLs.
- Seek Professional Help: If the attacks are complex, and persistent, or if you suspect your site has been compromised, consider contacting Wordfence’s premium support or a cybersecurity professional to assist with incident response.
- Stay Informed: Keep up with the latest security news from Wordfence via their blog, Twitter updates, or by listening to the “Think Like a Hacker” podcast to stay informed about recent threats and best practices.
By following these steps, you can take control of the situation and reinforce your site’s security posture. It’s always better to be proactive rather than reactive when it comes to website security.
Enhancing Website Security:
For WordPress site owners, this means taking proactive measures to protect against a myriad of threats that can compromise your online presence. The security of your website not only protects your content but also safeguards the data of your users. This section delves into the strategies and actionable steps you can take to fortify your WordPress security. From choosing the right hosting environment to hardening your application settings, each measure contributes to a robust defence against potential breaches. Let’s explore these strategies in detail to ensure your WordPress site stands as a bastion against cyber threats.
- Choose Secure Hosting:
- Your choice of web hosting can significantly impact your site’s security. Look for hosts that offer built-in security features like firewalls, malware scanning, and intrusion detection systems.
- Example: A hosting provider that offers 24/7 monitoring and actively scans for vulnerabilities can preemptively address threats before they impact your site.
- Update Regularly:
- Regularly updating your WordPress core, themes, and plugins is crucial. Updates often include security patches for vulnerabilities that have been discovered since the last version.
- Example: Enable auto-updates for WordPress and routinely check for updates on your dashboard.
- Strong Passwords and User Management:
- Use complex passwords and manage user permissions carefully. Limit administrative access to only those who need it.
- Example: Change the default ‘admin’ username to something unique and use a password manager to generate and store a strong password.
- Implement a Web Application Firewall (WAF):
- A WAF can block malicious traffic before it reaches your site, offering an additional layer of protection.
- Example: Services like Cloudflare can be configured to protect your site with their cloud-based WAF solutions.
- Install SSL Certificate:
- An SSL certificate encrypts data between the user’s browser and your server, making it essential for protecting sensitive information.
- Example: Install a free Let’s Encrypt SSL certificate through your hosting provider and ensure your site loads over HTTPS.
- Remove Unused Plugins and Themes:
- Deactivate and delete any plugins and themes you’re not using to minimize potential entry points for hackers.
- Example: Regularly audit your plugins and themes through your WordPress dashboard and remove those that are inactive.
- Security Plugins:
- Use security plugins like Wordfence or iThemes Security to scan for malware, enforce strong passwords, and monitor your site for unusual activity.
- Example: Install Wordfence and configure its settings to schedule regular scans and enable its firewall.
- Two-Factor Authentication:
- Add two-factor authentication (2FA) to your login process for an extra layer of security.
- Example: Use a plugin like Google Authenticator to generate time-based one-time passwords (TOTPs) that users must enter in addition to their regular password.
- Database Security:
- Secure your database by changing the default wp_ table prefix to something unique and regularly backing up your database.
- Example: In your wp-config.php file, change the
$table_prefixform ‘wp_’ to a more complex prefix like ‘wp79sd_’.Always make backups before making such changes.
File Permissions:
File permissions are a fundamental aspect of website security, defining who can read, write, and execute files on your server. Setting these permissions correctly can prevent unauthorized access and changes to your site’s files. Here’s how to manage file permissions effectively for different types of files in WordPress:
- wp-config.php: This file contains sensitive information and should be strictly protected. Ideally, permissions should be set to 440 or 400 to prevent other users on the server from reading it. This means only your user (and root) can read this file, and no one can write to it.
Command example for setting wp-config.php permissions:chmod 400 wp-config.php - .htaccess: This file controls the server’s directory settings, and it’s crucial for URL rewriting and preventing directory browsing. Permissions should be set to 644 to allow reading by all users but write access only for your user account.
Command example for setting .htaccess permissions:chmod 644 .htaccess - wp-content Directory: This directory contains your themes, plugins, and uploads, so it’s a popular target for attacks. Permissions should be set to 755, which allows the web server to read and execute files but only allows write access for your user account.
Command example for setting wp-content directory permissions:chmod 755 wp-content - WordPress Files: Most of the WordPress files should have a permission setting of 644, which allows read and write permissions for the owner, and only read permissions for the group and public.
Command example for setting general WordPress file permissions:find /path/to/your/wordpress/install/ -type f -exec chmod 644 {} \; - WordPress Directories: Directories within your WordPress install should be set to 755. This means the directory is readable and executable by all users but only writable by the owner.
Command example for setting WordPress directory permissions:find /path/to/your/wordpress/install/ -type d -exec chmod 755 {} \;
Remember to replace/path/to/your/wordpress/install/with the actual path to your WordPress installation. - Uploads Directory: The uploads directory should also be set to 755, allowing images and other files to be added (write) by your user account while being readable by all users.
Command example for setting uploads directory permissions:chmod 755 wp-content/uploads
When adjusting file permissions, it is crucial to:
- Always back up your site before making changes in case you need to restore previous settings.
- Use secure methods like SFTP or SSH to connect to your server when changing file permissions.
- Never set a file permission to 777, which allows read, write, and execute permissions to everyone and significantly increases security risks.
File permissions can be a complex topic, especially for those not familiar with command-line operations. While the commands provided here are a starting point, if you’re unsure about applying these changes, consult with your hosting provider or a web security professional to ensure they’re done correctly.
By implementing these strategies, you can significantly enhance the security of your WordPress website. Remember, security is an ongoing process and should be part of your regular site maintenance routine. Each layer of security you add acts as a deterrent to potential attackers and safeguards your website’s integrity.
Long-term Security Strategies
When establishing long-term security strategies for a WordPress website, these five points are pivotal:
- Regular Updates: Ensure that WordPress core, plugins, and themes are always up to date. Each update not only brings new features but also fixes for security vulnerabilities that have been discovered. Set up automatic updates where possible and conduct regular checks for any manual updates that might be necessary.
- Strong Access Controls: Implement and maintain strong password policies and use two-factor authentication. Limit user permissions according to roles, only providing the necessary access required for each user. Regularly review user accounts and remove any that are no longer needed or pose a risk.
- Continuous Security Audits: Periodically perform thorough security checks which include reviewing user activity, ensuring that file permissions are set correctly, and scanning for malware. Tools like WPScan can be utilized for such tasks, and some services can perform these audits regularly.
- Robust Backup and Recovery Plan: Keep regular backups of your WordPress site and ensure you have a reliable recovery plan in place. The backups should be scheduled according to the frequency of updates to your site and stored in a secure, off-site location. It is crucial to know how to restore your site from these backups in case of an emergency.
- Web Application Firewall (WAF) and DDoS Protection: Use a WAF to filter and monitor incoming traffic to your website, blocking potential threats before they reach your site. Also, ensure you have DDoS protection in place to safeguard against attacks intended to overwhelm your site with traffic, which can cause downtime.
These strategies form a foundational framework for maintaining the ongoing security and integrity of a WordPress website. Implementing them helps to create a proactive security posture capable of responding to evolving cyber threats.
When to Seek Professional Help?
There are specific scenarios in managing a WordPress website where seeking professional help is advisable to ensure optimal security and functionality:
- Complex Security Breaches: If your site experiences a sophisticated attack or persistent security breaches, professional cybersecurity experts can conduct thorough investigations, identify vulnerabilities, and implement advanced security measures.
- After a Major Update or Migration: Significant updates or migrating to a new hosting environment can introduce complexities best handled by professionals, ensuring smooth transitions without compromising security.
- Custom Development Needs: For custom plugin or theme development, professional developers ensure that the code is secure, efficient, and compliant with WordPress standards.
- Regular Security Audits: While basic audits can be done in-house, periodic comprehensive audits by professionals can provide deeper insights into your website’s security posture.
- Implementing Complex Features: Adding complex features or integrations may require expert knowledge to maintain security integrity.
In each of these cases, the expertise of a professional can not only resolve immediate issues but also provide long-term benefits in terms of the security, performance, and scalability of your WordPress site.
Conclusion
Maintaining the security of a WordPress site is an ongoing, dynamic process that demands diligence and an understanding of best practices. Implementing the strategies outlined in this guide – from basic steps like regular updates and strong passwords to more complex measures like security audits and using a Web Application Firewall – is essential in safeguarding your website. However, it’s equally important to recognize situations that call for professional assistance, such as handling sophisticated security breaches or implementing complex site features. By staying informed, proactive, and ready to seek expert help when necessary, you can ensure that your WordPress site remains secure, functional, and resilient against the ever-evolving landscape of cyber threats. Remember, the security of your website not only protects your digital presence but also the trust and privacy of your users.