
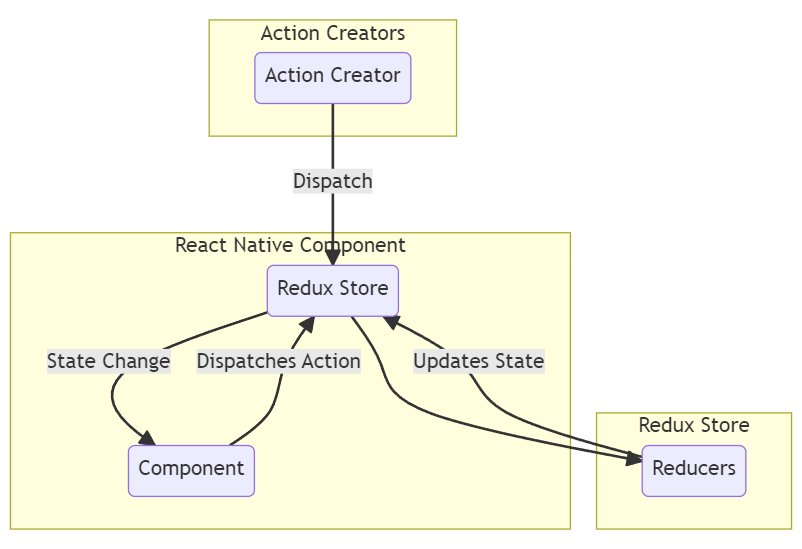
React Native, a popular framework for building cross-platform mobile applications has gained widespread acclaim for its ability to deliver a native-like experience using a single codebase. However, as your React Native applications grow in complexity, managing state and data flow can become a daunting challenge. This is where Redux comes into play. Redux is a state management library that provides a predictable and centralized way to manage the state of your application. It complements React Native by solving the intricate problem of state management, making your codebase more maintainable and efficient.
In React Native development, your app’s state represents the data that changes over time—user input, server responses, and more. Without proper state management, your code can quickly become tangled and difficult to maintain. Bugs may emerge, and it can be challenging to understand how data flows through your app.
Redux offers several advantages when integrated with React Native:
- Predictable State Changes: Redux enforces a unidirectional data flow, making it easier to understand how state changes occur in your app. This predictability simplifies debugging and enhances code maintainability.
- Centralized State: With Redux, all your application’s state is stored in a single store. This centralization provides a unified source of truth, making it easier to synchronize and manage data across different components.
- Improved Scalability: As your React Native app grows, Redux scales gracefully. It enables you to manage a complex application state without introducing unnecessary complexity into your codebase.
- Enhanced Debugging: Redux comes with powerful development tools like Redux DevTools, which provide insights into your app’s state changes, actions, and performance, simplifying the debugging process.
In this comprehensive guide, we will walk you through the process of integrating Redux into your React Native project. We will cover everything from project setup to creating reducers and actions, integrating Redux with React Native components, handling asynchronous actions, debugging, and best practices. Let’s get started!
Setting Up Your React Native Project
In order to incorporate Redux into your React Native application, it’s essential to start with a well-structured project. This section will guide you through the initial setup, including the prerequisites, creating a new React Native project, and understanding the project structure.
Prerequisites for Starting a Redux Project with React Native
Before diving into Redux integration, ensure that you have the following prerequisites in place:
- Node.js: Redux and React Native both rely on Node.js for their development environments. Ensure you have Node.js installed by visiting the official Node.js website and following the installation instructions.
- npm or Yarn: Node.js comes bundled with npm (Node Package Manager). Alternatively, you can use Yarn, a popular alternative package manager. Both npm and Yarn are used for installing and managing project dependencies.
- React Native CLI: To create and manage React Native projects, you need the React Native Command Line Interface (CLI). You can install it globally on your system using npm or Yarn with the following command:
npm install -g react-native-cli
#or
yarn global add react-native-cliWith these prerequisites in place, you’re ready to kickstart your Redux-powered React Native project.
Creating a New React Native Project
Now that you have the necessary tools, let’s create a new React Native project. Follow these steps:
- Initialize a New Project: Open your terminal and run the following command to create a new React Native project:
npx react-native init YourProjectName
ReplaceYourProjectNamewith your desired project name.
- Navigate to the Project Directory: Change your working directory to the newly created project folder:
cd YourProjectName - Start the Development Server: Launch the React Native development server by running:
npm start
or
yarn start
This will start the Metro bundler, which bundles your JavaScript code and serves it to your application.
- Run the App: In a separate terminal window, run your React Native app on a simulator or device:
For iOS:npx react-native run-ios
For Android:npx react-native run-android
Your React Native application should now be running on your chosen platform.
Understanding the Project Structure
Before we delve into Redux, it’s crucial to understand the basic structure of your React Native project:
node_modules/: This directory contains all the project dependencies installed via npm or Yarn.android/andios/: These directories hold the native Android and iOS project files. You typically won’t need to modify these directly.App.jsorindex.js: This is the entry point of your React Native application, where you define the root component and structure of your app.package.json: This file lists the project dependencies, scripts, and metadata. You can manage dependencies and project settings here.babel.config.js: Babel is used for JavaScript transpilation. This file contains configuration settings for Babel.metro.config.js: The Metro configuration file allows you to customize the behavior of the development server.
With your React Native project set up and ready, we can proceed to integrate Redux into your application.
Installing Redux and Dependencies
Before we dive into the nitty-gritty of using Redux with React Native, let’s take a moment to understand what Redux is, why it’s beneficial, and how to set it up in your project.
What is Redux and Why is it Beneficial?
Redux is a predictable state management container for JavaScript applications, including those built with React Native. Its primary goal is to manage the application’s state in a predictable and centralized manner. Here’s why Redux is beneficial:
- Predictable State Changes: Redux enforces a unidirectional data flow, making it easier to understand how state changes occur in your application. This predictability simplifies debugging and enhances code maintainability.
- Centralized State: With Redux, all your application’s state is stored in a single store. This centralization provides a unified source of truth, making it easier to synchronize and manage data across different components.
- Improved Scalability: As your React Native app grows, Redux scales gracefully. It enables you to manage a complex application state without introducing unnecessary complexity into your codebase.
- Enhanced Debugging: Redux comes with powerful development tools like Redux DevTools, which provide insights into your app’s state changes, actions, and performance, simplifying the debugging process.
Now that you understand why Redux is a valuable addition to your React Native project, let’s proceed with the installation of Redux and its related packages.
Installing Redux and Related Packages
To get started with Redux, you’ll need to install several packages. Here’s how you can do it using either npm or Yarn:
Using npm:
Open your terminal and navigate to your React Native project directory. Then, run the following commands: npm install redux react-redux redux-thunk
This installs the following packages:
- redux: The core Redux library.
- react-redux: The official Redux bindings for React, allow you to connect your React components to the Redux store.
- redux-thunk: A middleware for handling asynchronous actions in Redux.
Using Yarn:
If you prefer Yarn, you can install the packages like this: yarn add redux react-redux redux-thunk
Now, let’s briefly discuss the purpose of each of these dependencies:
- redux: This is the core Redux library that provides the central store and essential functions for managing the state.
- react-redux: React Redux is the official library that simplifies the process of connecting your React components to the Redux store. It offers the
connectfunction andProvidercomponent, making it easier to access and dispatch actions within your components. - redux-thunk: Redux Thunk is a middleware that enables you to dispatch asynchronous actions in Redux. It’s particularly useful for handling network requests, asynchronous operations, and side effects in your Redux actions.
With Redux and its dependencies installed, you’re now ready to start implementing Redux in your React Native project. In the following sections, we’ll guide you through creating a Redux store, designing your application state, and implementing reducers and actions.
Creating Redux Store
Now that we’ve installed Redux and its dependencies, it’s time to dive into creating the heart of Redux: the Redux store. In this section, we’ll explore what a Redux store is, why it’s important, and how to set it up in your React Native project.
What is a Redux Store and Why is it Important?
A Redux store is the core component of Redux. It is a JavaScript object that holds the entire state of your application. The store plays a pivotal role in managing the state in a predictable and centralized manner. Here’s why the Redux store is important:
- Centralized State: The Redux store acts as a single source of truth for your application’s state. It consolidates all the data and provides a clear overview of your app’s current state.
- Predictable State Changes: State modifications in Redux are predictable and controlled through pure functions called reducers. This predictability simplifies debugging and enhances code maintainability.
- Accessibility: With the Redux store, your application’s state becomes easily accessible to all components that need it. This eliminates the need for complex state passing between components.
Creating a Redux Store and Defining Initial State
Let’s start by creating a Redux store in your React Native project:
- Import Dependencies: In your project, import the necessary Redux dependencies at the top of your file where you plan to create the store:
import { createStore } from 'redux';- Define Initial State: Before creating the store, define your initial state. This is the starting point of your application’s data. For example:
   const initialState = {
     user: null,
     todos: [],
};In this example, we’ve defined an initial state with a user object and an empty todos array.
- Create the Redux Store: Now, create the Redux store by calling the
createStorefunction and passing your reducer function as an argument. We’ll discuss reducers in detail in the next section.
const store = createStore(rootReducer, initialState);Here, rootReducer is a placeholder for your actual reducer function. We’ll set up the reducer shortly.
Setting Up Reducers and Actions
Before you can complete the setup of your Redux store, you need to define reducers and actions. These are fundamental aspects of Redux that control state changes.
Reducers:
Reducers are pure functions that specify how the state should change in response to actions. They take the current state and an action as input and return the new state. Here’s a basic example of a reducer:
const rootReducer = (state = initialState, action) => {
  switch (action.type) {
    case 'SET_USER':
      return { ...state, user: action.payload };
    case 'ADD_TODO':
      return { ...state, todos: [...state.todos, action.payload] };
    default:
      return state;
  }
};In this example, the rootReducer function handles two actions: SET_USER and ADD_TODO, updating the state accordingly.
Actions:
Actions are plain JavaScript objects that describe what happened in your application. They contain a type property that defines the action type and, optionally, a payload property with additional data. Here are examples of actions:
const setUser = (user) => ({
  type: 'SET_USER',
  payload: user,
});

const addTodo = (todo) => ({
  type: 'ADD_TODO',
  payload: todo,
});Actions are dispatched to the store to trigger state changes.
With your Redux store created and initial state defined, you’re now equipped to start managing your React Native application’s state efficiently.
Certainly, here’s the “Designing Your Application State” section for your blog, following the outlined guidelines:
Designing Your Application State
Before you start implementing Redux in your React Native application, it’s crucial to design your application state thoughtfully. In this section, we’ll delve into the significance of defining a clear application state, structuring that state, and organizing it into manageable slices.
The Importance of Defining a Clear Application State
A well-designed application state is the foundation of efficient state management with Redux. Here’s why it’s important:
- Clarity: A well-defined state structure makes it easier to understand the current state of your application. It provides clarity to you and your development team, reducing confusion.
- Maintenance: A clear state structure simplifies maintenance. You’ll spend less time hunting for data and more time focusing on adding features and fixing bugs.
- Scalability: As your React Native app grows, having a structured state will enable you to scale it without introducing unnecessary complexity.
- Predictability: With a clear state design, you can predict how data flows through your application, making debugging and troubleshooting much more straightforward.
Define Your Application’s State Structure and Data Flow
To design your application’s state, follow these steps:
- Identify Key Components: Identify the major components of your application that require state management. For example, in a to-do list app, you might have components for user authentication, displaying tasks, and task creation.
- List Relevant Data: For each component, list the data it needs to function. For user authentication, this might include user credentials and login status, while the task component may require task lists and task details.
- Create a State Tree: Based on the identified data, create a state tree. This is a hierarchical structure that represents your application’s entire state. Each piece of data should have a specific place within this tree.
- Plan Data Flow: Determine how data flows through your application. Consider which components need read access (using
mapStateToProps) and which components need write access (using action dispatches).
Organizing State into Different Slices
In Redux, it’s common to organize your state into different slices, each corresponding to a specific feature or aspect of your application. This approach helps keep your codebase modular and maintainable. Here’s how you can organize your state into slices:
- Create Slice Folders: Within your project’s directory structure, create folders for each slice. For example, you might have a folder structure like this:
   ├── src/
   │   ├── actions/
   │   ├── reducers/
   │   │   ├── auth.js
   │   │   ├── tasks.js
   │   │   ├── ...
In this example, there are separate slices for authentication (auth) and tasks (tasks).
- Define Reducers: Within each slice folder, define the corresponding reducers. These reducers should handle actions specific to that slice.
- Actions for Each Slice: Create action creators specific to each slice. These action creators should only dispatch actions relevant to their respective slices.
- Combine Reducers: In your root reducer (often named
rootReducer.js), combine the reducers from all slices using thecombineReducersfunction from Redux.
   import { combineReducers } from 'redux';
   import authReducer from './auth';
   import tasksReducer from './tasks';

   const rootReducer = combineReducers({
     auth: authReducer,
     tasks: tasksReducer,
     // ...other slices
   });

export default rootReducer;By following these steps, you’ll have a well-organized and modular Redux state management system in your React Native application. In the next sections, we’ll dive deeper into implementing reducers, actions, and connecting Redux with React Native components.
Implementing Reducers
Reducers are a fundamental aspect of Redux that control how your application’s state changes in response to actions. In this section, we’ll explore how reducers work, how to create them to handle different parts of your application state, and provide examples of action types and their impact on the state.
How Reducers Work in Redux
Reducers are pure functions in Redux that specify how the application’s state should change when an action is dispatched. They take two arguments: the current state and an action. The reducer then returns the new state based on the action type and, if needed, the action’s payload.
Here’s the basic structure of a reducer:
const reducer = (state, action) => {
  switch (action.type) {
    case 'SOME_ACTION_TYPE':
      // Update the state based on the action
      return newState;
    // Handle other action types...
    default:
      return state;
  }
};Creating Reducers to Handle Application State
To create reducers that handle different parts of your application state, follow these steps:
- Identify Slices: Consider the slices of your application state that you defined earlier. Each slice should have its corresponding reducer.
- Create Reducer Functions: For each slice, create a reducer function. The reducer should be responsible for managing that specific slice of the state.
- Switch Statement: Inside each reducer, use a switch statement to handle different action types. Each case in the switch statement should specify how the state should change in response to that action.
Examples of Action Types and State Modifications
Let’s provide some examples to illustrate how reducers work with action types and state modifications:
Example 1: Updating User Authentication State
const authReducer = (state = initialState, action) => {
  switch (action.type) {
    case 'LOGIN':
      // Update the user and set the login status
      return {
        ...state,
        user: action.payload,
        isAuthenticated: true,
      };
    case 'LOGOUT':
      // Clear the user data and set the login status to false
      return {
        ...state,
        user: null,
        isAuthenticated: false,
      };
    default:
      return state;
  }
};In this example, the authReducer handles actions related to user authentication. When a 'LOGIN' action is dispatched, it updates the user data and sets the isAuthenticated flag to true. Conversely, a 'LOGOUT' action clears the user data and sets isAuthenticated to false.
Example 2: Managing To-Do List State
const tasksReducer = (state = initialState, action) => {
  switch (action.type) {
    case 'ADD_TASK':
      // Add a new task to the task list
      return {
        ...state,
        todos: [...state.todos, action.payload],
      };
    case 'REMOVE_TASK':
      // Remove a task by its ID
      const updatedTodos = state.todos.filter((task) => task.id !== action.payload);
      return {
        ...state,
        todos: updatedTodos,
      };
    default:
      return state;
  }
};In this example, the tasksReducer manages actions related to a to-do list. When an 'ADD_TASK' action is dispatched, it adds a new task to the todos array. Conversely, a 'REMOVE_TASK' action removes a task from the list based on its ID.
By creating separate reducers for different parts of your application state and defining how they respond to specific action types, you can maintain a clear and predictable state management system in your React Native application.
Creating Actions
Actions are at the core of Redux, describing what has happened in your application and serving as a bridge between your components and reducers. In this section, we’ll explore the role of actions, define action creators and actions, and demonstrate how to dispatch actions to trigger state changes.
The Role of Actions in Redux
In Redux, actions are plain JavaScript objects that convey information about events or changes within your application. They act as messengers, letting reducers know what kind of state modifications are required. The primary role of actions is to describe:
- What Happened: The
typeproperty of an action specifies what type of event or change occurred. - Additional Data: Actions may contain a
payloadproperty that provides additional data necessary for the state modification.
Defining Action Creators and Actions
Action creators are functions that create and return action objects. They encapsulate the logic required to construct these objects, making it easier to maintain and dispatch actions throughout your application. Here’s how to define action creators and actions:
// Action creator for adding a task
const addTask = (task) => ({
  type: 'ADD_TASK',
  payload: task,
});

// Action creator for removing a task
const removeTask = (taskId) => ({
  type: 'REMOVE_TASK',
  payload: taskId,
});In the examples above, addTask and removeTask are action creators. They each return an action object with a type property and, in the case of addTask, a payload property to carry relevant data.
Dispatching Actions to Trigger State Changes
Once you’ve defined action creators, you can dispatch actions to trigger state changes in your Redux store. Dispatching an action is the process of notifying Redux that a specific event has occurred. To dispatch actions, follow these steps:
- Import
dispatch: In your React component, you need to access thedispatchfunction from Redux. You can do this by connecting your component usingconnectfromreact-redux. - Dispatch Actions: Inside your component, call the action creator functions and dispatch the resulting action objects.
import { connect } from 'react-redux';
import { addTask, removeTask } from './actions';

class TaskList extends React.Component {
  // ...

  handleAddTask = () => {
    const newTask = { id: 1, text: 'New Task' }; // Example task data
    this.props.addTask(newTask); // Dispatch the 'ADD_TASK' action
  };

  handleRemoveTask = (taskId) => {
    this.props.removeTask(taskId); // Dispatch the 'REMOVE_TASK' action
  };

  // ...
}

const mapDispatchToProps = {
  addTask,
  removeTask,
};

export default connect(null, mapDispatchToProps)(TaskList);In the example above, the addTask and removeTask action creators are imported and connected to the component using mapDispatchToProps. When handleAddTask and handleRemoveTask functions are called, they dispatch the respective actions.
By dispatching actions, you initiate state changes in your Redux store, allowing reducers to handle these actions and modify the state accordingly. This creates a predictable and centralized way to manage your React Native application’s state. In the next section, we’ll explore how to integrate Redux with React Native components using the connect function.
Integrating Redux with React Native Components
Integrating Redux with React Native components is a crucial step in harnessing the power of Redux for state management. In this section, we’ll explain how to connect Redux with React Native components using the connect function from react-redux. We’ll walk through the process of mapping state and dispatch to props, providing examples of using mapStateToProps and mapDispatchToProps.
Connecting Redux with React Native Components
The connect function from react-redux allows you to connect your React Native components to the Redux store, enabling them to access the application’s state and dispatch actions. Here’s how you can integrate Redux with your React Native components:
- Import Dependencies: Import
connectfromreact-reduxand any action creators you want to use in your component.
   import { connect } from 'react-redux';
import { addTask, removeTask } from './actions';- Define Your Component: Define your React Native component as you normally would.
   class TaskList extends React.Component {
     // ...
}- Map State and Dispatch to Props: Use
mapStateToPropsandmapDispatchToPropsfunctions to connect your component to Redux. These functions specify which parts of the Redux state to map to props and which actions to map to props for dispatching.
   const mapStateToProps = (state) => ({
     tasks: state.tasks.todos, // Map 'todos' slice of state to 'tasks' prop
   });

   const mapDispatchToProps = {
     onAddTask: addTask, // Map 'addTask' action creator to 'onAddTask' prop
     onRemoveTask: removeTask, // Map 'removeTask' action creator to 'onRemoveTask' prop
};- Connect Your Component: Finally, connect your component using
connectand pass in themapStateToPropsandmapDispatchToPropsfunctions.
export default connect(mapStateToProps, mapDispatchToProps)(TaskList);Examples of Using mapStateToProps and mapDispatchToProps
Let’s provide examples of using mapStateToProps and mapDispatchToProps within a React Native component:
import React from 'react';
import { View, Text, Button } from 'react-native';
import { connect } from 'react-redux';
import { addTask, removeTask } from './actions';

class TaskList extends React.Component {
  render() {
    return (
      <View>
        <Text>Task List:</Text>
        <Button title="Add Task" onPress={this.props.onAddTask} />
        <Button title="Remove Task" onPress={() => this.props.onRemoveTask(1)} />
        <Text>{this.props.tasks.map((task) => task.text).join(', ')}</Text>
      </View>
    );
  }
}

const mapStateToProps = (state) => ({
  tasks: state.tasks.todos,
});

const mapDispatchToProps = {
  onAddTask: addTask,
  onRemoveTask: removeTask,
};

export default connect(mapStateToProps, mapDispatchToProps)(TaskList);In this example, we’ve connected a TaskList React Native component to Redux. We use mapStateToProps to map the todos slice of the Redux state to the tasks prop, and mapDispatchToProps to map the addTask and removeTask action creators to onAddTask and onRemoveTask props, respectively. These props can now be used to interact with Redux state and dispatch actions within the component.
Handling Asynchronous Actions
In Redux, handling asynchronous actions is a common requirement, especially when dealing with tasks like fetching data from an API or performing asynchronous operations. In this section, we’ll discuss the need for handling asynchronous actions, introduce Redux Thunk as a middleware for managing async actions, and provide examples of async actions and their usage.
The Need for Handling Asynchronous Actions in Redux
React Native applications often need to interact with external data sources, such as APIs or databases. These interactions involve asynchronous operations like making network requests. Handling asynchronous actions in Redux is essential because:
- Predictable State Changes: Redux promotes a predictable state management flow, and async operations can introduce complexity. Properly handling async actions ensures that state changes remain predictable and follow the unidirectional data flow.
- Middleware Requirement: Redux itself doesn’t natively support asynchronous operations. To address this, you need a middleware like Redux Thunk to manage async actions while adhering to Redux principles.
Introducing Redux Thunk
Redux Thunk is a middleware for Redux that allows you to write action creators that return functions instead of plain action objects. These functions can contain asynchronous logic, such as API calls, and dispatch multiple actions during their lifecycle. Redux Thunk intercepts these functions and ensures proper execution.
To use Redux Thunk, you need to install it as part of your Redux setup, which was discussed earlier in the blog.
Examples of Async Actions and Their Usage
Let’s illustrate how to create and use async actions with Redux Thunk through an example of fetching data from an API:
- Action Creator with Redux Thunk:
   import axios from 'axios'; // You may need to install Axios

   // Action creator for fetching data from an API
   const fetchUserData = () => {
     return async (dispatch) => {
       try {
         // Dispatch an action to indicate the start of the request
         dispatch({ type: 'FETCH_USER_DATA_REQUEST' });

         // Make an asynchronous API request
         const response = await axios.get('https://api.example.com/user-data');

         // Dispatch an action with the received data
         dispatch({
           type: 'FETCH_USER_DATA_SUCCESS',
           payload: response.data,
         });
       } catch (error) {
         // Handle errors and dispatch an error action
         dispatch({
           type: 'FETCH_USER_DATA_FAILURE',
           payload: error.message,
         });
       }
     };
};In this example, fetchUserData is an action creator that returns a function. This function dispatches actions indicating the start of the request, success, or failure based on the asynchronous API call’s result.
- Usage in a Component:
   import React from 'react';
   import { View, Text, Button } from 'react-native';
   import { connect } from 'react-redux';
   import { fetchUserData } from './actions';

   class UserProfile extends React.Component {
     render() {
       return (
         <View>
           <Text>User Profile:</Text>
           <Button title="Fetch User Data" onPress={this.props.fetchUserData} />
           <Text>{this.props.userData}</Text>
         </View>
       );
     }
   }

   const mapStateToProps = (state) => ({
     userData: state.user.data,
   });

   const mapDispatchToProps = {
     fetchUserData,
   };

export default connect(mapStateToProps, mapDispatchToProps)(UserProfile);In this component, we connect the fetchUserData action creator to the UserProfile component. When the “Fetch User Data” button is pressed, it dispatches the fetchUserData action, which initiates the asynchronous API request.
By using Redux Thunk, you can seamlessly handle asynchronous actions while maintaining the predictability and unidirectional flow of Redux. This allows you to manage external data sources and other async operations in your React Native application with ease.
Debugging Redux
Debugging is an integral part of the development process, and Redux provides several techniques and tools to make the debugging process more manageable. In this section, we’ll explain common debugging techniques for Redux and introduce tools like Redux DevTools and how to integrate them into your project.
Common Debugging Techniques for Redux
Debugging Redux can be made more effective by following these common techniques:
- Console Logging: Use
console.logstatements in your action creators, reducers, and components to log the state, actions, and other relevant data. This provides visibility into how your application’s state changes. - Redux DevTools: Redux DevTools is a powerful extension for debugging Redux applications. It allows you to inspect the state, view dispatched actions, and even time-travel through your application’s state history.
- Middleware Logging: You can create custom middleware that logs actions and state changes as they pass through Redux. This can be helpful for tracking the flow of actions and identifying issues.
- Testing: Writing unit tests for your action creators and reducers can help catch bugs early in the development process. Testing frameworks like Jest and Enzyme are commonly used for this purpose.
Introducing Redux DevTools
Redux DevTools is a browser extension and a standalone application that provides a visual interface for inspecting and debugging Redux applications. It offers several features, including:
- State Inspection: View the current state of your application and how it changes over time.
- Action History: See a log of dispatched actions and the order in which they were triggered.
- Time Travel: Step backward and forward through the application’s state history to observe changes at different points in time.
- Action Replay: Re-dispatch actions to replay specific scenarios for testing and debugging purposes.
Integrating Redux DevTools into Your Project
To integrate Redux DevTools into your React Native project, follow these steps:
- Install the Redux DevTools Extension:
- For Google Chrome: Install the Redux DevTools Extension.
- Configure Redux Store with Redux DevTools: In your Redux store configuration, import
composeWithDevToolsfrom theredux-devtools-extensionpackage and use it to enhance your store:
   import { createStore, applyMiddleware } from 'redux';
   import { composeWithDevTools } from 'redux-devtools-extension';
   import rootReducer from './reducers';
   import thunk from 'redux-thunk';

   const middleware = [thunk]; // Include any middleware you use

   const store = createStore(
     rootReducer,
     composeWithDevTools(applyMiddleware(...middleware))
   );

export default store;- Connect Redux DevTools to Your App: You can use the
redux-devtools-extensionpackage to enable the Redux DevTools Extension in your React Native app. Add the following code to your entry file (e.g.,index.js):
   import { AppRegistry } from 'react-native';
   import App from './App';
   import { name as appName } from './app.json';
   import { Provider } from 'react-redux';
   import store from './store'; // Import your Redux store

   const ReduxApp = () => (
     <Provider store={store}>
       <App />
     </Provider>
   );

AppRegistry.registerComponent(appName, () => ReduxApp);With Redux DevTools integrated into your project, you can now open the extension in your browser while running your React Native app to inspect and debug your Redux state and actions easily.
By applying these debugging techniques and integrating Redux DevTools, you can streamline the process of identifying and resolving issues in your Redux-powered React Native application.
Conclusion
In this comprehensive guide, we’ve explored how to use Redux with React Native for efficient state management. We started by setting up a React Native project and installing Redux and its dependencies. We then delved into creating a Redux store, designing the application state, and implementing reducers and actions.
We also covered the integration of Redux with React Native components, including mapping state and dispatch to props. Handling asynchronous actions with Redux Thunk was discussed, followed by a guide on debugging techniques and the use of Redux DevTools.
With Redux as your state management solution, you have a robust and predictable way to manage your React Native application’s state. By following best practices and leveraging debugging tools, you can streamline development and build high-quality applications. Now, you’re well-equipped to harness the power of Redux in your React Native projects.
FAQs:
What is the purpose of Redux middleware, and how does it work?
Redux middleware intercepts actions before they reach reducers and allows you to perform asynchronous operations, logging, or other tasks. It sits between dispatching an action and the moment it reaches the reducer. A common example is Redux Thunk, which enables the handling of asynchronous actions. Middleware can also be used for custom tasks like analytics tracking or routing.
How can I optimize Redux performance in a large-scale React Native application?
To optimize Redux performance in a large-scale React Native app:
1. Use the reselect library to create memoized selectors and prevent unnecessary re-renders.
2. Normalize your state structure to avoid deeply nested objects.
3. Implement code-splitting and dynamic imports to load reducers and components lazily.
4. Consider using the Redux Toolkit, which simplifies store setup and reduces boilerplate.
What’s the difference between Redux Saga and Redux Thunk?
Redux Saga and Redux Thunk are both middleware for handling asynchronous actions, but they differ in approach. Redux Thunk uses simple action creators that return functions, making it suitable for basic async operations. Redux Saga, on the other hand, uses generators to manage complex async flows, allowing more fine-grained control over asynchronous logic.
How can I persist Redux state in a React Native app, such as for user authentication?
To persist Redux state in a React Native app, use libraries like redux-persist or AsyncStorage. These libraries allow you to save and load the Redux store state across app sessions, making it suitable for persisting user authentication tokens, settings, or any other relevant data.
What are the potential downsides of using Redux in React Native?
While Redux is a powerful state management solution, it may not be suitable for all scenarios:
1. Complexity: Redux can introduce complexity, especially in small apps, and may lead to over-engineering.
2. Learning Curve: Learning Redux and its concepts may take time, especially for developers new to state management.
3. Boilerplate: Redux often involves writing boilerplate code for actions, reducers, and selectors, which can be seen as a drawback in smaller projects.
Happy coding!


