As applications become more complex, managing the state of your React components can become increasingly challenging. One popular solution to this problem is to use Redux, a predictable state container for JavaScript applications. Redux provides a centralized location for storing and managing application state, making it easier to track changes and manage complex interactions between components.
In this article, we will explore the basics of Redux and how to integrate it with a React application to manage global state. We’ll discuss the key concepts of Redux, such as the store, actions, reducers, immutable state, and middleware, as well as best practices for using Redux in a React application.
React Redux is a great alternative of React Context API for managing the state.
By the end of this article, you will have a solid understanding of how to use Redux with React to manage global state in your applications. Whether you’re building a small app or a large-scale enterprise application, this guide will provide you with the tools you need to effectively manage state and build robust, scalable applications.
Redux Concepts:
Redux is a predictable state container for JavaScript applications. It provides a centralized location for storing and managing application state, making it easier to track changes and manage complex interactions between components.
At its core, Redux is based on three key principles: a single source of truth, state is read-only, and changes are made with pure functions. The single source of truth means that the entire state of the application is stored in a single location called the store. This makes it easier to track changes and manage complex interactions between components.

The state in Redux is read-only, meaning that it cannot be modified directly. Instead, you must dispatch actions to the store, which describe what happened in the application. These actions are then processed by pure functions called reducers, which calculate the new state of the application based on the action.
Redux also supports middleware, which provides a way to add additional functionality to the store, such as logging, handling asynchronous actions, or dispatching multiple actions in response to a single action.
One of the main benefits of using Redux is that it provides a clear separation of concerns between the state and the UI components. This makes it easier to manage state in large applications and reduces the complexity of the code.
In the next section, we’ll dive into the key concepts of Redux, including the store, actions, reducers, immutable state, and middleware. We’ll also discuss best practices for using Redux in a React application.
Store:
The store is the central hub of Redux, which holds the entire state of the application. It is a plain JavaScript object that contains the state tree of your application. The state tree is immutable, meaning that it cannot be changed directly. Instead, you must dispatch actions to the store, which describe what happened in the application.
Here’s an example of creating a store in Redux:
import { createStore } from 'redux';
import rootReducer from './reducers';

const store = createStore(rootReducer);
In this example, we create a store by calling the createStore function and passing in our rootReducer. The rootReducer is a combination of all our reducers, which we’ll discuss in the next section.
Action:
Actions are plain JavaScript objects that describe what happened in the application. They are the only way to modify the state of the store. An action must have a type property that describes the type of action being performed. You can also include additional data in the action object.
Here’s an example of defining an action in Redux:
const ADD_TODO = 'ADD_TODO';

const addTodo = (text) => {
  return {
    type: ADD_TODO,
    text,
  };
};
In this example, we define an action type called ADD_TODO and create an addTodo action creator function that returns an object with the type property and the text data.
Reducer:
Reducers are pure functions that take the current state of the store and an action as input, and return a new state based on the action. They are responsible for updating the state of the store in response to actions.
Here’s an example of a simple reducer in Redux:
const initialState = {
  todos: [],
};

const todoReducer = (state = initialState, action) => {
  switch (action.type) {
    case 'ADD_TODO':
      return {
        ...state,
        todos: [
          ...state.todos,
          {
            text: action.text,
            completed: false,
          },
        ],
      };
    default:
      return state;
  }
};
In this example, we define a todoReducer that takes the current state and an action as input and returns a new state based on the action. In the ADD_TODO case, the reducer returns a new state with the text data added to the todos array.
Immutable State:
As mentioned earlier, the state in Redux is immutable, which means that it cannot be changed directly. Instead, you must create a new state object for every change.
Here’s an example of creating an immutable state in Redux:
const state = {
  todos: [
    {
      text: 'Buy milk',
      completed: false,
    },
    {
      text: 'Take out trash',
      completed: true,
    },
  ],
};

const newState = {
  ...state,
  todos: [
    ...state.todos.slice(0, 1),
    {
      ...state.todos[1],
      completed: false,
    },
  ],
};
In this example, we create a new state object by spreading the old state and creating a new array of todos. We replace the second todo object with a new object that has a different completed value.
Middleware
Middleware is a way to add additional functionality to the Redux store. It allows you to intercept and modify actions before they reach the reducer, or to handle asynchronous actions and dispatch additional actions based on the result.
In Redux, middleware is simply a function that takes three arguments: the store, the next function, and the action being dispatched. The middleware function can modify the action before passing it on to the next function, or it can stop the action from reaching the reducer altogether.
Here’s an example middleware function that logs every action that is dispatched to the console:
const loggerMiddleware = store => next => action => {
  console.log(`Action: ${action.type}`);
  return next(action);
};
In this example, the loggerMiddleware function takes the store as its argument and returns a function that takes the next function as its argument. The next function is a reference to the next middleware function in the chain, or to the dispatch function if there are no more middleware functions.
The middleware function then returns another function that takes the action being dispatched as its argument. This function can modify the action, or it can pass it on to the next function by calling next(action).
To use the middleware in your Redux application, you can pass it as an argument to the applyMiddleware function when creating the store:
import { createStore, applyMiddleware } from 'redux';
import loggerMiddleware from './loggerMiddleware';
import rootReducer from './reducers';

const store = createStore(rootReducer, applyMiddleware(loggerMiddleware));
In this example, the loggerMiddleware is passed as an argument to the applyMiddleware function when creating the store. The applyMiddleware function returns an enhanced version of the store that includes the middleware.
Using middleware in Redux can make it easier to handle complex interactions and to add additional functionality to the store. However, it’s important to use middleware sparingly and to keep it simple, as too much middleware can make your code harder to understand and maintain.
Redux Lifecycle:
In Redux, the state of the application is managed by a centralized store, which contains the entire state of the application. The state can only be modified by dispatching actions, which are plain JavaScript objects that describe what happened in the application.
The Redux lifecycle can be broken down into the following steps:
- Step 1: Dispatch an action
An action is dispatched to the store by calling thedispatchfunction. The action is a plain JavaScript object that contains atypeproperty, which describes the type of action being performed. Additional data can also be included in the action, such as a payload of data to be updated in the store.
store.dispatch({
  type: 'ADD_TODO',
  payload: {
    id: 1,
    text: 'Buy milk',
    completed: false
  }
});- Step 2: Action is processed by the reducer
The action is passed to the reducer function, which is responsible for updating the state of the application based on the action. The reducer function takes the current state of the application and the action as its inputs, and returns a new state object.
const todosReducer = (state = [], action) => {
  switch (action.type) {
    case 'ADD_TODO':
      return [
        ...state,
        {
          id: action.payload.id,
          text: action.payload.text,
          completed: action.payload.completed
        }
      ];
    default:
      return state;
  }
};- Step 3: Store is updated with the new state
The new state returned by the reducer function is then passed back to the store, which updates its state accordingly.
const store = createStore(todosReducer);

console.log(store.getState()); // []

store.dispatch({
  type: 'ADD_TODO',
  payload: {
    id: 1,
    text: 'Buy milk',
    completed: false
  }
});

console.log(store.getState()); // [{ id: 1, text: 'Buy milk', completed: false }]- Step 4: Components re-render with the updated state
Finally, the updated state is passed back to the components, which can use the updated state to re-render the UI.
const App = () => {
  const todos = useSelector(state => state.todos);

  return (
    <div>
      {todos.map(todo => (
        <div key={todo.id}>{todo.text}</div>
      ))}
    </div>
  );
};

ReactDOM.render(
  <Provider store={store}>
    <App />
  </Provider>,
  document.getElementById('root')
);
This completes the cycle of state management in Redux. The diagram below illustrates the Redux lifecycle:
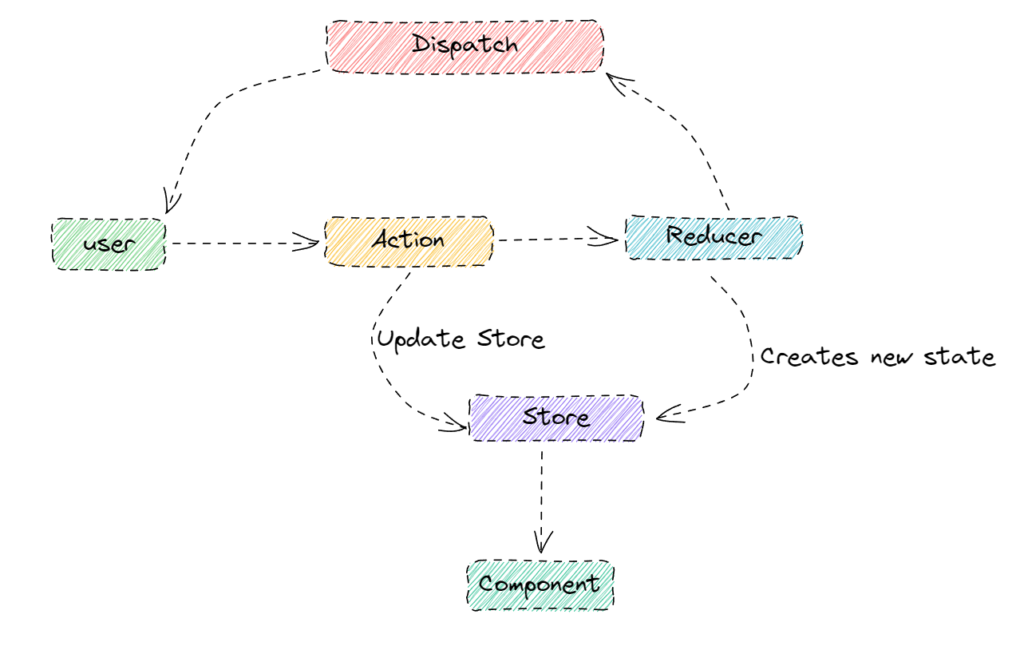
In this diagram, the arrow from the user to the action represents the user initiating some action, which is then dispatched to the store. The arrow from the action to the reducer represents the action being processed by the reducer, which updates the state of the store. The arrow from the reducer to the store represents the updated state being passed back to the store.
Finally, the arrow from the store to the component represents the updated state being passed down to the component, which can then use the updated state to re-render the UI.
Integrating Redux with React:
In the previous section, we discussed the fundamental concepts of Redux, including the store, actions, reducers, and middleware. In this section, we’ll explore how to integrate Redux with React, one of the most popular JavaScript libraries for building user interfaces. We’ll go through the steps to install Redux, create a store, define actions and reducers, dispatch actions, and connect the Redux store to React components. We’ll also look at how to use selectors to retrieve data from the store. So let’s get started!

Installing Redux
To use Redux in your React application, you need to install the Redux library as well as the React bindings for Redux. You can install both libraries using npm: npm install redux react-redux
Creating a store
The store is the central place where the state of the application is held. You create the store using the createStore function from the Redux library. Here’s an example:
import { createStore } from 'redux';

const initialState = {
  count: 0
};

function reducer(state = initialState, action) {
  switch (action.type) {
    case 'INCREMENT':
      return { ...state, count: state.count + 1 };
    case 'DECREMENT':
      return { ...state, count: state.count - 1 };
    default:
      return state;
  }
}

const store = createStore(reducer);
This creates a store with an initial state of { count: 0 }, and a reducer function that can handle two types of actions: INCREMENT and DECREMENT.
Creating actions
Actions are payloads of information that send data from your application to the store. You can create actions using action creators. Here’s an example:
function increment() {
  return { type: 'INCREMENT' };
}

function decrement() {
  return { type: 'DECREMENT' };
}
These action creators create actions with the type INCREMENT and DECREMENT.
Creating reducers
Reducers are functions that take the current state and an action, and return a new state. Here’s an example:
const initialState = {
  count: 0
};

function reducer(state = initialState, action) {
  switch (action.type) {
    case 'INCREMENT':
      return { ...state, count: state.count + 1 };
    case 'DECREMENT':
      return { ...state, count: state.count - 1 };
    default:
      return state;
  }
}
This reducer function takes the current state, checks the type of the action, and returns a new state depending on the action type.
Dispatching actions
You can dispatch actions using the dispatch function from the store. Here’s an example:
store.dispatch(increment());
store.dispatch(decrement());
These dispatch calls send the INCREMENT and DECREMENT actions to the store.
Connecting Redux with React components
You can connect React components to the Redux store using the connect function from the react-redux library. Here’s an example:
import { connect } from 'react-redux';

function Counter({ count, increment, decrement }) {
  return (
    <div>
      <h1>Count: {count}</h1>
      <button onClick={increment}>+</button>
      <button onClick={decrement}>-</button>
    </div>
  );
}

function mapStateToProps(state) {
  return { count: state.count };
}

const mapDispatchToProps = { increment, decrement };

export default connect(mapStateToProps, mapDispatchToProps)(Counter);
This example creates a Counter component that displays the current count, and two buttons to increment and decrement the count. The mapStateToProps function maps the count property from the Redux store state to the component’s props. The mapDispatchToProps object maps the increment and decrement action creators to the component’s props. The connect function connects the component to the Redux store.
Using selectors to retrieve data from the store:
Sometimes we need to access the data from the store, but we don’t want to pass the whole store to the component as props. Here comes the role of selectors. A selector is a function that takes the state as an argument and returns a slice of the state.
We can use the createSelector function from the reselect library to create selectors. createSelector takes one or more selectors and a transform function as arguments. It returns a new selector that memorizes the result of the transform function based on the input selectors.
Here’s an example of how to create a selector:
import { createSelector } from 'reselect';

const getUsers = state => state.users;

export const getActiveUsers = createSelector(
  [getUsers],
  users => users.filter(user => user.isActive)
);
In the above example, we created a selector getUsers that returns the users slice of the state. Then, we used createSelector to create another selector getActiveUsers that takes getUsers as an input selector and returns an array of active users.
We can then use this selector in our component to retrieve the active users from the store:
import React from 'react';
import { connect } from 'react-redux';
import { getActiveUsers } from './selectors';

const UsersList = ({ activeUsers }) => (
  <ul>
    {activeUsers.map(user => (
      <li key={user.id}>{user.name}</li>
    ))}
  </ul>
);

const mapStateToProps = state => ({
  activeUsers: getActiveUsers(state)
});

export default connect(mapStateToProps)(UsersList);
In the above example, we used the mapStateToProps function to map the activeUsers slice of the state to the activeUsers prop of the UsersList component. We passed the state as an argument to the getActiveUsers selector to retrieve the active users from the store.
This is how we can use selectors to retrieve data from the store without passing the whole store to the component as props.
In the next section, we’ll be implementing the concept of react-redux by creating a sample application.
Building a Sample Application with React Redux
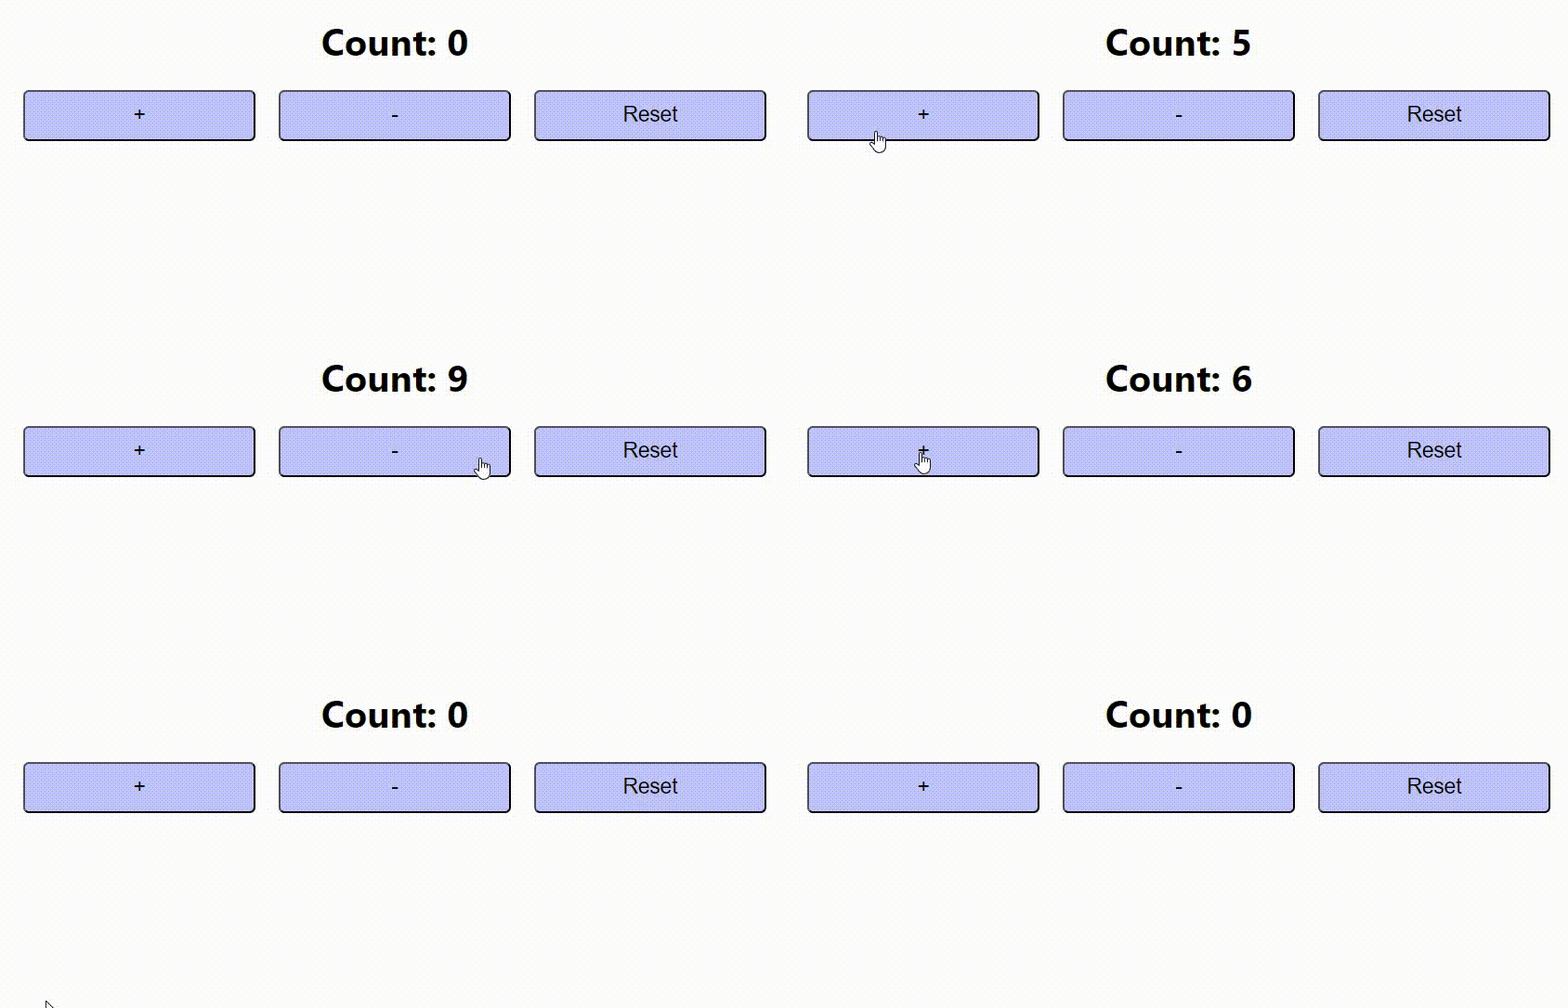
In this section, we will build a sample application with React Redux, using the concepts and techniques we have learned so far. The application will be a simple counter that will allow users to increment, decrement, and reset the count value.
Let’s get started!
First, we need to install the redux and react-redux packages using npm. npm install redux react-redux
Create a Redux store
Next, we will create a Redux store using the createStore function from the redux package. The store will hold the current count value and provide methods for updating the count.
import { createStore } from 'redux';

const initialState = { count: 0 };

function counterReducer(state = initialState, action) {
  switch (action.type) {
    case 'INCREMENT':
      return { count: state.count + 1 };
    case 'DECREMENT':
      return { count: state.count - 1 };
    case 'RESET':
      return { count: 0 };
    default:
      return state;
  }
}

const store = createStore(counterReducer);

export default store;In the above code, we define an initial state for the store, which includes a count property set to zero. We also define a reducer function counterReducer that takes the current state and an action object as arguments and returns a new state based on the action type. We create the Redux store using the createStore function, passing in the counterReducer as an argument.
Define actions
Next, we will create action objects that describe how we want to update the count value. Actions are plain JavaScript objects that have a type property and an optional payload property.
export const increment = () => ({ type: 'INCREMENT' });
export const decrement = () => ({ type: 'DECREMENT' });
export const reset = () => ({ type: 'RESET' });
In the above code, we define three action creator functions that return action objects with the appropriate type property.
Connect Redux with React Components
To connect our React components with the Redux store, we will use the connect function from the react-redux package. The connect function takes two arguments: mapStateToProps and mapDispatchToProps.
import { connect } from 'react-redux';
import { increment, decrement, reset } from './actions';

function Counter({ count, increment, decrement, reset }) {
  return (
    <div>
      <h1>Count: {count}</h1>
      <button onClick={increment}>+</button>
      <button onClick={decrement}>-</button>
      <button onClick={reset}>Reset</button>
    </div>
  );
}

const mapStateToProps = state => ({ count: state.count });
const mapDispatchToProps = { increment, decrement, reset };

export default connect(mapStateToProps, mapDispatchToProps)(Counter);In the above code, we define a Counter component that renders the current count value and three buttons to increment, decrement, or reset the count. We use the connect function to connect the Counter component with the Redux store. The mapStateToProps function maps the count property from the store state to the count prop of the Counter component. The mapDispatchToProps object maps the increment, decrement, and reset action creators to props of the Counter component.
Render the Component
Finally, we can render the Counter component inside our main App component.
import React from 'react';
import './App.css';
import { Provider } from 'react-redux';
import store from './store';
import Counter from './Counter';


function App() {
  return (
    <Provider store={store}>
      <div className="App">
        <Counter />
      </div>
    </Provider>
  );
}

export default App;So, we’ve successfully created a simple app and implemented the logics we’ve just learned.
Why Redux?
| Parameters | Hooks | State Management Libraries (e.g., Redux) | React Context API |
|---|---|---|---|
| Ease of use | Easy to use and learn | Can be difficult to learn and use | Easy to use and learn |
| Scalability | May become difficult to manage | Highly scalable | Can become difficult to manage |
| Performance | Can have performance issues with deep updates | Highly performant | Can have performance issues |
| Debugging | Easy to debug | Easy to debug | Difficult to debug in large apps |
| Global state management | Not suitable for global state management | Highly suitable for global state management | Suitable for small to medium sized apps |
| Middleware support | Not supported | Supported | Not supported |
| Time travel debugging | Not supported | Supported | Not supported |
Even though, Hooks are easy to use and learn, but not suitable for global state management. State Management Libraries like Redux are highly scalable and suitable for global state management, but can be difficult to learn and may have performance issues with deep updates. React Context API is easy to use and learn, but suitable for small to medium-sized apps and can become difficult to manage in large apps.
Best Practices for Using React Redux
Here are some best practices for using React Redux:
- Keep the store structure simple and shallow: The store should not be over-complicated and should only contain the required data. Keeping it simple will make it easier to manage and debug.
- Use selectors to retrieve data from the store: Using selectors makes it easier to get data from the store and helps to avoid writing unnecessary code.
- Use middleware only when required: Middleware can be useful, but it should only be used when necessary. Overuse of middleware can make the code more complicated and harder to maintain.
- Use action creators to encapsulate actions: Action creators are functions that return actions, and they make it easier to encapsulate and organize actions.
- Use immutable data structures: Using immutable data structures ensures that the state is not accidentally modified, which can lead to unexpected results.
- Use the Redux DevTools extension: The Redux DevTools extension can be used to debug the state of the store and helps to quickly identify any issues.
- Test the application: Writing tests for the application can help to ensure that everything is working as expected and can help to identify any issues.
By following these best practices, you can ensure that your React Redux application is well-organized, easy to maintain, and performs well.
Conclusion:
React Redux is a powerful state management library that helps to build complex applications with ease. It provides a centralized place for state management and makes it easier to maintain and debug the application. By using React Redux, developers can easily separate the state management from the presentation layer, which makes it easier to test, reuse, and maintain the codebase.
In this article, we have covered the core concepts of React Redux and how to integrate it with a React application. We have also built a sample application using React Redux and discussed best practices for using React Redux.
Overall, React Redux is a great choice for managing the state of your React applications. It provides a lot of features out of the box and has a huge community, which makes it easier to find solutions to common problems.
Happy Coding!


