User authentication forms the cornerstone of modern web applications, offering a secure gateway for users to access personalized content and features. Integrating robust authentication mechanisms into Angular applications, however, can be a demanding task, often requiring intricate coding and configuration.
Enter Firebase Authentication – a solution designed to simplify the authentication process. As an integral part of the Firebase suite, it offers developers an efficient way to implement user authentication in Angular projects. With its straightforward setup and reliability, Firebase Authentication eliminates the need to build authentication systems from scratch.
In this comprehensive guide, we’ll talk about “how to use Firebase authentication with angular”. Basically, we will unravel the process of seamlessly integrating Firebase Authentication into your Angular applications. Each step will be meticulously broken down, making even complex concepts easily digestible. Whether you’re a fledgling developer or a seasoned pro, by the end of this tutorial, you’ll have the skills to fortify your Angular app with Firebase Authentication.
So, let’s embark on this journey to enhance the security of your Angular applications, ensuring a smooth and user-friendly authentication experience for your users.
Prerequisites:
Before diving into the process of integrating Firebase Authentication into your Angular project, it’s essential to ensure you have the foundational elements in place. Familiarity with key components and tools will set the stage for a successful integration process without unnecessary roadblocks.
1. Angular Basics: Prior knowledge of Angular’s fundamental concepts, such as components, services, templates, and dependency injection, forms the bedrock of this integration. A solid grasp of these concepts will empower you to navigate through the authentication setup with ease.
2. Firebase Account: A Firebase account is essential for creating and managing projects. If you haven’t signed up yet, head over to the Firebase website and create an account to access its suite of services.
3. Angular CLI: The Angular Command Line Interface (CLI) simplifies project management tasks. Installing it globally on your machine will enable you to create, build, and deploy Angular projects effortlessly.
4. Node.js and npm: Node.js and npm (Node Package Manager) are fundamental tools for running Angular applications and managing packages. Make sure these are installed on your machine to facilitate a seamless development environment.
By ensuring these prerequisites are met, you’ll be well-equipped to embark on the journey of integrating Firebase Authentication into your Angular application. Let’s proceed with confidence and delve into the integration process!
Setting Up Firebase:
In this section, we’ll establish the groundwork for integrating Firebase Authentication into your Angular project. By configuring both your Firebase project and your Angular project, you’ll create a seamless connection that lays the groundwork for enhanced user authentication.
- Create Your Firebase Project:
To initiate the process, log in to your Firebase account. Once logged in, take the following steps to create a new Firebase project:- Click on the “Add Project” button to begin project creation.
- Name your project and configure preferred analytics settings.
- After project creation, you’ll be redirected to the project dashboard.
- Configure Your Angular Project:
With your Firebase project in place, it’s time to configure your Angular project for seamless integration:- If not already done, install the Angular Command Line Interface (CLI) globally using the command:
npm install -g @angular/cli. - Open your terminal or command prompt and navigate to the directory where you intend to create your Angular project.
- Create a new Angular project using the CLI command:
ng new your-project-name. - Navigate into the project directory using:
cd your-project-name.
- If not already done, install the Angular Command Line Interface (CLI) globally using the command:
- Establish the Firebase Connection:
With both projects prepared, proceed to link Firebase with your Angular project:- In your Firebase project dashboard, click on the “Project settings” gear icon.
- Under the “Your apps” section, locate and click on the “Web” icon ().
- Provide a nickname for your app to register it.
- Firebase will generate a configuration code – make sure to copy this code, as it will be crucial for the next steps.
By completing these steps, you’ve set the stage for the successful integration of Firebase Authentication into your Angular project. The next sections will delve into installing vital dependencies and configuring Firebase within your Angular application. Stay engaged as we progress toward a more secure user authentication experience!
Building the Framework: Installing Essential Dependencies
Now that the foundation is laid with the Firebase and Angular project setups, it’s time to equip your application with the necessary tools to seamlessly integrate Firebase Authentication. This section focuses on installing the pivotal dependencies that bridge the gap between Firebase and Angular, enabling a smooth authentication experience.
- Firebase SDK and AngularFire Integration:
The Firebase Software Development Kit (SDK) and AngularFire are the cornerstones of this integration. These dependencies provide Angular-specific features that facilitate interaction between your Angular application and Firebase services.
To incorporate the Firebase SDK and AngularFire into your project, follow these steps:- Open your terminal within your Angular project’s root directory.
- Execute the following command to install Firebase and AngularFire:
npm install firebase @angular/fire
- Configuration Blueprint:
With the dependencies in place, you’re now ready to configure Firebase within your Angular app. This configuration step establishes a link between your app and your Firebase project, ensuring seamless communication between the two.- Navigate to the
src/environmentsdirectory in your Angular project. - Locate the
environment.tsandenvironment.prod.tsfiles within this directory. - Open the relevant environment file (based on your current mode).
- Insert the Firebase configuration code you copied earlier into the
environmentobject:
- Navigate to the
   export const environment = {
     production: false,
     firebaseConfig: {
       apiKey: 'YOUR_API_KEY',
       authDomain: 'YOUR_AUTH_DOMAIN',
       projectId: 'YOUR_PROJECT_ID',
       storageBucket: 'YOUR_STORAGE_BUCKET',
       messagingSenderId: 'YOUR_MESSAGING_SENDER_ID',
       appId: 'YOUR_APP_ID'
     }
};Replace the placeholders with the actual values obtained from your Firebase project.
By successfully installing these dependencies, you’re paving the way for the forthcoming implementation of Firebase Authentication within your Angular application. The subsequent sections will guide you through the exhilarating process of integrating user authentication into your app. Stay with us as we continue this journey toward more secure and feature-rich authentication!
Firebase Configuration with angular/fire:
With the dependencies in place and Firebase connected to your Angular project, it’s time to configure Firebase for authentication. In this section, we’ll walk you through the steps to set up Firebase Authentication and ensure that your Angular app communicates effectively with Firebase services.
1. Import AngularFireModule and AngularFireAuthModule
Open the src/app/app.module.ts file in your Angular project. This is where you’ll configure AngularFire to work with Firebase Authentication.
- Import the required modules from
@angular/fire:
   import { BrowserModule } from '@angular/platform-browser';
   import { NgModule } from '@angular/core';
   import { AngularFireModule } from '@angular/fire';
   import { AngularFireAuthModule } from '@angular/fire/auth';
   import { environment } from '../environments/environment';

   // ... other imports

   @NgModule({
     declarations: [
       // ... components and directives
     ],
     imports: [
       BrowserModule,
       AngularFireModule.initializeApp(environment.firebaseConfig), // Initialize Firebase
       AngularFireAuthModule, // Enable Firebase Authentication
       // ... other modules
     ],
     bootstrap: [AppComponent]
   })
export class AppModule { }2. Update Component or Service
To access Firebase Authentication features in your components or services, import AngularFireAuth:
- In your component or service file, import
AngularFireAuth:
   import { AngularFireAuth } from '@angular/fire/auth';

// ... component or service code- Inject
AngularFireAuthin the constructor:
constructor(private auth: AngularFireAuth) { }3. Using Firebase Authentication
Now that Firebase is properly configured, you can start using Firebase Authentication methods in your Angular application. Common methods include:
signInWithEmailAndPassword(email, password): Authenticates users with email and password.createUserWithEmailAndPassword(email, password): Registers new users.signOut(): Signs out the currently authenticated user.
Remember, Firebase Authentication also provides methods for handling authentication state changes, password resets, and more. Check the official Firebase documentation for comprehensive details on available methods.
Implementing User Authentication
Now comes the exciting part – implementing user authentication using Firebase in your Angular application. In this section, we’ll guide you through creating user registration and login forms and using Firebase Authentication methods to handle user interactions.
1. Creating a User Registration Form
Let’s start by creating a user registration form using Angular Reactive Forms. This will allow users to sign up for your application.
- In your desired component template (
component-name.component.html), add the registration form:
   <form (ngSubmit)="register()" [formGroup]="registrationForm">
     <label>Email:</label>
     <input type="email" formControlName="email" />

     <label>Password:</label>
     <input type="password" formControlName="password" />

     <button type="submit">Register</button>
</form>- In the corresponding component (
component-name.component.ts), set up the Reactive Form and handle the registration process:
   import { Component, OnInit } from '@angular/core';
   import { FormBuilder, FormGroup, Validators } from '@angular/forms';
   import { AngularFireAuth } from '@angular/fire/auth';

   @Component({
     selector: 'app-registration',
     templateUrl: './registration.component.html',
     styleUrls: ['./registration.component.css']
   })
   export class RegistrationComponent implements OnInit {
     registrationForm: FormGroup;

     constructor(private fb: FormBuilder, private auth: AngularFireAuth) { }

     ngOnInit(): void {
       this.registrationForm = this.fb.group({
         email: ['', [Validators.required, Validators.email]],
         password: ['', [Validators.required, Validators.minLength(6)]]
       });
     }

     register() {
       const { email, password } = this.registrationForm.value;
       this.auth.createUserWithEmailAndPassword(email, password)
         .then(response => {
           // Handle successful registration
         })
         .catch(error => {
           // Handle registration error
         });
     }
}2. Creating User Login Form
Next, let’s create a user login form using Reactive Forms. This will enable users to log in to your application.
- In your desired component template (
component-name.component.html), add the login form:
   <form (ngSubmit)="login()" [formGroup]="loginForm">
     <label>Email:</label>
     <input type="email" formControlName="email" />

     <label>Password:</label>
     <input type="password" formControlName="password" />

     <button type="submit">Login</button>
</form>- In the corresponding component (
component-name.component.ts), set up the Reactive Form, and handle the login process:
   import { Component, OnInit } from '@angular/core';
   import { FormBuilder, FormGroup, Validators } from '@angular/forms';
   import { AngularFireAuth } from '@angular/fire/auth';

   @Component({
     selector: 'app-login',
     templateUrl: './login.component.html',
     styleUrls: ['./login.component.css']
   })
   export class LoginComponent implements OnInit {
     loginForm: FormGroup;

     constructor(private fb: FormBuilder, private auth: AngularFireAuth) { }

     ngOnInit(): void {
       this.loginForm = this.fb.group({
         email: ['', [Validators.required, Validators.email]],
         password: ['', Validators.required]
       });
     }

     login() {
       const { email, password } = this.loginForm.value;
       this.auth.signInWithEmailAndPassword(email, password)
         .then(response => {
           // Handle successful login
         })
         .catch(error => {
           // Handle login error
         });
     }
}By implementing these steps, you’ve successfully integrated user registration and login forms using Firebase Authentication in your Angular application.
User Authentication State Management
Managing user authentication states is a critical aspect of any application. In this section, we’ll explore how AngularFire helps you monitor user authentication changes in real-time, enabling you to provide a seamless user experience based on their login status.
1. Using authState Observable
AngularFire provides an authState observable that emits authentication state changes. You can use this observable to track whether a user is authenticated or not.
- In your component, inject
AngularFireAuth:
   import { Component, OnInit } from '@angular/core';
   import { AngularFireAuth } from '@angular/fire/auth';

   @Component({
     selector: 'app-user',
     templateUrl: './user.component.html',
     styleUrls: ['./user.component.css']
   })
   export class UserComponent implements OnInit {
     isAuthenticated: boolean = false;

     constructor(private auth: AngularFireAuth) { }

     ngOnInit(): void {
       this.auth.authState.subscribe(user => {
         this.isAuthenticated = !!user;
       });
     }
}- In your template, conditionally show content based on authentication status:
<div *ngIf="isAuthenticated"> <!-- Display content for authenticated users --> </div> <div *ngIf="!isAuthenticated"> <!-- Display content for non-authenticated users --> </div>2. Handling Authenticated Routes
With the authState observable, you can implement route guards to restrict access to certain routes based on authentication status.
- Create an
AuthGuardservice:
import { Injectable } from '@angular/core'; import { CanActivate, Router } from '@angular/router'; import { AngularFireAuth } from '@angular/fire/auth'; import { Observable } from 'rxjs'; @Injectable({ providedIn: 'root' }) export class AuthGuard implements CanActivate { constructor(private auth: AngularFireAuth, private router: Router) {} canActivate(): Observable<boolean> { return this.auth.authState.map(user => { if (!user) { this.router.navigate(['/login']); return false; } return true; }); } }- Apply the
AuthGuardto your protected routes in the route configuration:
import { NgModule } from '@angular/core'; import { RouterModule, Routes } from '@angular/router'; import { AuthGuard } from './auth.guard'; import { HomeComponent } from './home/home.component'; import { DashboardComponent } from './dashboard/dashboard.component'; const routes: Routes = [ { path: '', component: HomeComponent }, { path: 'dashboard', component: DashboardComponent, canActivate: [AuthGuard] } ]; @NgModule({ imports: [RouterModule.forRoot(routes)], exports: [RouterModule] }) export class AppRoutingModule { }By incorporating AngularFire’s authState observable and implementing route guards, you’ve established a robust system for managing user authentication states and securing your application’s routes.
Securing Angular Routes
Securing routes is a fundamental practice to control access to different parts of your application based on user authentication. In this section, we’ll delve into how you can use Angular route guards in combination with AngularFire’s authentication module to secure your Angular routes effectively.
1. Create an Auth Guard
An authentication guard is a service that implements the CanActivate interface to determine whether a user can access a specific route.
- Create a new file for your Auth Guard, for example,
auth.guard.ts:
import { Injectable } from '@angular/core'; import { CanActivate, Router } from '@angular/router'; import { AngularFireAuth } from '@angular/fire/auth'; import { Observable } from 'rxjs'; @Injectable({ providedIn: 'root' }) export class AuthGuard implements CanActivate { constructor(private auth: AngularFireAuth, private router: Router) {} canActivate(): Observable<boolean> { return this.auth.authState.map(user => { if (!user) { this.router.navigate(['/login']); return false; } return true; }); } }2. Apply the Auth Guard
Now that you have your Auth Guard, you can apply it to specific routes in your Angular application’s routing configuration.
- Open your
app-routing.module.tsor a similar routing configuration file. - Import the Auth Guard:
import { AuthGuard } from './auth.guard';- Apply the Auth Guard to the routes you want to secure by adding the
canActivateproperty:
const routes: Routes = [ { path: '', component: HomeComponent }, { path: 'dashboard', component: DashboardComponent, canActivate: [AuthGuard] } ];3. Protect Routes with Auth Guard
By adding the Auth Guard to a route’s canActivate property, you’re ensuring that only authenticated users can access that route. If a user is not authenticated, they will be redirected to a login page or a designated route of your choice.
With this setup, you’ve effectively secured your Angular routes using Firebase authentication and Angular route guards. Users attempting to access protected routes without being authenticated will be seamlessly redirected, ensuring the security and integrity of your application.
Displaying User Information
Displaying personalized user information can enhance the user experience and provide a sense of customization. In this section, we’ll explore how to fetch and display user-specific data using the Firebase User object in your Angular templates.
1. Fetching User Data
- Import
AngularFireAuthin your component:
import { AngularFireAuth } from '@angular/fire/auth';- Inject
AngularFireAuthin your component’s constructor:
constructor(private auth: AngularFireAuth) { }- In your component, you can access the currently authenticated user’s data:
user = this.auth.authState;2. Displaying User Data in Templates
Now that you have access to the user’s data, you can display it in your templates:
- In your component’s template:
<div *ngIf="user | async as authUser; else showLoading"> <h2>Welcome, {{ authUser.displayName || 'User' }}!</h2> <p>Email: {{ authUser.email }}</p> </div> <ng-template #showLoading>Loading user data...</ng-template>3. Updating User Data
You can also allow users to update their profile data using AngularFire:
- Import
AngularFireAuthandauthfrom@angular/fire/auth:
import { AngularFireAuth } from '@angular/fire/auth'; import { auth } from 'firebase/app';- Inside your component, implement an update function:
updateProfile(newName: string) { const user = this.auth.currentUser; if (user) { user.updateProfile({ displayName: newName }) .then(() => { // Update successful }) .catch(error => { // Handle error }); } }- Use this function in your template:
<input [(ngModel)]="newDisplayName" placeholder="New Display Name" /> <button (click)="updateProfile(newDisplayName)">Update Profile</button>By leveraging the Firebase User object and AngularFire, you can effortlessly fetch and display user-specific information in your Angular templates. This personalized touch enhances the user experience and contributes to building a user-friendly application.
Handling Authentication Errors
Dealing with authentication errors gracefully is crucial for maintaining a positive user experience in your Angular application. In this section, we’ll explore common authentication errors that users might encounter and how to handle them effectively using Firebase and Angular.
1. Handling Errors During Authentication
When users encounter authentication errors, such as invalid credentials, it’s essential to provide clear feedback and guidance.
- In your authentication component, create a variable to hold error messages:
errorMessage: string | null = null;- Update your authentication methods to catch and display errors:
login() { // ... this.auth.signInWithEmailAndPassword(email, password) .then(response => { // Successful login }) .catch(error => { this.errorMessage = error.message; }); }- Display the error message in your template:
<div *ngIf="errorMessage" class="error-message"> {{ errorMessage }} </div>2. Handling Logout Errors
Logout errors can also occur due to various reasons. Provide users with feedback when a logout error occurs.
- Implement a logout function in your component:
logout() { this.auth.signOut() .then(() => { // Successful logout }) .catch(error => { this.errorMessage = error.message; }); }- Display the error message in your template:
<button (click)="logout()">Logout</button> <div *ngIf="errorMessage" class="error-message"> {{ errorMessage }} </div>By capturing and displaying error messages, you empower users with information and reduce frustration. Handling authentication errors with care contributes to a smoother user experience and fosters trust in your application.
Social Auth Integration
In today’s digital landscape, providing users with multiple authentication options enhances the accessibility and convenience of your application. Social media authentication allows users to sign in using their existing accounts on platforms like Google, Facebook, and more. In this section, we’ll explore how to seamlessly integrate social media authentication into your Angular application using Firebase Authentication.
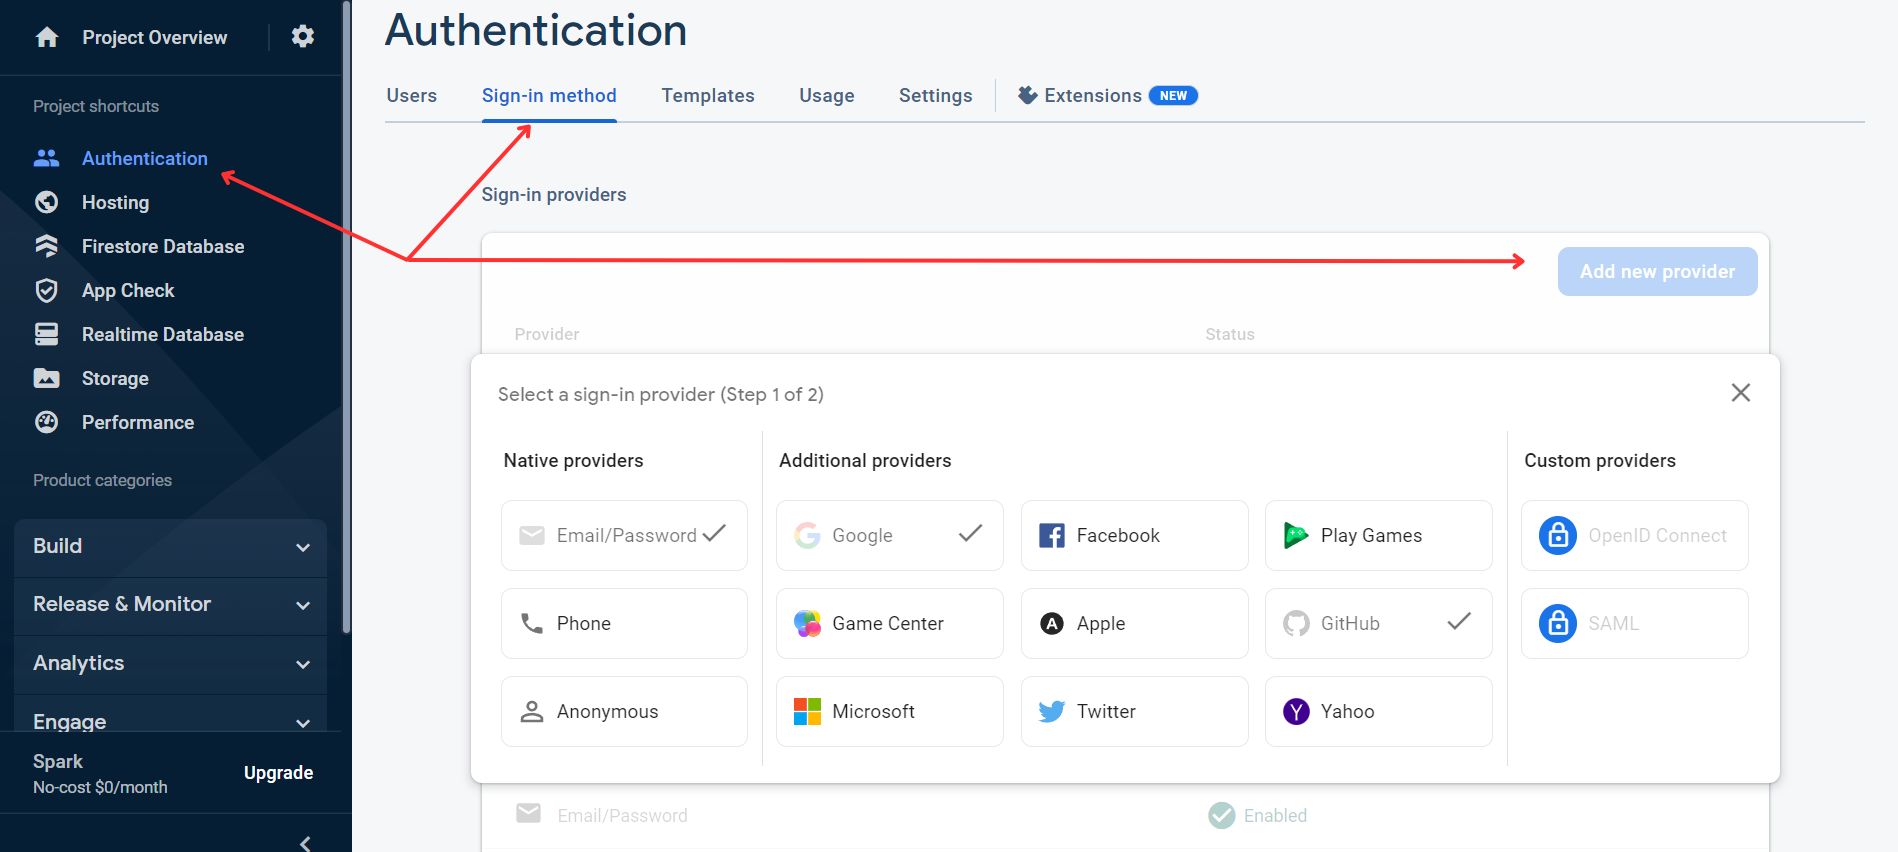
- Enabling Social Media Providers in Firebase:
To begin, you need to enable the desired social media authentication providers within your Firebase project:- Go to your Firebase project console.
- Navigate to the “Authentication” section.
- Under the “Sign-in method” tab, choose the social media providers you want to enable (e.g., Google, Facebook).
- Follow the provider-specific setup instructions to configure the integration.
- Implementing Social Media Authentication in Angular:
Once the providers are configured in Firebase, integrating them into your Angular application is straightforward using AngularFire:- Import the necessary AngularFire modules into your Angular component or service.
- Utilize the
signInWithPopupmethod for the desired social media provider:
import { AngularFireAuth } from '@angular/fire/auth'; import { auth } from 'firebase/app'; // ... constructor(private auth: AngularFireAuth) {} signInWithGoogle() { this.auth.signInWithPopup(new auth.GoogleAuthProvider()) .then(response => { // User signed in using Google }) .catch(error => { // Handle authentication error }); }- Providing User-Friendly Options:
By incorporating social media authentication, you empower users to choose their preferred sign-in method, enhancing their experience within your application. The combination of Firebase Authentication and Angular’s flexibility makes implementing social media authentication a seamless process.
Logging Out Users
Enabling users to log out securely is a crucial aspect of user authentication in your Angular application. In this section, we’ll explore how to implement a logout functionality using Firebase Authentication and provide users with a smooth transition out of the application.
1. Implementing Logout Functionality
- In your component, import
AngularFireAuth:
import { AngularFireAuth } from '@angular/fire/auth';- Inject
AngularFireAuthin your component’s constructor:
constructor(private auth: AngularFireAuth) { }- Implement a logout function:
logout() { this.auth.signOut() .then(() => { // Successful logout }) .catch(error => { // Handle logout error }); }2. Displaying Logout Button
In your template, you can now display a logout button to users:
<button (click)="logout()">Logout</button>By adding this button, you allow users to securely log out of the application, ensuring their sensitive data remains protected.
3. Redirect After Logout
To enhance the user experience, you can automatically redirect users to a specific page after they log out:
- In your component, import
Routerfrom@angular/router:
import { Router } from '@angular/router';- Inject
Routerin your component’s constructor:
constructor(private auth: AngularFireAuth, private router: Router) { }- Modify the
logoutfunction to redirect after successful logout:
logout() { this.auth.signOut() .then(() => { this.router.navigate(['/login']); }) .catch(error => { // Handle logout error }); }With the logout functionality in place, users can now log out securely and be redirected to the desired page, completing their interaction with your application.
Conclusion
In traversing the intricacies of integrating Firebase Authentication into your Angular project, you’ve embarked on a journey that empowers your application with enhanced security and user experience. By following this comprehensive guide, you’ve gained a robust understanding of how to seamlessly implement user registration, login, and management functionalities.
From establishing Firebase configurations to utilizing AngularFire to bridge the gap between Angular and Firebase, you’ve navigated a path that simplifies complex authentication processes. Armed with this knowledge, you’re well-equipped to create applications that not only protect user data but also provide a seamless, user-friendly authentication experience.
As you bid adieu to this guide, remember that Firebase Authentication is a powerful tool that opens doors to myriad possibilities for your Angular applications. Whether you’re building personal projects or professional-grade applications, the skills you’ve acquired here will undoubtedly set you on a trajectory toward more secure, reliable, and user-centric web development.
So, take this newfound knowledge, explore the realm of Firebase’s capabilities, and continue to enhance your Angular applications with advanced features and robust security. Keep coding, keep innovating, and keep building remarkable digital experiences!
FAQs:
What is Firebase Authentication?
Firebase Authentication is a service provided by Firebase that simplifies the process of adding user authentication to your web or mobile applications. It provides secure methods for user registration, login, and management.
Is Firebase Authentication free to use?
Yes, Firebase Authentication offers a free tier with a generous set of features, including authentication using email/password, Google, Facebook, and more. However, keep in mind that there might be charges associated with some advanced features or high usage.
Can I use Firebase Authentication with Angular?
Absolutely! Firebase Authentication can seamlessly integrate with Angular applications. AngularFire, an official library, helps bridge the gap between Firebase and Angular, making the integration process smoother.
What is AngularFire, and why should I use it?
AngularFire is the official library that brings Firebase and Angular together. It provides Angular-specific features and syntax for interacting with Firebase services, including Authentication. Using AngularFire can significantly simplify your code and enhance your development experience.
How can I secure my Angular routes based on user authentication?
You can use Angular route guards in combination with Firebase Authentication to secure your routes. Implement an Auth Guard that checks the user’s authentication status before allowing access to certain routes.
Can I implement social media authentication with Firebase in Angular?
Yes, Firebase Authentication offers built-in support for social media authentication providers. You can integrate Google, Facebook, Twitter, GitHub, and more using Firebase Auth. AngularFire makes this integration straightforward.
How do I handle authentication errors gracefully?
When using Firebase Authentication, errors can occur during login, registration, or other operations. You can catch these errors and display user-friendly error messages to guide users through the process.
Can users update their profile information using Firebase Authentication?
Yes, Firebase provides methods to update user profiles, including display names and profile pictures. You can implement functionality in your Angular app to allow users to modify their profile data.
Happy coding! (^///^)


