Push notifications have become an integral part of modern mobile applications, allowing developers to engage users with timely updates and notifications. In this tutorial, we will explore how to implement push notifications in your mobile app using Firebase Cloud Messaging (FCM). Firebase Cloud Messaging is a powerful and reliable push notification service provided by Google, offering seamless integration for both Android and iOS platforms.
By leveraging the capabilities of Firebase Cloud Messaging, you can easily send notifications to your app users, keeping them informed and engaged with your app’s latest updates, promotions, or personalized content. Whether you are a beginner, intermediate, or advanced developer, this tutorial will guide you through the process of implementing push notifications using React Native, making it accessible to developers with varying levels of experience.
Throughout this tutorial, we will cover the prerequisites for the project, including setting up a React Native app, integrating Firebase Cloud Messaging, and implementing push notification functionalities. We will dive into the configuration steps required for both Android and iOS platforms, and demonstrate how to handle push notification payloads, customize notifications, and optimize their delivery.
So, let’s dive in and learn how to enhance your mobile app with the power of push notifications using Firebase Cloud Messaging!
What is Firebase Cloud Messaging?
Firebase Cloud Messaging (FCM) is a powerful and reliable mobile messaging platform provided by Firebase, a comprehensive app development platform offered by Google. FCM enables app developers to send push notifications to their users’ devices, keeping them engaged and informed.
FCM operates on a robust architecture that ensures efficient and scalable message delivery. Let’s explore the FCM architecture in brief:
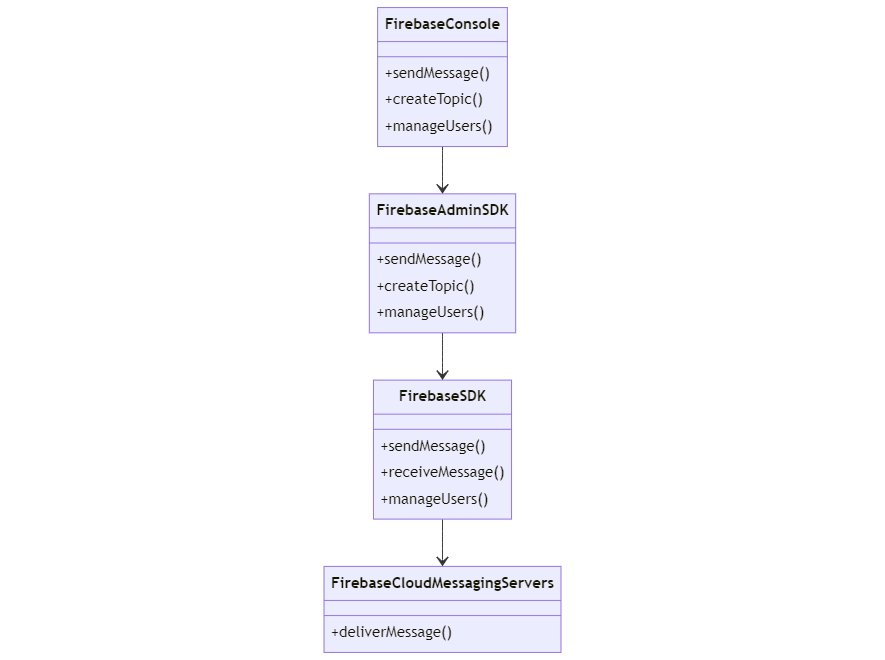
- App Server: The app server is responsible for sending push notifications to FCM. It can be a backend server or a cloud function that interacts with FCM’s APIs. The app server authenticates with FCM using the server key provided by Firebase.
- Firebase Cloud Messaging: FCM acts as a reliable intermediary between the app server and the target devices. It receives push notification requests from the app server, processes them, and delivers them to the intended devices. FCM handles device registration tokens, message queuing, and delivery optimization.
- Device: The target devices include Android and iOS devices that have the client-side SDK integrated. These devices register with FCM to obtain a unique device registration token. FCM uses these tokens to identify and deliver push notifications to the appropriate devices.
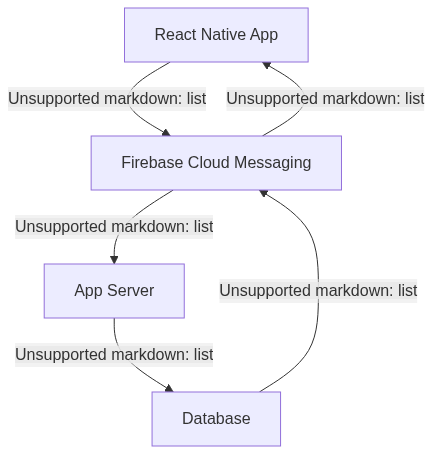
The communication flow in the FCM architecture is as follows:
- The app server sends a push notification request to FCM, including the target device registration tokens and the payload of the notification.
- FCM receives the request and processes it, ensuring the validity of the tokens and managing any necessary message queuing.
- FCM delivers the push notifications to the target devices using platform-specific push notification services (such as Apple Push Notification service for iOS and Firebase Cloud Messaging service for Android).
- The devices receive the push notifications and handle them according to the app’s logic, displaying the notification to the user or performing custom actions.
This architecture allows app developers to leverage FCM’s robust infrastructure for delivering push notifications reliably and at scale. It abstracts the complexities of handling device tokens, message delivery, and platform-specific push notification services, providing a seamless and streamlined experience for developers.
By integrating Firebase Cloud Messaging into their apps, developers can leverage the power of push notifications to engage users, provide timely updates, and enhance the overall user experience.
Prerequisites
Before we begin implementing push notifications in your mobile app with Firebase Cloud Messaging, there are a few prerequisites you need to have in place:
- React Native Development Environment: Ensure that you have a basic understanding of React Native and have set up a development environment on your machine. This includes having Node.js installed, along with
npm(Node Package Manager). - React Native Project: Create a new React Native project or use an existing one where you want to implement push notifications. If you need guidance on setting up a React Native project, refer to the official React Native documentation.
- Firebase Account: Sign up for a free Firebase account at firebase.google.com if you haven’t already. Firebase provides a comprehensive suite of tools and services, including Firebase Cloud Messaging, that enable efficient app development and management.
- Firebase Project: Create a new Firebase project within the Firebase console. This project will be used to configure and manage your app’s push notifications using Firebase Cloud Messaging.
- Firebase CLI: Install the Firebase Command Line Interface (CLI) globally on your machine using npm. The Firebase CLI allows you to interact with your Firebase project from the command line and perform various tasks, such as deploying functions and managing resources.
- React Native Firebase: Install the React Native Firebase library, which provides a JavaScript API for interacting with Firebase services. This library simplifies the integration process and enables seamless communication between your React Native app and Firebase Cloud Messaging.
Setting up Firebase Cloud Messaging:
To enable Firebase Cloud Messaging (FCM) for your React Native app, follow these steps:
- Go to the Firebase Console: Visit the Firebase Console and sign in to your account.
- Create or Select a Project: If you haven’t created a Firebase project yet, click on the “Add project” button and provide a name for your project. Otherwise, select your existing project from the project list.
- Enable Firebase Cloud Messaging: In the left sidebar, click on “Cloud Messaging” under the “Develop” section. On the Cloud Messaging page, click on the “Get Started” button to enable Firebase Cloud Messaging for your project.
- Configure Platforms: To support both Android and iOS platforms, configure Firebase Cloud Messaging for each platform separately.
- Android Configuration:
- Click on the “Android” tab on the Cloud Messaging page.
- Provide your Android app’s package name. This can be found in the
android/app/build.gradlefile of your React Native project. - Optionally, you can provide the SHA-1 certificate fingerprint for additional security features.
- Click on “Register App” to register your Android app with Firebase.
- Download the
google-services.jsonfile and place it in the appropriate location in your React Native project. This file contains the necessary configuration for Firebase Cloud Messaging in your Android app.
- iOS Configuration:
- Click on the “iOS” tab on the Cloud Messaging page.
- Provide your iOS app’s bundle ID. This can be found in the
Info.plistfile in theiosdirectory of your React Native project. - Optionally, you can upload your iOS app’s APNs authentication key or certificate.
- Click on “Register App” to register your iOS app with Firebase.
- Download the
GoogleService-Info.plistfile and place it in the appropriate location in your React Native project. This file contains the necessary configuration for Firebase Cloud Messaging in your iOS app.
- Android Configuration:
- Install Required Dependencies: Install the necessary dependencies for Firebase Cloud Messaging integration in your React Native app. You can use the
react-native-firebasepackage to simplify the integration process. - Configure React Native Firebase: Follow the instructions provided by the
react-native-firebasepackage to configure Firebase in your React Native project. This includes adding necessary configuration files and initializing Firebase modules.
With Firebase Cloud Messaging set up for your project, you are now ready to create your first campaign and send notifications to your app users.
Creating Your First Campaign in Firebase Cloud Messaging:
Once you have Firebase Cloud Messaging set up for your project, you can create your first campaign to send notifications to your app users. Follow these steps:
- Go to the Firebase Console: Visit the Firebase Console and sign in to your account.
- Access the Messaging Tab: Click on the “Messaging” tab in the left sidebar to access the Firebase Cloud Messaging section.
- Create Your First Campaign: If this is your first campaign, click on “Create your first campaign” to get started.
- Select Firebase Notification Messages: Choose “Firebase Notification messages” as the campaign type, and click on “Create” to proceed.
- Provide Campaign Details: In the Campaign details section, enter the necessary information such as title, body, and an optional image or action for the message.
- Define the Audience: In the Audience section, select the users who will receive your message based on segments, topics, or custom audiences.
- Schedule Your Message: Specify when you want to send your message immediately or schedule it for a later time.
- Publish Your Message: Click on the “Publish” button to send your message to the selected audience.
Integrate Firebase into the React Native Project
To integrate Firebase Cloud Messaging into your React Native project, follow these steps:
- Install Dependencies: Open a terminal or command prompt and navigate to your React Native project’s root directory. Run the following command to install the necessary dependencies:
npm install @react-native-firebase/app @react-native-firebase/messaging - Android Configuration:
- In your React Native project, navigate to the
androiddirectory and open thebuild.gradlefile. - Add the following classpath to the
dependenciessection of thebuild.gradlefile:classpath 'com.google.gms:google-services:4.3.8' - Save the file and go back to the project’s root directory.
- Open the
android/app/build.gradlefile and add the following plugin at the bottom:apply plugin: 'com.google.gms.google-services' - Save the file and run the following command in the terminal to sync the changes:
npx react-native run-android
- In your React Native project, navigate to the
- iOS Configuration:
- Open your React Native project in Xcode.
- Locate the
iosdirectory and open the<ProjectName>.xcworkspacefile. - In Xcode, navigate to the project’s settings by selecting the project file in the file explorer.
- Select the target corresponding to your app and go to the “Signing & Capabilities” tab.
- Enable the “Push Notifications” capability.
- Save the changes and close Xcode.
- Initialize Firebase: In your React Native project’s entry file (usually
index.jsorApp.js), import the necessary Firebase modules and initialize Firebase using your Firebase project’s configuration files. Here’s an example:
import { AppRegistry } from 'react-native';
import messaging from '@react-native-firebase/messaging';
import { name as appName } from './app.json';
import App from './App';

// Initialize Firebase
const firebaseConfig = {
  // Your Firebase config object here
};
messaging().setBackgroundMessageHandler(async remoteMessage => {
  // Handle background messages
});

// Register the app
AppRegistry.registerComponent(appName, () => App);- Request Permissions: To receive push notifications, you need to request permissions from the user. Add the following code to the relevant part of your React Native app:
import messaging from '@react-native-firebase/messaging';

// Request permission
const requestPermission = async () => {
  try {
    await messaging().requestPermission();
    // Permission granted
  } catch (error) {
    // Permission denied
  }
};

// Call the function to request permission
requestPermission();
With these steps, we have successfully integrated Firebase Cloud Messaging into our React Native project.
Implementing Push Notifications in React Native
Now that you have integrated Firebase Cloud Messaging into your React Native project, it’s time to implement push notifications functionality. In this section, we will cover the necessary steps to handle device registration tokens, send and receive push notifications, and handle notification interaction in your React Native app.
Handling Device Registration Tokens
To send push notifications to specific devices, you need to handle device registration tokens. These tokens uniquely identify each device and allow Firebase Cloud Messaging to deliver notifications. Follow these steps to retrieve and handle device registration tokens:
- Retrieve the Device Token: In your React Native app, use the following code to retrieve the device registration token:
   import messaging from '@react-native-firebase/messaging';

   // Get the device token
   const getDeviceToken = async () => {
     try {
       const token = await messaging().getToken();
       // Use the device token
     } catch (error) {
       // Handle error
     }
   };

   // Call the function to get the device token
getDeviceToken();- Handling Token Refresh: The device registration token can change under certain circumstances, such as when the app is reinstalled or the user logs out. To handle token refresh, use the following code:
   import messaging from '@react-native-firebase/messaging';

   // Listen for token refresh
   messaging().onTokenRefresh(token => {
     // Use the refreshed token
   });
Sending Push Notifications
Now that you can retrieve the device registration token, let’s explore how to send push notifications to specific devices using Firebase Cloud Messaging. Follow these steps to send push notifications from the Firebase console:
- Go to the Firebase Console: Visit the Firebase Console and sign in to your account.
- Access the Messaging Tab: Click on the “Messaging” tab in the left sidebar to access the Firebase Cloud Messaging section.
- Create a New Campaign: Click on “New Campaign” and select “Firebase Notification messages.”
- Compose Your Notification: Enter the notification details, including title, body, and optional image or action.
- Select the Audience: Choose the target audience for your push notification based on segments, topics, or custom audiences.
- Schedule or Send Immediately: Specify the delivery time for your push notification, either by scheduling it for a later time or sending it immediately.
- Send Your Notification: Click on “Publish” to send your push notification to the selected audience.
Receiving Push Notifications
To handle incoming push notifications in your React Native app, use the following code:
- Foreground Notifications: To handle push notifications received while the app is in the foreground, add the following code:
   import messaging from '@react-native-firebase/messaging';

   // Listen for foreground notifications
   messaging().onMessage(remoteMessage => {
     // Handle foreground notification
});- Background Notifications: To handle push notifications received while the app is in the background, add the following code:
   import messaging from '@react-native-firebase/messaging';

   // Listen for background notifications
   messaging().setBackgroundMessageHandler(async remoteMessage => {
     // Handle background notification
   });
Handling Notification Interaction
You can add custom actions and handle user interaction with push notifications. Here’s an example of handling notification actions in your React Native app:
import messaging from '@react-native-firebase/messaging';

// Listen for notification interaction
messaging().onNotificationOpenedApp(remoteMessage => {
  // Handle notification interaction
});
By following these steps, you can implement push notifications in your React Native app using Firebase Cloud Messaging. Your app will now be able to receive and handle push notifications, enhancing the user experience and engagement.
Testing Push Notifications
After implementing push notifications in your React Native app with Firebase Cloud Messaging, it’s crucial to thoroughly test the functionality to ensure proper delivery and handling of notifications. In this section, we will cover the steps to test push notifications on both Android and iOS platforms.
Testing on Android
To test push notifications on Android, follow these steps:
- Ensure Device Registration: Make sure your test device is registered with Firebase Cloud Messaging by retrieving the device registration token as explained in the previous section.
- Send Test Notifications: Go to the Firebase Console and navigate to the “Messaging” tab. Create a new campaign and select the desired target audience. Compose a test notification and send it.
- Foreground Notification: If your app is in the foreground, you should see a notification displayed in the system tray. Handle the notification by implementing the code mentioned earlier in the “Receiving Push Notifications” subsection.
- Background Notification: If your app is in the background, you should receive a notification in the system tray. Tapping on the notification should open your app and trigger the code mentioned earlier in the “Receiving Push Notifications” subsection.
Testing on iOS
To test push notifications on iOS, follow these steps:
- Ensure Device Registration: Make sure your test device is registered with Firebase Cloud Messaging by retrieving the device registration token as explained in the previous section.
- Send Test Notifications: Go to the Firebase Console and navigate to the “Messaging” tab. Create a new campaign and select the desired target audience. Compose a test notification and send it.
- Foreground Notification: If your app is in the foreground, you should receive a foreground notification as a banner or an alert. Handle the notification by implementing the code mentioned earlier in the “Receiving Push Notifications” subsection.
- Background Notification: If your app is in the background, you should receive a background notification as a system tray notification. Tapping on the notification should open your app and trigger the code mentioned earlier in the “Receiving Push Notifications” subsection.
Additional Testing Considerations
When testing push notifications, consider the following:
- Payload Handling: Test the handling of notification payloads in your app, including extracting data and performing appropriate actions based on the payload content.
- Error Handling: Test the handling of errors related to push notifications, such as network issues or incorrect device registration tokens.
- Notification Interaction: Test the interaction with notifications, including custom actions and deep linking functionality.
By thoroughly testing push notifications on both Android and iOS devices, you can ensure that your app delivers notifications effectively and provides a seamless user experience.
You can find this project on Giithub.
Advanced Features and Customizations
Firebase Cloud Messaging offers several advanced features and customizations that allow you to enhance your push notification functionality in your React Native app. In this section, we will explore some of these features and how you can leverage them to provide a more personalized and engaging user experience.
Handling Notification Payloads
When receiving a push notification, the payload may contain additional data that you can extract and use within your app. Firebase Cloud Messaging allows you to include custom key-value pairs in your notification payload. To handle notification payloads in your React Native app, follow these steps:
- Foreground Payload Handling: When your app is in the foreground, you can handle the notification payload within the
onMessagecallback:
   import messaging from '@react-native-firebase/messaging';

   messaging().onMessage(remoteMessage => {
     // Extract and handle the payload data
     const { data } = remoteMessage;
     // Handle the payload data accordingly
});- Background Payload Handling: When your app is in the background, you can extract the notification payload from the
remoteMessageobject passed to thesetBackgroundMessageHandlercallback:
   import messaging from '@react-native-firebase/messaging';

   messaging().setBackgroundMessageHandler(async remoteMessage => {
     // Extract and handle the payload data
     const { data } = remoteMessage;
     // Handle the payload data accordingly
   });
Adding Custom Actions and Deep Linking
Firebase Cloud Messaging allows you to add custom actions to your push notifications. These actions can be triggered when a user interacts with a notification, allowing you to provide specific functionality within your app. To implement custom actions and deep linking, follow these steps:
- Add Action Buttons: When composing your notification in the Firebase Console, you can add action buttons. These buttons can have custom labels and icons, and you can define the action to be performed when a button is tapped.
- Handle Notification Interaction: In your React Native app, you can handle notification interaction by implementing the
onNotificationOpenedAppcallback:
   import messaging from '@react-native-firebase/messaging';

   messaging().onNotificationOpenedApp(remoteMessage => {
     // Handle the notification interaction
     // You can access the action and other data from remoteMessage
});- Deep Linking: To deep link to a specific screen or functionality within your app, you can include the necessary deep link URL in the notification payload. Extract the deep link URL from the payload and navigate the user to the appropriate screen.
Handling Notification Interaction and User Engagement
To provide a seamless and engaging user experience with push notifications, consider the following strategies:
- Personalization: Leverage user data and preferences to send targeted and personalized notifications. Segment your user base and send notifications that are relevant to specific user groups.
- A/B Testing: Experiment with different notification styles, content, and timings to optimize user engagement. Utilize A/B testing to analyze the effectiveness of different notification strategies and iterate accordingly.
- Notification Analytics: Use Firebase Analytics to track user interactions with push notifications. Gain insights into user behavior and tailor your notification strategies based on the collected data.
By implementing advanced features and customizations in your push notifications, you can provide a more personalized and interactive experience for your app users, leading to increased engagement and retention.
Conclusion
In this tutorial, we learned how to implement push notifications in a React Native app using Firebase Cloud Messaging (FCM). We covered the steps to set up FCM, integrate it into our React Native project, and implement push notifications. We also explored advanced features and customizations offered by FCM, such as handling notification payloads, adding custom actions and deep linking, and considering user engagement strategies.
By following the steps in this tutorial, you can implement push notifications in your React Native app and enhance the user experience. Remember to leverage personalization, A/B testing, and analytics to optimize your notification strategies and meet your users’ needs effectively.