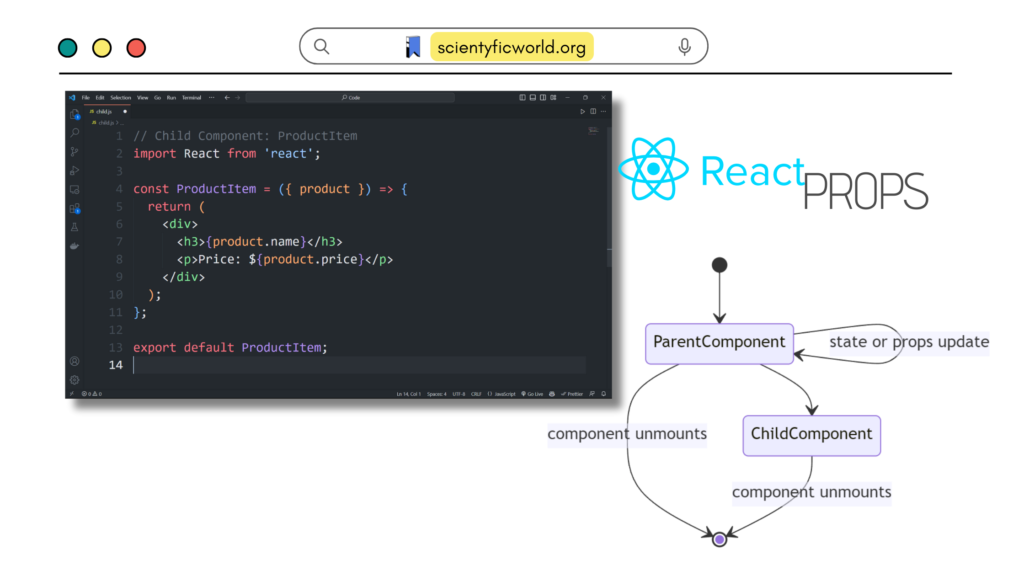
React.js is a widely used JavaScript library for building modern and interactive user interfaces. As a developer or aspiring developer, understanding its core concepts is crucial for developing efficient and maintainable applications. One such essential concept in React is “Props” or properties.
In this comprehensive guide, we will delve into React Props and their significance in the development process. Props serve as a means of communication between different components, allowing data to be passed from parent components to their child components.
Throughout this blog, we will explore the purpose of Props and how they enable the creation of reusable and dynamic components. We will provide clear explanations and practical examples to help you grasp the concepts effortlessly.
Understanding React Props
In React.js, “Props” stands for properties, and they play a vital role in how components communicate and share data. Props are an essential concept to understand because they enable us to build reusable and modular components, making React applications more manageable and scalable.
What are Props?
Props are a mechanism for passing data from a parent component to its child components. When we create a React component, we can assign it various attributes, which we refer to as Props. These attributes hold data that influences the behavior and appearance of the component.
The Purpose of Props
Props (properties) play a fundamental role in React.js by enabling seamless communication and data sharing between components. Understanding the purpose of Props is essential as it unlocks the potential to create flexible, reusable, and dynamic components in React applications.
- Enabling Component Customization:
One of the primary purposes of Props is to allow us to customize the behavior and appearance of components without altering their internal logic. By passing data through Props, we can configure components based on various use cases or requirements. This customization capability is especially crucial when building component libraries or large-scale applications with multiple instances of the same component, each needing different configurations. - Encouraging Reusability and Modularity:
React is renowned for promoting a modular and reusable approach to building user interfaces. Props facilitate this by enabling the creation of components that can be easily integrated into different parts of the application. When we design components with clear, well-defined Props, they become self-contained units that can be composed together to form complex UIs. This reusability aspect not only saves development time but also improves code maintainability and readability. - Separation of Concerns:
The concept of Props aligns with React’s philosophy of separation of concerns. Components should focus on specific tasks and have well-defined responsibilities. Props allow us to pass relevant data from parent components to their child components, ensuring that each component has only the information it needs to function correctly. This decoupling of data and behavior promotes clean code architecture and enhances the overall design of the application. - Stateless and Predictable Components:
In React, components are classified as either stateless functional components or class components with state. Stateless functional components rely solely on Props to display content and handle user interactions. By keeping components stateless and minimizing internal state usage, we achieve predictability and improve the performance of our application. This predictability is vital when debugging and maintaining the codebase, as we can trace data flow through Props more effectively. - Unidirectional Data Flow:
React follows a unidirectional data flow, meaning data flows from parent components to their children in a top-down manner. Props are a critical part of this data flow pattern, ensuring a clear direction for data transfer and making the application’s behavior more deterministic. Since Props are immutable, child components cannot modify them directly, preventing unintended side effects and maintaining data integrity throughout the application. - Improving Collaboration Among Team Members:
In team-based development, well-defined Props in component APIs serve as a contract between different team members. When a component exposes clear and comprehensive Props, it becomes easier for other developers to understand its intended use and integrate it into various parts of the application. This promotes collaboration and reduces conflicts when different parts of the application need to interact with each other.
How do Props Work?
When a parent component renders its child components, it can pass values to them using Props. The child components then receive these values as read-only properties, which they can use to display content, make decisions, or trigger specific actions. They serve as a unidirectional mechanism for passing data from parent components to their child components. Understanding how Props work is fundamental to effectively designing and building React applications.
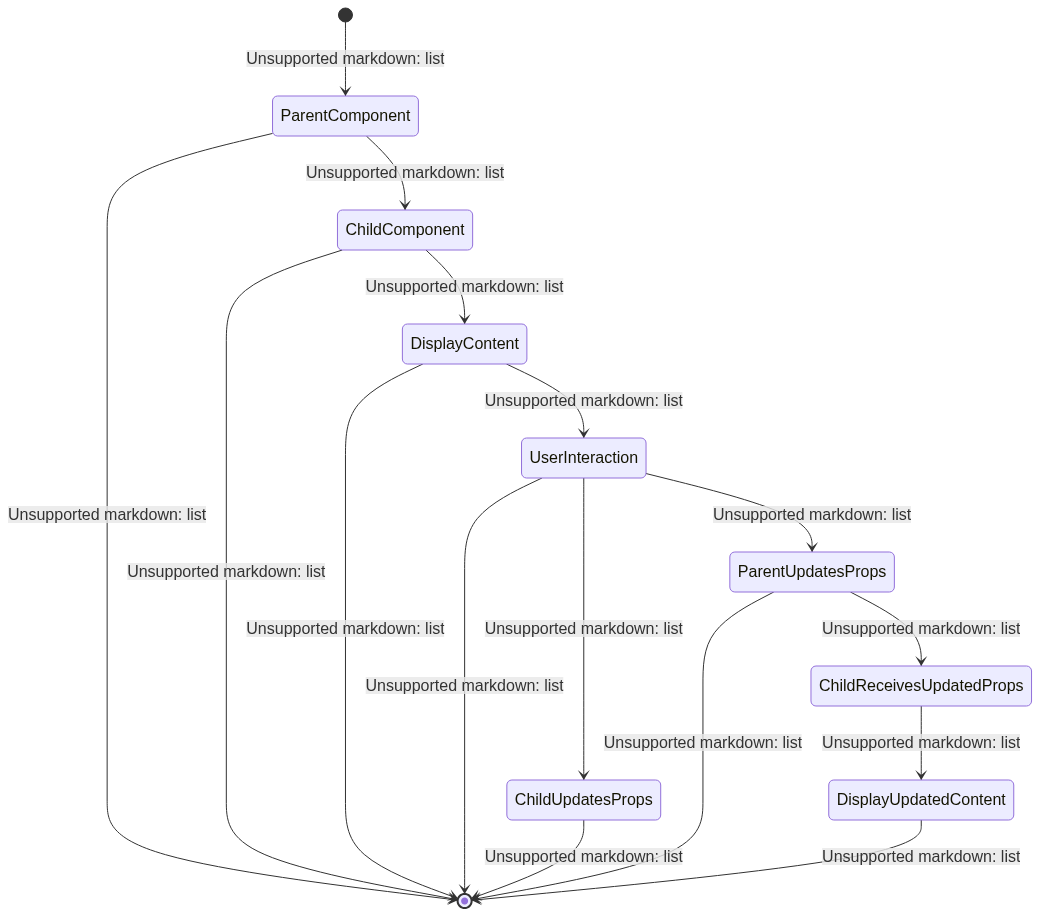
- Declaring Props in Parent Component: To start using Props, we need to declare them in the parent component. A parent component can pass data to its child components by setting attributes on the child components in JSX. These attributes represent the Props that will be received by the child components.
- Passing Props to the Child Component: Once the Props are declared in the parent component, they are passed down to the child components during the rendering process. Each instance of the child component receives its own set of Props, making it possible to customize the behavior and appearance of each child component independently.
- Receiving and Accessing Props in Child Component: In the child component, we access the Props through the function parameters for functional components or the
this.propsobject for class components. The child component can then use these Props to display content, render dynamic data, or respond to user interactions. - Rendering Content with Props: With Props available in the child component, we can use the data they contain to render content dynamically. For example, we might pass an array of objects representing items, and the child component can map over the array to display a list of items.
// Parent Component
const items = [
  { id: 1, name: 'Item 1' },
  { id: 2, name: 'Item 2' },
  { id: 3, name: 'Item 3' },
];

// Child Component
const ItemList = ({ items }) => {
  return (
    <ul>
      {items.map((item) => (
        <li key={item.id}>{item.name}</li>
      ))}
    </ul>
  );
};- Immutable Nature of Props: Props are immutable, meaning their values cannot be changed by the child component that receives them. This design decision ensures a clear data flow and avoids potential issues related to shared mutable data. If a child component needs to modify the data passed via Props, it should request the parent component to update the Props accordingly.
- Handling User Interaction with Props: Child components can also handle user interactions, such as button clicks or form submissions, using the data provided via Props. When a user interacts with a child component, the component can use Props to trigger actions or update the state in the parent component, leading to a re-render and potentially causing changes in the Props passed down to child components.
- Prop Validation with PropTypes: In React, we can use PropTypes to define the expected types of Props and perform type checking during development. PropTypes help ensure that the correct data is passed as Props and provide useful warnings when there are mismatches.
- Passing Callback Functions as Props: Props can also include callback functions, allowing child components to communicate with their parent components. By passing callback functions from the parent to the child component, the child can trigger actions in the parent component when specific events occur.
// Parent Component
const ParentComponent = () => {
  const handleButtonClick = () => {
    // Handle the button click event in the parent component
    console.log('Button clicked in parent component!');
  };

  return <ChildComponent onClick={handleButtonClick} />;
};

// Child Component
const ChildComponent = ({ onClick }) => {
  return <button onClick={onClick}>Click Me</button>;
};
By passing data from parent to child components through Props, React ensures a clear and predictable data flow. The immutable nature of Props promotes component stability and reduces potential side effects. By following best practices and utilizing PropTypes, we can create robust and maintainable React applications with efficient communication between components.
Declaring and Passing Props
In React, declaring and passing Props from parent to child components is a fundamental aspect of building dynamic and interactive user interfaces. Understanding how to declare and pass Props correctly is essential for effective React.js development.
Declaring Props in Parent Component
To declare Props in a parent component, you need to set attributes on the child components when rendering them in JSX. These attributes represent the data that will be passed down to the child components as Props. The attribute names become the Prop names, and their values become the data passed to the child components.
// Parent Component
const ParentComponent = () => {
  const name = "John Doe";
  const age = 30;

  return (
    <ChildComponent name={name} age={age} />
  );
};
Receiving and Accessing Props in Child Component
In the child component, you can access the Props by defining the function parameters for functional components or using the this.props object for class components. The Props become available within the child component and can be used to display content or control the component’s behavior.
// Child Component (Functional Component)
const ChildComponent = (props) => {
  return (
    <div>
      <p>Name: {props.name}</p>
      <p>Age: {props.age}</p>
    </div>
  );
};

// Child Component (Class Component)
class ChildComponent extends React.Component {
  render() {
    return (
      <div>
        <p>Name: {this.props.name}</p>
        <p>Age: {this.props.age}</p>
      </div>
    );
  }
}
Passing Complex Data as Props
Props can contain various data types, including strings, numbers, booleans, arrays, and even objects. You can pass complex data structures like arrays and objects as Props to enable dynamic rendering of content in the child components.
// Parent Component
const ParentComponent = () => {
  const person = {
    name: "Alice",
    age: 25,
    hobbies: ["Reading", "Cooking"],
  };

  return <ChildComponent person={person} />;
};

// Child Component
const ChildComponent = ({ person }) => {
  return (
    <div>
      <p>Name: {person.name}</p>
      <p>Age: {person.age}</p>
      <p>Hobbies: {person.hobbies.join(", ")}</p>
    </div>
  );
};
Prop Validation with PropTypes
PropTypes is a built-in utility in React that allows you to define the expected types of Props passed to a component. By specifying Prop types, you can perform type checking during development, helping to catch potential bugs early and ensuring that components receive the correct data types.
PropTypes were removed from the React core library starting from React version 15.5. This was done because PropTypes were considered to be too complex and error-prone. Instead, React now recommends using a third-party library called prop-types for type checking. prop-types is a much simpler library than PropTypes, and it is easier to use. It also has a wider range of features, such as support for custom types and nested types. If you are using an older version of React, you will still need to use PropTypes. However, if you are using React version 15.5 or later, you should use prop-types instead.
Here is a table that summarizes the differences between PropTypes and prop-types:
| Feature | PropTypes | prop-types |
|---|---|---|
| Included in React core library | Yes | No |
| Complexity | More complex | Less complex |
| Error-prone | More error-prone | Less error-prone |
| Features | Limited features | More features, such as support for custom types and nested types |
| When to use | Older versions of React | React version 15.5 or later |
- Installing PropTypes: As just told, you need to install PropTypes separately using the
prop-typespackage from NPM:npm install prop-types - Importing PropTypes: To use PropTypes in your components, you need to import them from the
prop-typespackage:import PropTypes from 'prop-types'; - PropTypes API: The PropTypes API provides a variety of validators for different data types and use cases. Some of the most commonly used PropTypes are:
PropTypes.string: Validates that the prop is a string.PropTypes.number: Validates that the prop is a number.PropTypes.bool: Validates that the prop is a boolean value.PropTypes.array: Validates that the prop is an array.PropTypes.object: Validates that the prop is an object.PropTypes.func: Validates that the prop is a function.PropTypes.element: Validates that the prop is a React element.PropTypes.node: Validates that the prop is a React node (string, number, element, or an array containing these types).
Using PropTypes in Components
You can define PropTypes for a component by setting the propTypes property on the component. The propTypes object maps the prop names to their corresponding PropTypes validators.
import PropTypes from 'prop-types';

const MyComponent = ({ name, age }) => {
  return (
    <div>
      <p>Name: {name}</p>
      <p>Age: {age}</p>
    </div>
  );
};

MyComponent.propTypes = {
  name: PropTypes.string.isRequired,
  age: PropTypes.number.isRequired,
};
In this example, we define PropTypes for the name age props of the MyComponent component. We use PropTypes.string and PropTypes.number to ensure that name is a string and age is a number. The isRequired validator indicates that these props are mandatory.
Default Prop Values
You can also set default values for Props using the defaultProps property. Default Props are used when the parent component does not pass specific data to the child component.
import PropTypes from 'prop-types';

const MyComponent = ({ name, age, city }) => {
  return (
    <div>
      <p>Name: {name}</p>
      <p>Age: {age}</p>
      <p>City: {city}</p>
    </div>
  );
};

MyComponent.propTypes = {
  name: PropTypes.string.isRequired,
  age: PropTypes.number.isRequired,
  city: PropTypes.string,
};

MyComponent.defaultProps = {
  city: "Unknown",
};
In this example, we set a default value of “Unknown” for the city prop. If the parent component does not provide the city prop, the default value will be used instead.
PropTypes and Development Environment
PropTypes only perform type checking in development mode. When you build and deploy your React application in production, the PropTypes are stripped from the code to reduce bundle size and improve performance. Therefore, PropTypes serve as a helpful development aid without affecting the production performance of your application.
Prop Drilling and Mitigation Techniques
In React applications, Prop drilling occurs when data needs to be passed through multiple levels of components to reach a deeply nested child component that requires the data. While Prop drilling is a common pattern, it can lead to code clutter and decreased maintainability. However, there are mitigation techniques to avoid or minimize the issues caused by Prop drilling.
Understanding Prop Drilling
Prop drilling happens when a parent component passes data as Props to its child components, which then passes the same data as Props to their child components, and so on until the desired component receives the data. This creates a long chain of passing data through intermediate components, even when those components don’t directly use the data.
// Parent Component
const ParentComponent = () => {
  const data = "Hello from Parent";

  return <ChildA data={data} />;
};

// Child A Component
const ChildA = ({ data }) => {
  return <ChildB data={data} />;
};

// Child B Component
const ChildB = ({ data }) => {
  return <ChildC data={data} />;
};

// Desired Component Receiving Data (Child C)
const ChildC = ({ data }) => {
  return <p>{data}</p>;
};
Issues with Prop Drilling
- Code Clutter: Prop drilling can lead to excessive passing of Props, cluttering the code and making it harder to read and maintain.
- Component Coupling: Prop drilling can tightly couple components together, making it difficult to refactor or change the structure of the application.
Mitigation Techniques
1. Context API
The Context API is a built-in feature of React that allows data to be shared across components without passing Props manually. It provides a way to create a “context” that can be accessed by any component within a specific subtree of the component tree.
import { createContext, useContext } from 'react';

// Create a Context
const DataContext = createContext();

// Parent Component
const ParentComponent = () => {
  const data = "Hello from Parent";

  return (
    <DataContext.Provider value={data}>
      <ChildA />
    </DataContext.Provider>
  );
};

// Child A Component
const ChildA = () => {
  return <ChildB />;
};

// Child B Component
const ChildB = () => {
  const data = useContext(DataContext);
  return <ChildC data={data} />;
};

// Desired Component Receiving Data (Child C)
const ChildC = ({ data }) => {
  return <p>{data}</p>;
};
In this example, we create a DataContext using createContext(). The ParentComponent wraps its child components with DataContext.Provider, passing the data to be shared using the value prop. Then, in the ChildB component, we use useContext(DataContext) to access the shared data directly, avoiding the need for Prop drilling.
2. State Management Libraries (Redux)
State management libraries like Redux offer a centralized state store that allows components to access data from anywhere in the application without passing Props explicitly. Redux, in particular, provides a single source of truth for the entire application’s state. Redux can be especially beneficial for large-scale applications with complex data flow requirements. It helps maintain a clear data flow and ensures that components receive the required data without the need for excessive Prop passing.
Prop drilling can be a common pattern in React applications, but it can lead to code complexity and maintenance challenges. By using mitigation techniques like the Context API or state management libraries like Redux, we can avoid excessive Prop drilling and promote a cleaner, more maintainable codebase.
Debugging and Troubleshooting Props-related Issues
Debugging Props-related issues in React applications is a crucial skill for developers. When working with Props, you may encounter various challenges that can affect your application’s behavior. Here are some common debugging techniques and troubleshooting steps to address Props-related issues:
- Check Prop Names: Ensure that the Prop names in the parent component match the names used in the child component’s function parameters or
this.props(for class components). Mismatched names can lead to undefined or incorrect data. - Prop Type Mismatch: Use PropTypes to validate the expected types of Props. If you encounter issues with incorrect data types being passed to a component, review the PropTypes definitions to ensure they align with the expected data.
- Check Prop Values: Inspect the values of Props being passed to child components. Use console.log or debugging tools like React DevTools to verify that the correct data is flowing through the components.
- Default Props: If a child component relies on specific Props but the parent component doesn’t pass them, ensure that you have set default values for those Props using defaultProps.
- Immutable Props: Remember that Props are immutable, and child components should not attempt to modify them directly. If a child component needs to change the data, request the parent component to update the Props accordingly.
- Conditional Rendering: If you are conditionally rendering components based on Props, double-check your conditions and make sure they evaluate to the expected values.
- Use Debugger Statements: Insert debugger statements in your code to pause execution and inspect the current state of Props during runtime. This can help you understand how Props change as your application runs.
- React DevTools: Utilize the React DevTools extension in your browser to inspect the component hierarchy, Props, and state of your components. This tool provides valuable insights into your application’s data flow.
- Consistent Data Flow: Ensure that Props are passed down the component tree consistently. Debugging becomes easier when the data flow follows a clear, unidirectional pattern.
- Prop Drilling Issues: If you are encountering issues with Prop drilling, consider using the Context API or a state management library like Redux to share data between components more efficiently.
- Avoid Nested Components: Limit the depth of component nesting to avoid excessive Prop drilling. Break down complex components into smaller, more manageable pieces.
- React Warnings and Errors: Pay attention to any warnings or errors in the console, as they often provide useful hints about Props-related issues.
- Test Isolated Components: When debugging, consider testing components in isolation to identify if the issues originate from specific components or their interaction.
Remember that debugging is a normal part of the development process, and understanding how Props work and flow between components will help you identify and resolve Props-related issues more effectively. Use the available tools and techniques to gain insights into your application’s behavior and achieve a robust and reliable React application.
FAQs:
Yes, props can be functions. This can be useful for passing dynamic data to a component, or for performing calculations on the data before it is passed to the component.
Props and state are both ways of passing data to a component, but they have different purposes. Props are used to pass data from the parent component to the child component, while state is used to store data that is specific to the child component.
By default, props can be modified by the child component. However, you can prevent props from being modified by using the const keyword when declaring the prop.
Props have a few limitations. First, they can only be passed down from parent components to child components. Second, they cannot be nested. Third, they cannot be used to pass functions to a child component.
Uncontrolled components are those that do not have a state, and they rely on the props that are passed to them to determine their behavior. Controlled components, on the other hand, have states, and they use the props that are passed to them to update their state. Uncontrolled components are more reactive to changes in the props, while controlled components are more predictable. The best way to decide which type of component to use is to consider the specific requirements of your application.
Here is a table that summarizes the key differences between uncontrolled and controlled components:
| Feature | Uncontrolled Components | Controlled Components |
|---|---|---|
| State | No state | Has state |
| Reactivity | More reactive | Less reactive |
| Predictability | Less predictable | More predictable |
| Performance | More performant | Less performant |
| When to use | Simple components that do not need to track state | Complex components that need to track state or that need to be more predictable |
Conclusion
React Props are a fundamental aspect of building dynamic and interactive user interfaces. They allow components to communicate and share data, promoting reusability, modularity, and a clear separation of concerns. By declaring and passing Props correctly, you can create flexible and maintainable components.
Understanding how Props work and embracing best practices, such as PropTypes validation and avoiding excessive Prop drilling, enhances the predictability and efficiency of your React applications. Additionally, utilizing advanced features like the Context API or state management libraries like Redux can streamline data sharing and improve the overall architecture of your application.
As you continue your journey with React.js development, mastering Props will empower you to create powerful and intuitive user interfaces that meet the needs of your users and scale effectively as your application grows.
Happy coding!
